Fall Webworms: Webs in the Trees

Source(s): Willie O Chance


Two types of caterpillars make webs in trees. The Eastern tent caterpillar makes webs in the forks of the branches. They are more of a problem early in the spring. The fall webworm makes their webs on the ends of the branches and is more prevalent in the late summer and fall. Fall webworms are the most visible since their webs are located on the end of the branches. Their webs remain in the tree after the webworms leave and the webs can collect until there are many in a tree.

Fall Webworms Description

Fall webworms can be up to one inch long. They come in two color forms. Those with black heads are yellowish white while those with red heads are brown. Fall webworms are covered with long, soft gray hairs.

Fall Webworms Behavior

Fall webworms will feed on more than 100 types of trees but they prefer trees like pecans, black walnut, mulberry, elm, sweetgum, willow, apple, ash and oak. I most often see them in pecan trees.

The caterpillars form fine silken webs on the ends of the branches. They will enlarge the webs if they need more leaves. They feed on the leaves in these webs for a couple of weeks before they leave the trees to become pupae. These pupae eventually turn into a white moth. This moth may have black spots. This moth can fly away to lay eggs on trees to start another generation of webworms. There can be up to four generations of fall webworms in a year. The webworms survive the winter as pupae in cocoons in protected places.

These caterpillars feed on the leaves of the tree. This hurts the tree some but the tree should recover. Healthy trees are able to withstand a great deal of insect damage to their leaves without lasting injury. I would not be concerned about insects feeding on healthy trees unless most of the leaves were gone. If trees are weakened, webworm infestation may damage or kill the tree.

Healthy trees can usually stand the loss of almost all their leaves and still live. This is true of most deciduous trees (trees that lose their leaves in the fall) but not needled, evergreen trees like pines, cedars, junipers and other conifers. Evergreen trees with needles cannot withstand the loss of their leaves and must be better protected against loss of leaves. Fortunately, webworms do not like to attack needled evergreen trees.

Fall Webworms Control

Since most trees will not die from caterpillar attack, I do not generally recommend spraying. If you want to control the caterpillars by spraying, you must treat the entire tree – perhaps more than once. You will usually need to hire a tree service to do this. The person treating the tree will need to find some way to get the insecticide inside the webs to kill the caterpillars. For these reasons I generally suggest that we just live with these worms a while. They will eventually leave.

If you do decide to spray; use insecticidal soap, horticultural oils or Bacillus thuringiensis to kill small caterpillars. These insecticides are less likely to kill the natural predators that keep the levels of these webworms low. These chemicals are not good at killing large caterpillars. Watch the southern-most branches of trees in early spring to find the webs before the caterpillars get large. For larger caterpillars, use a chemical like cyfluthrin or bifenthrin. Once again – find a way to get the insecticide into the webs for best control.

Some people cut the branches off or burn out these webs. This may damage the tree more than the caterpillars would. I do not recommend that you do this. Put up with the fall webworms for a while and they should go away on their own.


Resource(s):

How to Care for Ice-Damaged Trees

Source(s): Ron Wolford


One cannot appreciate the damage ice causes to trees until they’ve experienced a heavy ice storm. Fortunately, major ice storms do not occur on a regular basis. The trees that normally take the brunt of the damage – Chinese and Siberian elms, poplars, silver maples, birches and willows – are the predictable victims. All of these species have brittle wood and are easily damaged by ice and wind storms.

Homeowners often plant fast-growing species like the ones mentioned above for rapid shade. Fast-growing trees normally have brittle wood and develop weak, V-shaped crotches that easily split apart under added weight. Often, trees with extensive internal rot and decay that may not have been evident from the exterior receive severe damage.

Many times these trees overhang the house, driveway or power lines servicing the home. When large limbs or tree tops are broken in an ice storm, they can cause major damage and expense.

For homeowners with trees with major limb or top damage, two questions should be addressed. The first one is: “Does the condition of the tree warrant efforts to save it or should it be removed?” Major tree repair can be quite expensive and should only be attempted if a major portion of the tree is still intact and efforts can be made to maintain its attractiveness and value to the property. If the whole side or top is gone, it’s questionable whether it’s worth spending the time and money to salvage the tree. This is especially true if it’s one with brittle wood that lends itself to similar problems in the future. While no one wants to remove a large, mature tree, the prudent decision may be to replace it with a young tree possessing desirable qualities.

The second question to consider is: “Can you handle the damage repair yourself or should you seek professional help?” Small limbs can be removed easily with pruning shears or a pole-lopper provided they are within your reach. Do you feel comfortable climbing a ladder up into the tree? Power equipment should never be operated from a ladder or in the tree where firm footing is questionable. Removing hanging limbs should be left to professional tree services. Look for them under Tree Service in the Yellow Pages. Make sure they carry proper liability and workmen’s compensation insurance before allowing them to start the job.

icedamage
What damage is repairable and what is not? Broken limbs should be removed. Generally, if the branch has not split away from the trunk, the broken segment should be removed back to the next major adjacent branch. Do not leave branch stubs. Stubs encourage rot and decay.

For trees with tops broken out, remove the snags to the next major interior branch. Generally, this will be a major fork. Avoid topping the tree to allow small side branches to grow out and continue the tree’s height growth. These branches will be weak and prone to breakage.

To avoid stripping the healthy bark from the trunk when a heavy, broken limb is removed the 3-step procedure should be used. The first cut is made on the underneath side of the branch about 18 inches out from the trunk. The cut should be approximately half-way through the branch or until its weight first starts to bind the saw. The next cut should be made on top of the branch about 1 to 2 inches in front (toward the end of the branch) of the bottom cut. Continue cutting until the branch drops free. The last cut removes the remaining branch stub from the trunk. The cut should be made from the top of the branch at the branch collar. The collar is the slight ridge where the branch attaches to the tree’s trunk or another major branch.

In certain situations, a damaged limb may strip healthy bark from the tree. To repair this type of damage, cut any ragged edges of torn bark away from the damaged area. Take care to limit the amount of healthy, tight bark removed. To speed the healing process, the repair cut made with a sharp knife into healthy bark should leave a wound shaped like an elongated football with the pointed ends of the cut running vertically along the trunk or limb or as near parallel to the initial damage as possible.

Trees with split trunks or major limb forks may possibly be salvaged if the split is not too extensive. Repairing this type of damage will involve a cable and brace technique that should be left to a professional tree service.

Some small to medium-sized trees may have been uprooted. It may be possible to straighten these trees and brace them with guy wires. Do not attempt this unless one-half to one-third of the tree’s original root system is still in the soil and the remaining exposed roots are relatively compact and undisturbed. Before straightening the tree, remove some of the soil from beneath the root mass so the roots will be placed below the existing grade level. Attach two to three guy wires to the trunk and anchor the wires 10 to 12 feet away from the tree.

Corrective pruning to help improve the shape of damaged trees is best done now. The tree will respond quickly this spring if it has not been severely damaged. Take care not to remove more than one-third of original branches. This will severely retard the tree’s growth in the spring and may damage it beyond recovery.

Treatment of the trunk and limb wounds with tree paint is not necessary. In fact, research shows that painted areas can lead to increased rot and decay due to trapped moisture in areas where the paint cracks open. You may want to fertilize your tree this spring with a good quality tree fertilizer. Check with a local nursery or garden center, or your county Extension office for recommended rates.


Resource(s): Winter Protection of Ornamental Plants

Center Publication Number: 75

Fall Perfect for Planting Trees

Source(s): Jim Midcap, Extension Horticulturist, The University of Georgia, College of Agricultural and Environmental Sciences.


The glaring heat of this summer may have you convinced that you need more shade in your yard. And fall is the perfect time to plant trees to create that needed shade.

Fall planting allows the trees’ root systems to become established and supply the moisture needed for next spring’s growth. This way your trees will get off to a great start.

Many ornamental trees give us a bountiful display of spring or summer flowers, too. Specimen trees attract attention because of their unique form and beauty.

So how do you select the right tree for the right place?

First, ask what you really need in your landscape.

Do you need shade over the patio from a large tree with wide-spreading branches? Do you need a splash of color you can see in the far meadow from the deck? Do you have the perfect place for an accent tree?

Next, do you have the space you need?

In particular, look at the room needed for the spread of the branches. Mature trees often reach out 20 to 30 feet in all directions, requiring a 40- to 60-foot open area.

Are there wires overhead? Wires limit the head room and may limit you to small trees or no trees at all. What about underground utilities and drain fields? Don’t plant trees directly over these.

Third, consider the strength of the wood and pest resistance of the trees. We’re always looking for pest-resistant trees that require little maintenance.

Finally, how about growth rate? Are you planting for your own gratification? Or can you plant trees for a future generation?
Here’s a short list of great, fast-growing trees that can fulfill your landscape needs. These are just a few of the lesser-known trees you can plant in the fall.

  • The red maple called October Glory is fast- growing with good, green summer foliage and bright red leaves in late fall. It’s dependable year after year.
  • The Shumard oak grows faster than most trees and has a nice, broad, oval crown. It has shiny, dark-green summer foliage and russet-red fall color. It quickly becomes a large, stately tree.
  • Willow oak leaves are long and willow-like. It’s a tough oak for moist or dry sites and makes a dependable large shade tree.
  • Lacebark elm loses its bark in small, puzzle- like pieces, creating a delicate pattern on the trunk and larger branches. The small leaves are glossy green and pest-resistant. This tough tree is extremely drought-tolerant. It’s a dependable, fast-growing shade tree.

The fall color of trees’ foliage greatly livens our landscapes. Several of the more dependable trees for fall color are the brilliant yellow ginkgo, wine-red sourwood, red and orange sugar maple (Southern sugar maple in central and southern Georgia) and Chinese pistache.


Resource(s): Landscape Plants for Georgia

Center Publication Number: 155

How to Handle Dead Birds

Source(s):

  • Georgia Division of Public Health Notifiable Diseases Epidemiology Section
  • Georgia Department of Agriculture Office of the State Veterinarian
  • Georgia Department of Natural Resources
  • Southeastern Cooperative Wildlife Disease Study

The recent spread of Asian Highly Pathogenic Avian Influenza (HPAI) H5N1, also commonly referred to as “bird flu,” in Asia, Europe, and Africa has resulted in concern and increased surveillance for H5 Avian Influenza viruses in North American bird populations. The following information provides guidance for those who are concerned or receive inquiries about sick or dead birds.

Please be advised to avoid handling any sick or dead birds before contacting the appropriate persons listed below and getting specific instructions. If more than one bird is sick or dead, please make this clear when consulting with appropriate agency/persons.

Personally owned birds: Any sick or dead birds that are personally owned (i.e. pet birds) should be referred to the caller’s veterinarian for consultation.

Wild bird species:

  • Waterfowl or shorebirds (e.g. ducks, migratory geese, swans, seagulls, etc): Individual birds of these species have been infected with the Asian HPAI H5N1 virus in affected regions (i.e. Asia, Europe and Africa) and may have contributed to the global spread of the virus. Surveillance in North America has detected low pathogenic H5 strains in some species of these birds, but there has been no Asian HPAI H5N1 detected in North American birds at the time of this writing (October 3, 2006). Some species of these birds are included in the wild bird avian influenza surveillance program in Georgia. Canadian geese in GA are considered resident, nonmigratory birds and will not be considered for avian influenza surveillance under most circumstances. All inquiries about sick or dead waterfowl or shorebirds should be directed to a GA Department of Natural Resources (DNR) Game Management Specialist in the appropriate region (refer to the appendices for talking points and contact information).
  • Birds of prey (e.g. falcons, hawks, eagles, etc): Individual birds of these species have become sick with the Asian HPAI H5N1 virus in affected countries, presumably after consuming an infected bird. As a result, some species will be included in the Georgia wild bird avian influenza surveillance program. However, they may also be infected with the West Nile Virus. Refer inquiries to a GA Department of Natural Resources (DNR) Game Management Specialist in the appropriate region (refer to the appendices for talking points and contact information). They will determine if avian influenza and/or WNV testing is appropriate.
  • Other birds (e.g. cardinals, sparrows, blue jays, crows, pigeons etc): These birds do not typically carry avian influenza viruses and are considered at very low risk for Asian HPAI H5N1 infection at this time. However, they may be infected with the West Nile Virus (WNV). Inquiries about these birds should be referred to County Environmental Health Offices in reference to WNV. Talking points and a contact list of Environmental Health Offices are in the appendices to this document.

Poultry species (e.g. quail, turkeys, chickens): If less than 4 birds, or less than 10% of the total flock, are involved (sick and/or dead) inquiries should be referred to the closest laboratory in the GA Poultry Laboratory Network (map of laboratories and contact information in the appendices of this document). Please call the laboratory for instructions. The GA Poultry Laboratory will encourage persons to submit bird(s) themselves to the laboratory (see dead bird handling protocol below). If 4 or more birds, or 10% or more of the flock, are involved (sick and/or dead), the GA Department of Agriculture State Veterinarian or the USDA Area Veterinarian in Charge needs to be notified so that a Veterinary Medical Officer (VMO) may be dispatched to investigate. A Department inspector or animal health technician may be requested by the VMO to transport the birds to the laboratory.

State Veterinarian’s Office – Bus Hrs 404-656-3667 – 800-282-5852 ext. 3667 – Wkends/Eve 800-TRY-GEMA

USDA Area Veterinarian’s Office – 770-922-7860 (24/7) –

HOW TO HANDLE DEAD BIRDS

If testing is not necessary, please follow the guidelines below to dispose of a dead bird, as appropriate:

  • Do not eat, drink, or smoke while handling animals.
  • Put hand(s) in a plastic bag turned inside out and pick up the bird using the plastic bag. Turn bag right-side-out over the bird and seal bag with bird inside.
  • Dispose of bird in trash.
  • Thoroughly wash hands with soap and warm water (or with alcohol-based hand sanitizers if hands are not visibly soiled)

To collect a sick or dead bird for testing, please follow the guidelines below:

  • Do not eat, drink, or smoke while handling animals.
  • Wear water-proof gloves that can be disposed of or decontaminated and protective eyewear (glasses).
  • Place bird in a plastic, sealable bag. Seal bag with bird inside.
  • Place bag with bird into a second plastic bag and seal.
  • Refrigerate the bag (e.g. on ice in a portable cooler or in a refrigerator that does not contain food) and take to the lab as soon as possible. Do not freeze.
  • If a live, sick bird, call the laboratory for instructions on proper handling and transport.
  • Dispose of the gloves as trash.
  • Thoroughly wash hands with soap and warm water (or with alcohol-based hand sanitizers if hands are not visibly soiled).

Web links:

Southeastern Wildlife Disease Study

Georgia Division of Public Health

Georgia Department of Agriculture

U.S. Geological Survey

Centers for Disease Control and Prevention

U.S. Department of Agriculture

U.S. Poultry and Egg Association

Developed by the Georgia Division of Public Health Notifiable Diseases Epidemiology Section in partnership with the Georgia Department of Agriculture Office of the State Veterinarian, the Georgia Department of Natural Resources, and the Southeastern Cooperative Wildlife Disease Study. Revised 10-27-2006.


Center Publication Number: 228

Fall Management of Large Patch Disease in Turfgrass

Source(s):

  • Alfredo Martinez
  • Lee Burpee

Large patch disease of turfgrass is most common in the fall and in the spring as warm season grasses are entering or leaving dormancy. Large patch is caused by the fungus Rhizoctonia solani. It can affect zoysiagrass, centipedegrass, St. Augustinegrass and occasionally bermudagrass.

Symptoms of this lawn disease include irregularly-shaped weak or dead patches that are from 2 feet to up to 10 feet in diameter. Inside the patch, you can easily see brown sunken areas. On the edge of the patch, a bright yellow to orange halo is frequently associated with recently affected leaves and crowns. The fungus attacks the leaf sheaths near the thatch layer of the turfgrass.

Large patch disease is favored by:

  • Thick thatch;
  • Excess soil moisture and poor drainage;
  • Too much shade which stresses turfgrass and increases moisture on turfgrass leaves and soil;
  • Early spring and late fall fertilization.

If large patch was diagnosed earlier, fall is the time to control it. Applying azoxystrobin (Heritage), flutolanil (Prostar), metconazole (Tourney), myclobutanil (Eagle), polyoxin (Endorse), , propiconazole (i.e. Banner Maxx), pyraclostrobin (Insignia), thiophanate methyl (3336 F, G and Plus), or triadimefon (Bayleton), at curatives rates in late September or early October and repeating the application 28 days later are effective for control of large patch during fall. Fall applications may make treating in the spring unnecessary. Always follow label instructions, recommendations, restrictions and proper handling.

Cultural practices are very important in control. Without improving cultural practices, you may not achieve long term control.

  • Use low to moderate amounts of nitrogen, moderate amounts of phosphorous and moderate to high amounts of potash. Avoid applying nitrogen when the disease is active.
  • Avoid applying N fertilizer before May in Georgia. Early nitrogen applications (March-April) can encourage large patch.
  • Water timely and deeply (after midnight and before 10 AM). Avoid frequent light irrigation. Allow time during the day for the turf to dry before watering again.
  • Prune, thin or remove shrub and tree barriers that contribute to shade and poor air circulation. These can contribute to disease.
  • Reduce thatch if it is more than 1 inch thick.
  • Increase the height of cut.
  • Improve the soil drainage of the turf.
  • Apply lime if soil pH is less than 6.5 (Except on centipede lawns).

See the current Georgia Pest Management Handbook for more information. Check fungicide labels for specific instructions, restrictions, special rates, recommendations and proper follow up and handling.


Resource(s):

Center Publication Number: 271

How To Prepare Samples For Handling

Source(s): Gary R Peiffer


Collecting a sample for identification of a pest or disease problem.

DO YOU WANT A GOOD PEST OR PROBLEM ID?

Observe the plant symptoms and collect the right sections. Then bring them in to the Extension office in good condition.

SYMPTOMS: WILTING; YELLOWING, GENERAL PLANT DECLINE could be caused by a root, stem or foliage problem.

If practical and possible: it is best to bring in the entire plant (leaves, stems and an intact root system). Dig the plant out carefully-do not pull it up or you will lose the roots.

SYMPTOMS: TWIG AND BRANCH BLIGHTS AND CANKERS wounds and dieback of the branches and their foliage.

Select specimens which show recent damage or infection. An area where there is a transition (change) from healthy to damaged (dying) or visa versa. The area where there is a wound or damage to the stem is often the point of infection and this is the area that should be examined for a correct diagnosis.

DO NOT include twigs or branches that are entirely dead, or have been dead for a while. These branches would NOT help with a proper diagnosis because several decay fungi would already have been introduced.

SYMPTOMS: FOLIAGE DISEASES can include spots, scorch, curling, mottling, marginal burning, etc.

Select leaves which show early or recent signs or symptoms of infection, not leaves that are entirely dead or long dead. Marginal burning on the edges of the leaves indicate chemical injury or a type of root disorder (physiological, organic or chemical).

SYMPTOMS: FRUIT, VEGETABLES FLESHY PLANT ORGANS often related to cultural or disease problems.

When collecting, NEVER select specimens that are showing advanced stages of decayor disease. SELECT fresh specimens which show EARLY stages of a problem-disease.

OTHER SUGGESTIONS FOR GOOD SAMPLING & HANDLING

  • DO NOT allow specimens to lay around several hours or days before bringing into the Extension Office. Rotted or dried, brittle samples are worthless.
  • PICK plant samples right before your trip to the Extension Service office.
  • KEEP SAMPLES COOL – under refrigeration – until you can bring them in.
  • DO NOT allow specimens to over-heat and be destroyed in an automobile.
  • Bring your FRESH specimens in a plastic bag but wrap all plant materials in paper towels before dropping them in the bags.
  • DO NOT add any moisture to these diseased samples.
  • Bring samples- Monday thru Wednesday so that they can go out right away if they need to, we can forward fresh samples to the UGA laboratory. (Samples brought Thursday and
  • Friday will be held until shipping, the following week – and will not be as fresh.)
  • Fill out diagnostic forms as completely as you can.


INSECT SAMPLES

  • Collect them ALIVE and bring them in alive, undamaged.
  • If you must kill them, place the insects in alcohol.
  • Do NOT crush or smash and bring more than one for ID (bring 3-5 or more).
  • IF POSSIBLE, and available on the plant or in your home, collect and bring in the various life stages of the pest: adult, larva, pupa, egg, etc.
  • DO NOT mail insects in envelopes or on tape – they are impossible to ID due to the handling they receive while in the mail.
  • MAKE NOTES as to where the pest resides, type of damage,host plant, types of chemicals or other controls you have tried, etc. (for ID FORM).

FEE SYSTEM

As of 3/5/99, there are a limited number of fees for diagnostic samples.

FEES ARE CHARGED FOR:

  • SOIL SAMPLES (basic test) is $6.00. For other specialized soil tests you should call for the current cost.
  • WATER TESTS: basic = $12.00. All specialized water tests, call for current cost.
  • DIAGNOSTIC SAMPLES sent directly to the UGA LAB without going through the local County Agent. These samples circumventing the system are not considered educational samples and are $25 per sample. So, please go through your County Extension office and use the correct forms.
  • (NO CHARGE TO HANDLE: plant ID, nematodes, disease or insect ID)

If you have questions about what can be tested, Call First!


Center Publication Number: 38

Hydrangea: A Southern Tradition

Source(s): Michele Browne, Former Horticulture Program Assistant – Cobb County Extension.


There are certain plants that just have a natural association with gardening in the South: magnolias, azaleas, camellias, and, of course, hydrangea. In previous generations, it would be hard to find a little white frame country home without a big bush of puffy, extravagant pink, blue, or white hydrangea blooms in a place of honor by the front door.

hyd
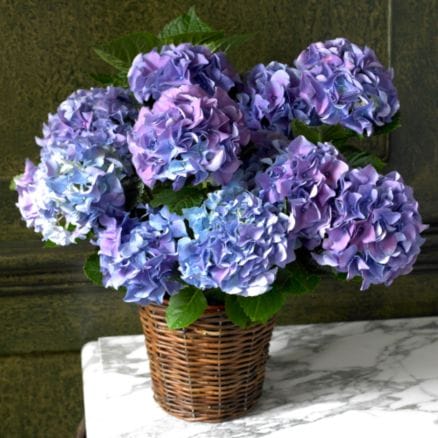
When most people hear the word “hydrangea,” they visualize Hydrangea macrophylla, or Bigleaf Hydrangea. This is the traditional hydrangea with the large puffball type of bloom in shades of blue or pink (color is dictated by the pH of the soil). However, there are many types of hydrangea, some more popular and appropriate to our gardens than others.The chart below lists five popular types:

Where to Plant Your Hydrangea

Hydrangeas love a location where they can get morning sun and afternoon shade. They will grow in locations with afternoon sun, but will probably wilt and need more supplemental watering. In either situation, don’t expect your plants to take full sun. The large leaves of hydrangea result in more water loss (transpiration) in the heat of summer, so all hydrangeas need a break from the sun. However, beware of deep shade – hydrangeas need 3-4 hours of direct sunlight to put on the best bloom show. The exception here is Oakleaf hydrangea. This Georgia native is stunning as an understory shrub beneath mature trees. As long as it receives good slanted sun in either early morning or late afternoon, it seems to bloom fine. Avoid planting any hydrangea in locations that stay soggy or very dry.

How to Plant and Care for Hydrangea

Dig a hole at least twice the size of the plant container. If possible, amend the bed around the hydrangea from 6-8 inches deep in an area several feet from the plant. If the soil is heavy clay, mix in 1/3 organic material such as homemade compost, finely ground pine bark chips, shredded leaves, composted cow manure, or mushroom compost (do not use peat moss – it breaks down too quickly). At the same time you may choose to mix in a slow release fertilizer such as Osmocote. If the hydrangea is potbound (has tightly packed roots that are running around the outside next to the container) be sure to cut into this root mass in several places, breaking up the roots and allowing them to spread into the surrounding soil. In severe cases you may even need to cut away excess, overgrown root material. Plant the plant at soil level or slightly higher to allow for soil settling. Water until puddles form around the plant and all the air bubbles have escaped. Apply two to three inches of mulch, avoiding piling mulch around the stem(s) of the plant.

Water your new hydrangea consistently during its first spring, summer, and fall. The larger the plant you have planted (3 – 5 gallon), the more it will need watering in the first year to compensate for its reduced root system. A thorough drenching of the root system once or twice a week is infinitely preferred to a daily “sprinkle.”

Hydrangeas have a reputation for being “water hungry.” Adequate water is critical in the high growth months of spring. However careful planting and mulching can go a long way to reduce watering needs.

Many hydrangeas (just like people!) will wilt during the heat of a summer afternoon. This is because their large leaves are giving off water faster than the roots of the plant can replace it. As soon as the sun goes down, they perk back up. Don’t assume that a wilted plant needs watering. Check the soil moisture level to a depth of 4-5”. If it is moist, put off watering until the soil is dry.

All blooming plants need a good schedule of fertilization and hydrangeas are no exception. A balanced fertilizer such as 8-8-8 or 10-10-10 sprinkled around the plant at the drip line in March, May, and July will do well. If you want to avoid repeat applications, apply a timed-release formulation in early March.

Read the fertilizer label for amount to apply. In early spring the plants will benefit from a 1 ½ to 2 inch layer of composted cow manure out to their drip line to add organics.

A Note on “Florist” Hydrangeas: “Florist” hydrangeas are usually just Bigleaf Hydrangeas that have been cultivated to stay small and bloom early and extravagantly. They’ve been grown in greenhouses under ideal conditions. You cannot take a plant grown under such conditions out to the garden without some care. When you receive one for a gift, enjoy its blooms. If it is cold outside, cut back the blooms and treat it as a houseplant until you can move it outside after the danger of frost in the spring. Be sure to remember that a hydrangea planted outdoors is a shrub averaging 3 feet tall by 3 feet wide. A gift hydrangea in bloom cannot be expected to bloom again in that same year. Don’t expect much in the way of bloom on a young hydrangea planted outdoors for the first two to three years.

Description of Hydrangea Bloom Forms:

Mophead

Panicle

Lacecap

Round or globe shaped flower cluster, this is the most commonly recognized form of hydrangea bloom.

Long (up to 12-14 inches), somewhat cone-shaped flower cluster (particularly in Oakleaf hydrangeas).

Flattened cluster of what appear to be tiny, immature buds surrounded at the edges by typical 4 to 5 petal flowers. Lacecaps are named after their likeness to Colonial ladies’ headcoverings

How to Prune Hydrangeas:

How and when to prune hydrangeas is an issue for many gardeners, even those with experience.

Pruning is done to:

  • reduce plant size or reshape plant
  • remove old, non-productive branches
  • remove frost damaged leaves
  • deadhead blossoms

Below are pruning guidelines for each of the five popular types of hydrangea listed in the table above.

Bigleaf Hydrangea (Hydrangea macrophylla) Flowers bloom on last year’s wood. In early spring remove older, woodier branches at ground level to allow more light and air circulation. (Note: Determine whether or not a branch is dead by scratching the bark with a fingernail or small knife. If there is green directly beneath the surface, the branch is alive.) After the last frost date, around mid April, clip or pull off any frost damaged leaves.

Do major pruning and reshaping after the blooms begin to fade in July, but no later than August 1st. On a mature bush (5-6 years old) remove 1/3 of the oldest woody stems each year by cutting to the ground. Encourage further new foliage growth by deadheading (removing faded flowers).

Oakleaf Hydrangea (Hydrangea quercifolia)

This is a large shrub that should be left to grow in its natural form. Flowers bloom on previous season’s wood. Prune after flowering only to remove dead wood, old flower heads and 1/3 of the oldest wood (to increase light and air circulation). If necessary, severe pruning (back to only two buds at the base of each stem) may be done in early spring (late February to early March) to renew overgrown plants.

Peegee Hydrangeas (Hydrangea paniculata ‘Grandiflora’)

Flowers develop on new wood. Plants may be handled in two ways: 1). Cut back severely to leave only two buds at the base of each stem in early March. or 2). Allow plant to develop without pruning. Blooms will still appear on new growth. Severe early pruning produces a smaller plant with larger blooms; not pruning produces a larger plant with many smaller blooms.*

Smooth Hydrangea (Hydrangea arborescens ‘Annabelle’)

Flowers bloom on current year’s wood. Prune entire plant back to 6-12” from ground in early March.*

Climbing Hydrangeas (Hydrangea anomola petiolaris)

Little or no pruning is required. In the summer, if needed, remove unwanted shoots that have grown out of bounds. (Note: Trees are not harmed by climbing hydrangea.)

*Note: Peegee and Annabelle hydrangeas, because they bloom on this year’s wood, do not have their buds damaged by the late spring frosts that so often harm Bigleaf hydrangeas. This makes them especially well adapted to growing in the Atlanta area.

Failure to Bloom

Failure to bloom can be attributed to any or all of the following causes:

  • Winter/early spring frost injury to flower buds
  • Pruning in late summer
  • Too much shade
  • Excess nitrogen

Color Change in Bigleaf Hydrangeas

hydrangea-247253_640
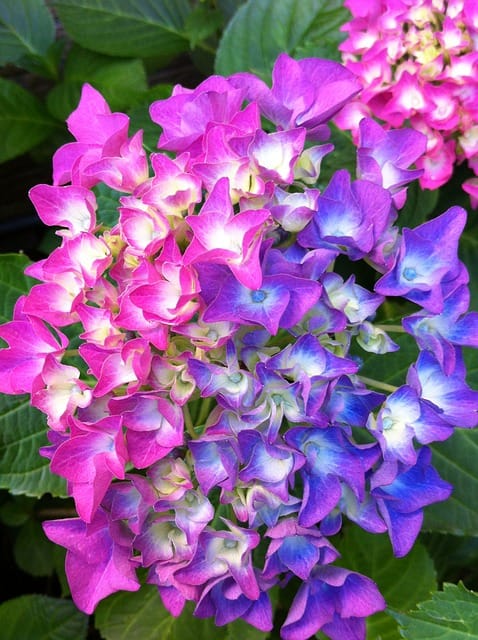
The color of Bigleaf or French Hydrangeas is influenced by the availability of aluminum in the soil. In acid soils more aluminum is available resulting in blue color; in alkaline soils with less aluminum available, the flowers are pink. A quick way to influence soil pH (acidity/alkalinity) for an individual plant is to apply a liquid soil drench:

  • To make flowers blue, dissolve 1 tablespoon of alum (aluminum sulfate) in a gallon of water and drench the soil around the plant in March, April, and May.
  • To make flowers pink, dissolve 1 tablespoon of hydrated lime in a gallon of water and drench the soil around the plant in March, April, and May.

Avoid applying to the leaves, as foliar damage can occur.

Some Popular Bigleaf Hydrangeas to Consider for Your Garden:

  • ‘Ayesha’ – 4-6 ft. tall with very unusual mophead blooms. Individual flower petals are slightly cupped and tightly packed together – gives the effect of popcorn.
  • ‘All Summer Beauty’ – 3-4 ft. tall with flowers produced on current year’s wood.
  • ‘Nikko Blue’- 4-6 ft. tall with the most dependably rich blue flower heads (in slightly acidic soil); mophead bloom.
  • ‘Pia’ – dwarf selection (1-2 ft. tall) with carmine red mophead blooms.
  • ‘Lanarth White’ – 3 ft. tall with lacecap blooms composed of pink or blue fertile flowers surrounded by a ring of pure white sterile flowers.
  • ‘Blue Wave’ – large 6-7 ft. plant covered with blue lacecap flowers in a layered effect.
  • ‘Preziosa’ – extremely interesting plant with mophead blooms that start a pale pink then mature darker pink, rose, wine red, then finally rust. Gives multiple season interest.

This is an extremely small sampling of the available varieties. Explore your local nurseries for different offerings.

Five Popular Hydrangeas for Atlanta Area Gardeners:

Common Name

Flower Form*

Flower Color

Bloom Time

Pruning Time

Bigleaf hydrangea, Garden hydrangea, French hydrangea, Common hydrangea

(Hydrangea macrophylla)

Mophead or Lacecap

Pink, Pink Reds,

Blue, Blue Violet,

Purple (color controlled by soil pH)

May thru early July. Deadhead promptly after flowers begin to fade. Deadheading means to remove faded flowers. Some plants may rebloom in fall. Flowers bloom on last year’s wood.

After bloom – July (always before August 1st)

Oakleaf hydrangea (hydrangea quercifolia)

Panicle

White fading to pinkish purple

June – blooms appear later than Bigleaf hydrangea and last a longer period of time, typically thru summer. Sets buds on last year’s wood.

This plant does not usually need pruning. If reshaping or size-reduction is necessary, prune after blooms begin to fade.

Peegee hydrangea

(Hydrangea paniculata ‘Grandiflora’)

Panicle

White fading to pinkish bronze in fall.

May-June. “Tardiva”  variety blooms in August.

March — Prune entire plant back to 6-12” from ground around March 1st. Plant blooms on current year’s wood. Or leave

unpruned –blossoms will appear on new growth.

Smooth hydrangea

(hydrangea arborescens ‘Annabelle’)

Mophead

White

May-June

Prune entire plant back to 6-12” from ground around March 1st. Plant blooms on current year’s wood.

Climbing hydrangea

(hydrangea anomola petiolaris)

Lacecap

White

June.

May not need pruning, except to shape. Prune after bloom.


Sources:
Hydrangeas: A Gardener’s Guide, Lawson-Hall & Rothera, 1995.
The Southern Living Garden Book, Steve Bender, 1998.
Hydrangea Culture, Leaflet 162, UGA Cooperative Extension Service, 1979.
Ornamental Horticulture Facts: Growing Bigleaf Hydrangea, FactSheet H-92-011, UGA Cooperative Extension Service,1992.
Hydrangea Identification and Pruning Guide, Cobb County Cooperative Extension Service, 2002.

Center Publication Number: 7

Icky Silverfish are Generally Harmless

Source(s): Jim Howell, Ph.D., Entomologist, The University of Georgia


Silverfish. Sounds like something you’d buy in the frozen foods section at a health food store. But in reality, these little insect pests can become a significant nuisance for homeowners, if populations get out of hand.

As their name implies, silverfish are usually silver to gray in color, and their bodies are flat and wingless. The color comes from the tiny silver scales that give the body a metallic sheen. Their bodies are 1/2 to 3/4 inch long and taper carrot-like from head to tail. Two long antennae extend from the head and usually wrap around the body, while from the tail three long, slender “bristles” extend to the rear.

Firebrats are similar insects but lack the silvery sheen. They are brown to gray, with dark spots that give a mottled appearance.

Biology

Development time for silverfish from egg to adult varies from three months to three years. Firebrats usually take about four months. Adults may live three more years and will molt throughout their lives, sometimes more than 30 times a year.

Depending on the species, adults lay five to fifty eggs in clutches, in cracks and crevices near food sources. The nymphs look almost identical to adults except they are smaller and white. Because their populations increase very slowly, large numbers indicate there is a longtime infestation.

Silverfish are found almost anywhere in the house but favor moist, warm locations, especially around sinks and other plumbing, and undisturbed storage areas where the humidity is high. They are frequently found in sinks or bathtubs because they fall in while seeking moisture and cannot climb out. Homeowners often see them when they move storage boxes or open a cabinet door.

Firebrats prefer areas of high temperature (90 degrees and above) and high humidity. They are more common in attics and around ovens, furnances, water heaters and hot water pipes. Both silverfish and firebrats are most active at night, and move swiftly, often stopping for short intervals before scurrying on. They move with a wriggling motion like that of swimming fish.

Both silverfish and firebrats are often initially brought into the home in paper, books, food, starched clothing or furniture.

Damage

These insects are considered pests primarily because they are a nuisance. They feed on a wide variety of materials, including bookbindings, starch in clothing, linen, dried organic ornaments, wallpaper, paste and glue. Damage is significant, however, only in large infestations over long periods.

Control

Sanitation is a major step in controlling these pests. When storing items, especially fabrics, be sure they are clean and starch-free. Store them in tight-fitting containers and reduce the moisture as much as posibble. Because these pests often reside in wall cavities, keep storage boxes a few inches away from walls and raised off the floor.

Chemical Control

If sanitation alone is not sufficient, various pesticides may be useful in eliminating or reducing these pests. Sprays for ants and roaches in pump sprayers or aerosol cans are usually effective. Recommended pesticides include cyfluthrin, cypermethrin, esfenvalerate and permethrin. Also, boric acid can be puffed into cracks and crevices and loosely around storage areas. It has the advantage of being very low in toxicity and very long-lasting if applied in dry voids where it will remain undisturbed.

Control may not be necessary if populations are low and limited to small areas and if no damage is noticed.


Center Publication Number: 166

Identification and Prevention of Termite Problems

Source(s):

  • Elizabeth S. Vantine, Master Gardener
  • Gary R Peiffer

It is important to correctly identify an insect as a termite. This way, you may be able to dismiss an insect that is not a termite. On the other hand, if you confirm the presence of termites, it is time to begin educating yourself on what to do next.

IS IT AN ANT? OR IS IT A TERMITE?termite2

OTHER INSECTS THAT CAN DAMAGE WOOD IN BUILDINGS

  • Carpenter ants
  • Carpenter bees
  • Powder-post beetles

COST OF DAMAGE FROM SUBTERRANEAN TERMITES

Subterranean termites cause millions of dollars worth of damage each year to buildings across the United States. Much of this loss occurs here in the South. It is important to check buildings often for evidence of termite infestation.

DETECTING TERMITE INFESTATION

Visible Evidence

termite1Obvious external evidence of subterranean termite damage includes:

  • Flights of adults emerging from soil or wood.
  • Discarded wings on floors beneath doors and windows where termites have emerged within a building and tried to escape.
  • Flattened, earthen shelter tubes running from the soil upward along the foundation walls into the building itself.

Hidden Damage:

Most subterranean termite damage is not visible on the surface, but it can completely honeycomb wooden timbers, leaving only a thin shell covering the surface. These are called “galleries.” Find these galleries by removing weatherboarding or trim boards or by probing suspicious areas with an ice pick or a knife. Termites do not push out sawdust-like material from their galleries.

PROTECTING EXISTING BUILDINGS FROM TERMITE DAMAGE

Look for areas termites favor where warm, moist soil contains an abundant wood supply or other cellulose material. Keep crawl spaces clean. Do not allow scrapes of wood to accumulate. Provide plenty of ventilation under buildings. Check cracks and voids in foundations and concrete floors through which termites may establish tunnels between the soil and wood.

AVOIDING FUTURE PROBLEMS WITH NEW CONSTRUCTION METHODS

Planning New Construction

Good building practices help insure long-term protection against subterranean termites. Termites must maintain contact with soil or other sources of moisture or they will die. Your Extension Service can provide you with detailed building methods and information designed to prevent problems from the beginning.

Selecting Resistant Materials

Pressure-impregnated wood chemically-treated by a standard process provides maximum protection where wood must be in contact with the soil. Certain species of native wood resist termites, but are not as resistant as pressure-treated wood.

AREAS OF POTENTIAL INFESTATION

Subterranean termites frequently infest certain types of construction including:

  • Concrete slabs on the ground.
  • Crawl spaces with inadequate clearance, ventilation, and drainage.
  • Foundations under enclosed porches and terraces where filled earth comes very close to the building timber.
  • Buildings with no basement and slab-on the ground construction attract termites along the inside of the foundation, while
  • Buildings with basements more often attract termites outside the foundation.

IF YOU SUSPECT YOU HAVE A TERMITE PROBLEM…

Termite control requires specialized equipment and knowledge. Retain the services of a competent, licensed professional termite control service. For a list of the name of termite eradication professionals, contact the

  • Better Business Bureau,
  • Georgia Department of Agriculture Pesticide Division,
  • County Extension Service,
  • Georgia Pest Control Association,
  • Experienced friends.

Get at least three estimates. Don’t automatically go with the lowest estimate. Select the professional you have the most confidence in and feel the most comfortable working with.

FIND AN EXPERT TO ERADICATE TERMITES.

IF YOU SUSPECT YOU HAVE A TERMITE PROBLEM…

Remove

All loose and unnecessary wood from underneath and adjacent to buildings with crawl spaces, including form boards and other debris. All wood units that connect the soil with the exterior woodwork of the building, such as trellises. All soil within 18 inches of floor joists and 12 inches of girders.

Replace

Needed units, such as trellises, in a way to avoid creating new contacts between soil and woodwork. Wooden piers and posts with pressure-applied preserved wood. Damaged and structurally weakened sills, joists, flooring, etc. with sound material.

Fill

Voids, cracks or expansion joints in concrete or masonry with either cement grout, roofing-grade coal-tar pitch or rubberoid bituminous sealers.

Provide

Adequate drainage and ventilation around and under the building.

Inspecttermite3

Frequently for evidence of new infestation. Wooden buildings in areas of high infestation should be inspected annually.

FREQUENT INSPECTION IS SIMPLY GOOD INSURANCE.

Identifying Subterranean Termites:  

The subterranean termite has:

  • Two short thread-like or bead-like straight antennae,
  • Two pairs of wings similar in size, shape, and pattern with many veins,
  • Four stubs remaining after the wings detach, and
  • A long rectangular body.

Life Cycle of the Subterranean Termite

Examining a piece of infested wood most likely reveals the wingless, grayish-white worker termites. The other mature forms are soldiers and reproducing adults. All individuals of each form pass through three stages: egg, nymph, and adult.


Center Publication Number: 26

Indian Meal Moths

Source(s):

  • Kathy Flanders, Extension Entomologist, Entomology and Plant Pathology, Auburn University.
  • Xing Ping Hu, Extension Entomologist , Auburn University.

The Indian meal moth is a common indoor pest. Larvae are frequently found infesting stored products, while the adults are swarming around in the house. The moth was given its common name by an early American entomologist, Asa Fitch, who found it feeding on cornmeal or Indian meal. However, you may have seen it attacking various other food materials stored at home.

Identificationindmeal

Many times an infestation is noticed when moths are seen flying around the home in the evening. They are attracted to lights and often appear in front of television screens. The adults are small moths with a wingspan of about three-fourths of an inch. They can be told apart from other indoor moths by their distinctive forewings: the outer two-thirds of the wing is reddish brown; the inner third grayish white. The forewings of Mediterranean flour moths are pale gray with two black zigzag transverse lines, and those of webbing clothes moths are gold. The larvae are about a half-inch long when mature and creamy- white, with a brown head. The pupa is in a loose light-brown silken cocoon.

Damage

Adults do not feed, but they lay eggs on food materials. The larval stage causes the injury. Larvae are generally surface feeders but can feed within the grain. As they feed, larvae spin silken thread webbing throughout the infested food source. Small particles are often adhered loosely to the threads.

Larvae feed on a variety of foodstuffs. They are often found in stored grain, cereals, dried fruits, nuts, seeds, and meal products. They will feed on flour, cake mixes, powdered milk, and chocolate. Two sources often overlooked are birdseed and dry pet food. Frequently, infestations start when moths are brought in on these products.

Biology

Adults fly around in the evening. An adult may lay up to 350 eggs, singly or in groups, on food materials such as grain, dried food, and especially pet food. The larvae feed on or in the food materials for a few weeks. When mature, they often migrate out of the food source and wander about in search of a suitable place to spin their cocoons for pupation. They are frequently found making cocoons in cracks and crevices on cupboard tops, shelves, ceiling corners, and walls. There are about 6 to 8 generations a year in the South, but the number can vary depending on environmental factors.

Management

  • Prompt action is important in preventing loss of foods stored on kitchen or pantry shelves.
  • First locate infested food products and packages. Check all potentially infested materials, even those unopened boxes or containers, including birdseed and pet foods.
  • Remove all containers, utensils, and shelf paper from the infested area, and clean thoroughly. Use a vacuum cleaner to pick up hiding insects and spilled materials in cracks and corners to make sure there is no lingering moth problem. Empty the vacuum cleaner and discard the vacuum cleaner bag after use to prevent re-infestation. You may then use hot soapy water to clean the pantry, but it will not provide moth control. Destroy cocoons that may be found in the cracks between shelves, moldings, and doorframes, on ceilings of cupboards, or where room walls and ceiling meet. In many cases, a thorough cleanup will control the insects.
  • Uninfested open packages must be transferred to containers with tight-fitting tops.
  • In difficult cases, a household formula of insecticide (Pyrethrins or Resmethrin) is recommended after a cleanup. Apply the solution with a paintbrush only to cracks and crevices. Allow paint to thoroughly dry before putting food materials back. Take great care to avoid contamination of utensils and food.
  • One fairly new control practice is the use of pheromone traps in confined areas, such as a cupboard. Such traps are available from garden catalogs that specialize in pest management products.
  • Continue to observe the infested area for several months after treatment.

Prevention

Avoid long-term storage of meal products or grains at home, but if you must, store susceptible foods in insect-tight containers: airtight glassware, metal or heavy plastic containers, or in the refrigerator or freezer. Do not purchase crushed or damaged packages of cereal or grain products.


Center Publication Number: 217