Fire Blight of Fruit Trees and Ornamentals

Source(s):

  • Nancy Doubrava, HGIC Information Specialist
  • James H. Blake, Extension Plant Pathologist, Clemson University

Fire blight is one of the most devastating and difficult-to-control diseases of many fruit trees including apple and pear, and other rosaceous ornamental plants. Caused by a bacterium (Erwinia amylovora ), fire blight can spread rapidly, killing individual apple and pear trees and ornamental plants when conditions are right for disease development.

Symptoms

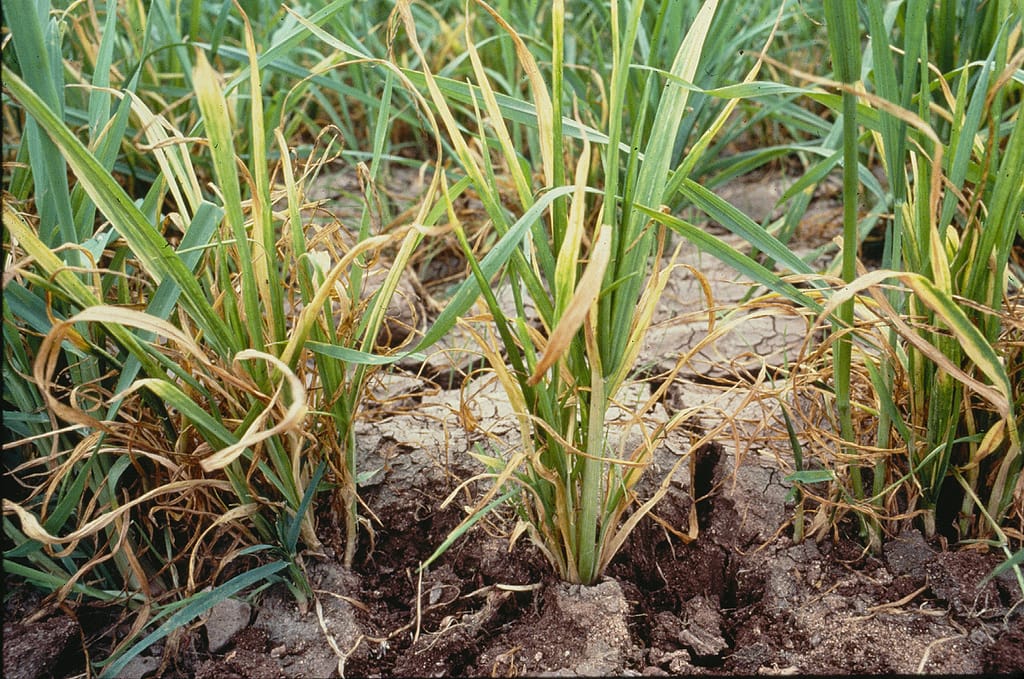
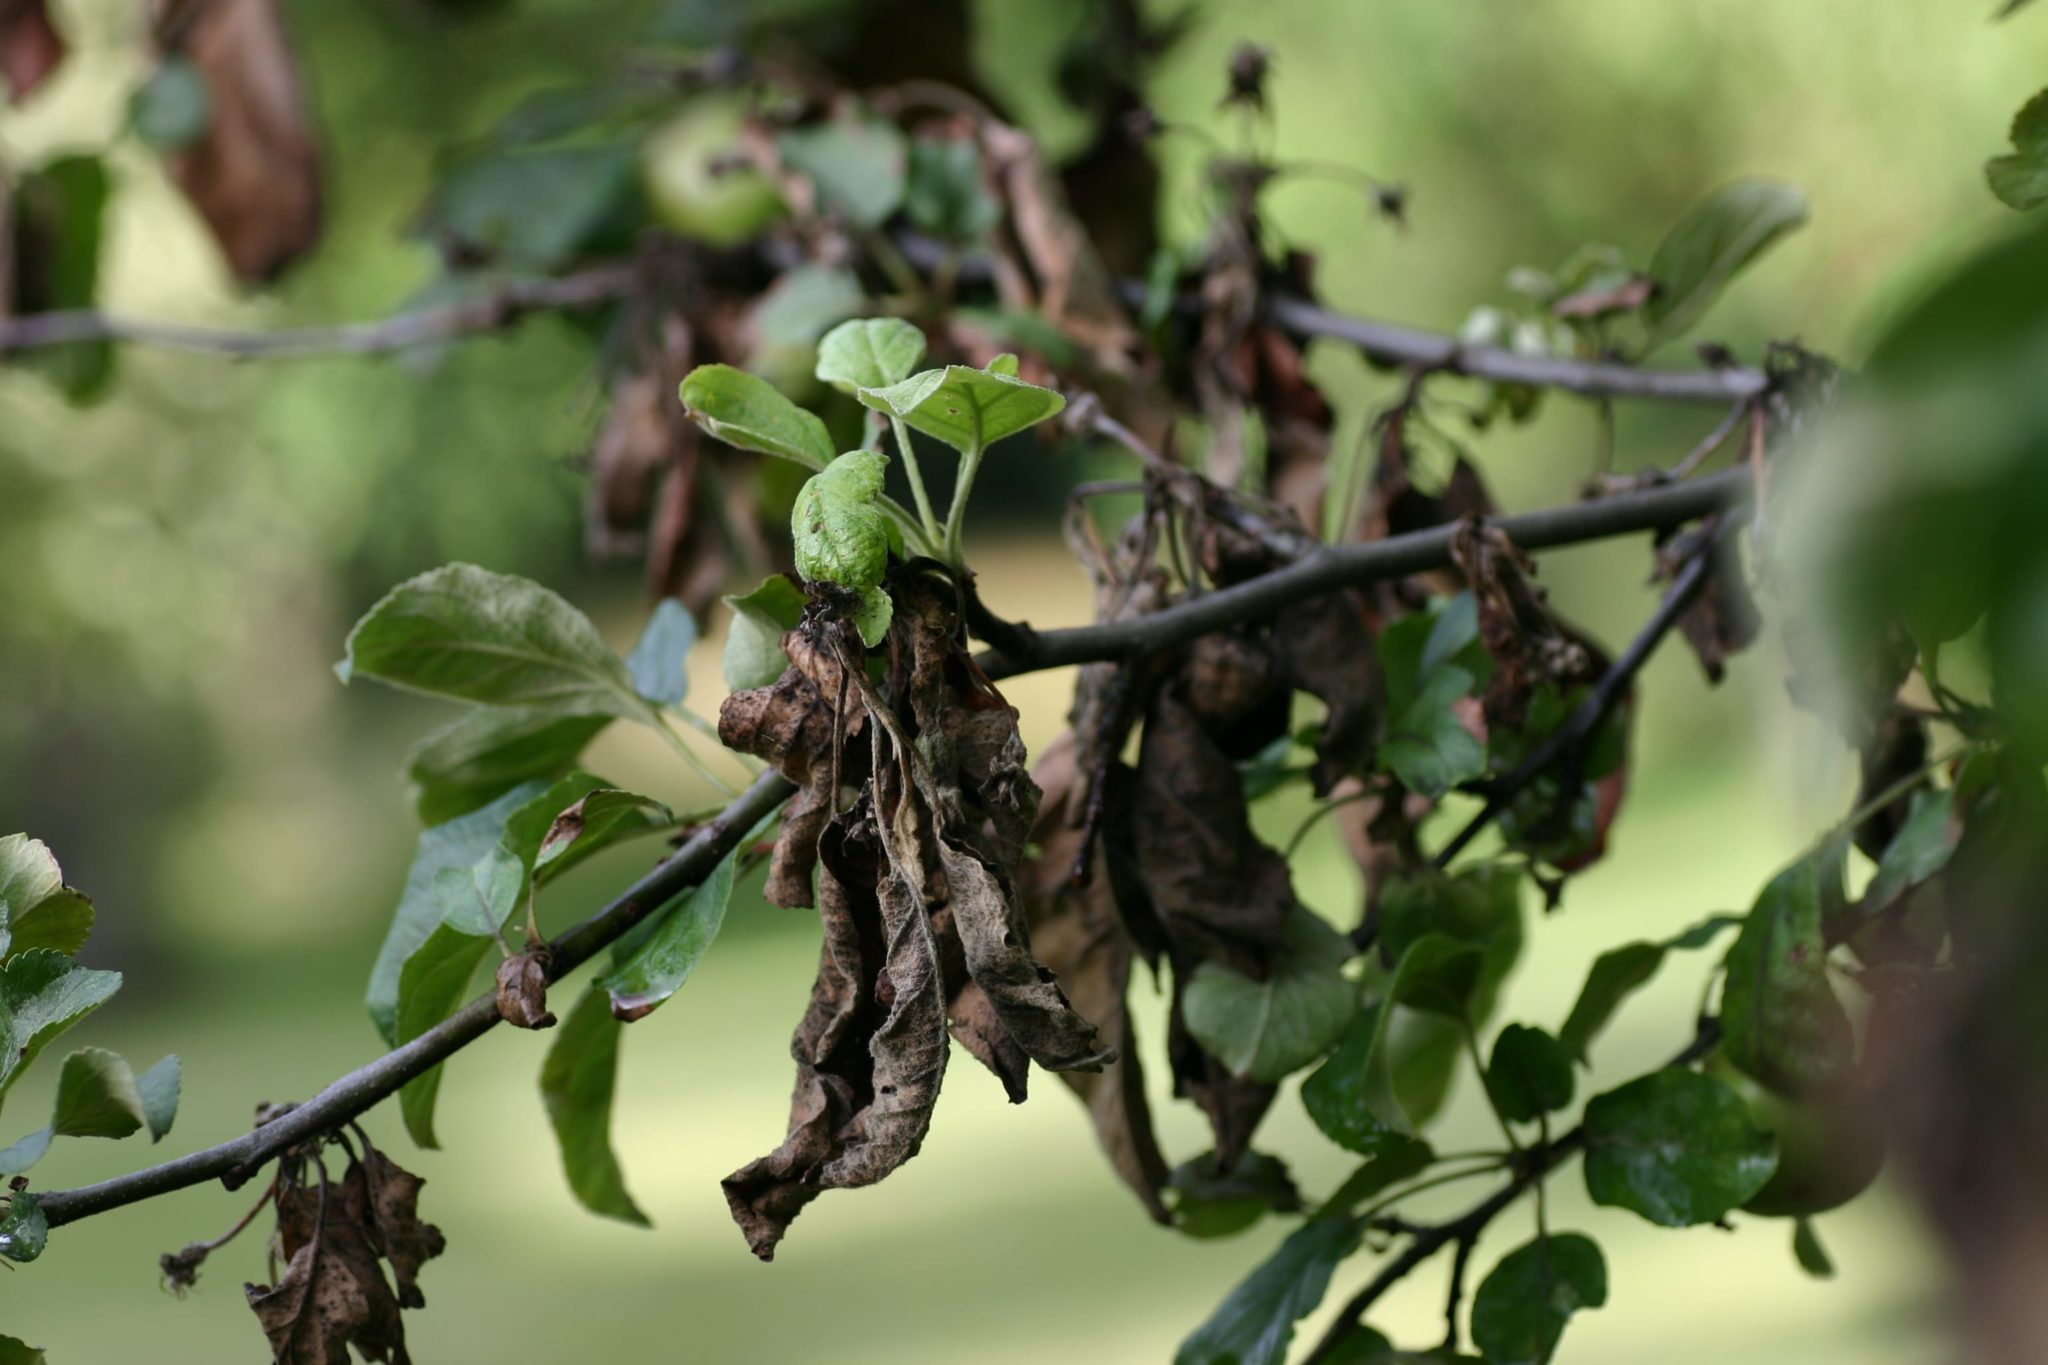
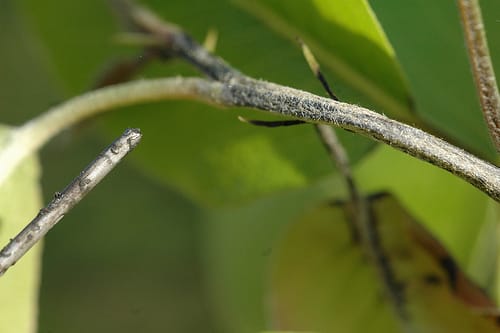
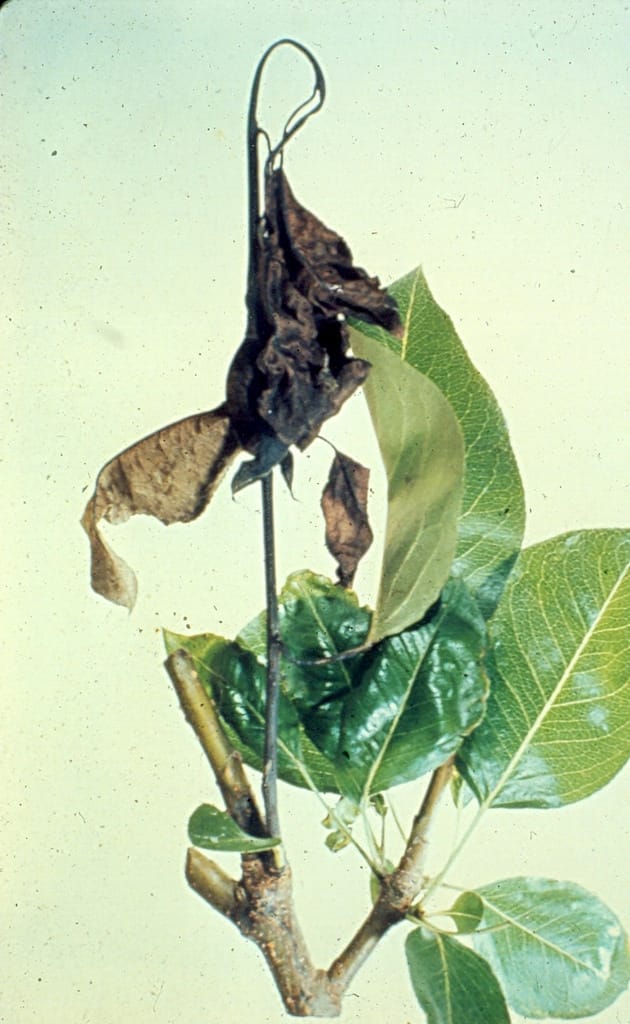
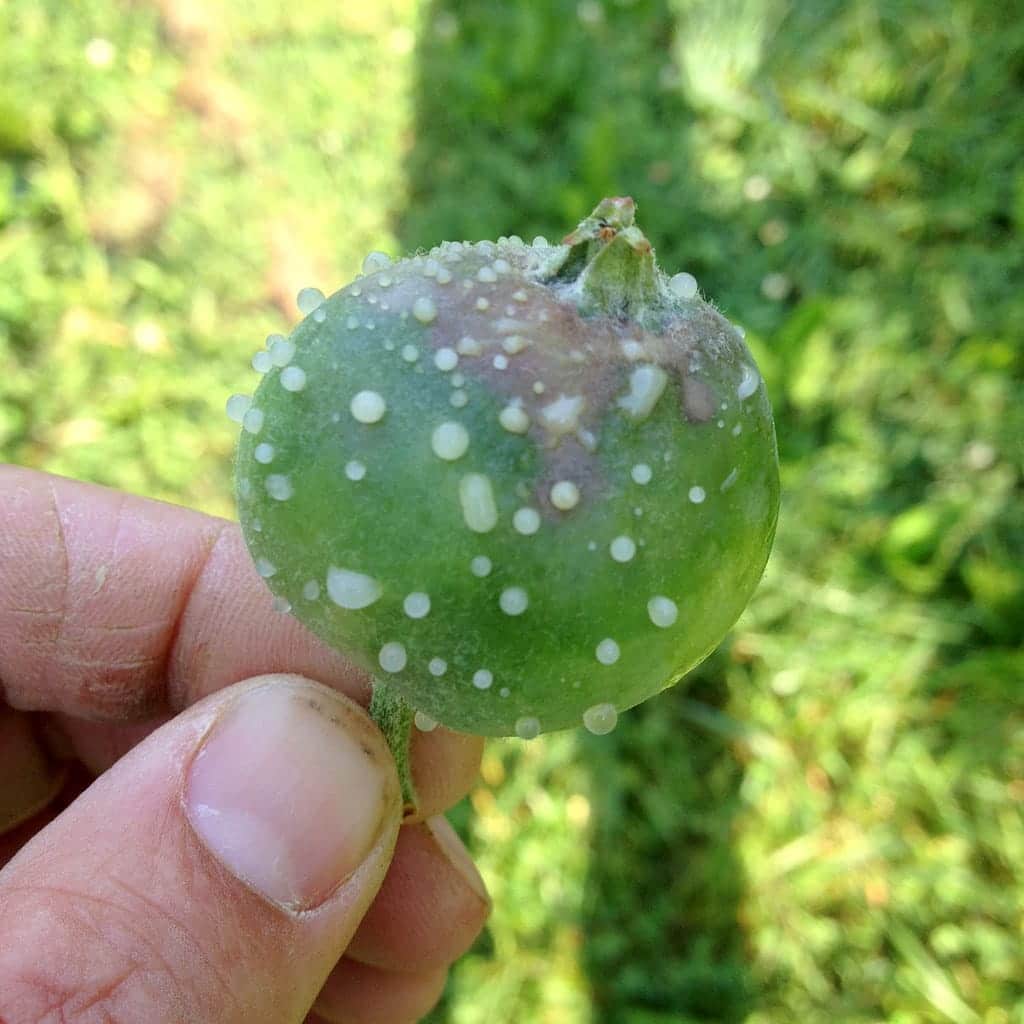
The first symptoms of fire blight occur in early spring, when temperatures are above 60 °F and the weather is rainy or humid. Infected flowers turn black and die. The disease moves down the branch, resulting in death of young twigs, which blacken and curl over, giving the appearance of a “shepherd’s crook.” Leaves on affected branches wilt, blacken and remain attached to the plant, giving it a fire-scorched appearance. Slightly sunken areas, called cankers, appear on branches and the main stem. Many parts of the plant can be affected including blossoms, stems, leaves and fruit. During wet weather you may notice a milky-like, sticky liquid oozing from infected plant parts. Insects and rain can spread the disease.

Plants Commonly Affected

In the home orchard, fire blight can be very destructive to apple and pear trees. Pear trees are particularly susceptible. Some ornamental pear trees, such as ‘Bradford,’ are considered resistant to the disease but can become infected when conditions are favorable for disease development. Certain plants in the rose family (Rosaceae), including many ornamental plants, can be affected by fire blight. Some of these include crabapple, pyracantha, cotoneaster, hawthorn, photinia, quince, loquat and spirea.

Prevention and Treatment

There is no cure for fire blight, making disease prevention extremely important. Controls for fire blight include selecting tolerant varieties, using recommended cultural practices and sanitation measures and applying insecticides and bactericides. Although these methods are not 100 percent effective, they help reduce disease severity.

Recommended Varieties

Select cultivars that are less susceptible to fire blight, and suitable for planting. Some relatively resistant ornamental pear varieties are ‘Bradford, ‘Chanticleer, ‘Fauriei’ and ‘Whitehouse.’ ‘Aristocrat, ‘Autumn Blaze, and ‘Redspire’ are all very susceptible to fire blight infection. A relatively resistant pyracantha is ‘Laland Firethorn,’ and a resistant hawthorn is ‘Washington.’ Relatively resistant edible pears include ‘Kieffer,’ ‘Moonglow,’ ‘Magness,’ ‘Orient,’ and ‘Seckel.’ Resistant apple varieties include ‘Red Delicious,’ ‘Ozark Gold,’ ‘Priscilla,’ ‘Prima,’ ‘Freedom,’ ‘Liberty’ and ‘Spartan.’ Several relatively resistant crabapples include ‘Adams,’Doldo,’ Jewellberry,’ and ‘Liset.’

Cultural Practices and Sanitation Measures

Reduce the spread of fire blight by removing and destroying all infected plant parts. Pruning cuts should be made 12 to18 inches below any sign of infected tissue. Disinfect all pruning tools between cuts using a solution of 1 part household bleach to 9 parts water. Succulent new growth is easily infected, if injured. Also, avoid excess nitrogen fertilization which results in excess succulent growth.

Insecticides and Bactericides

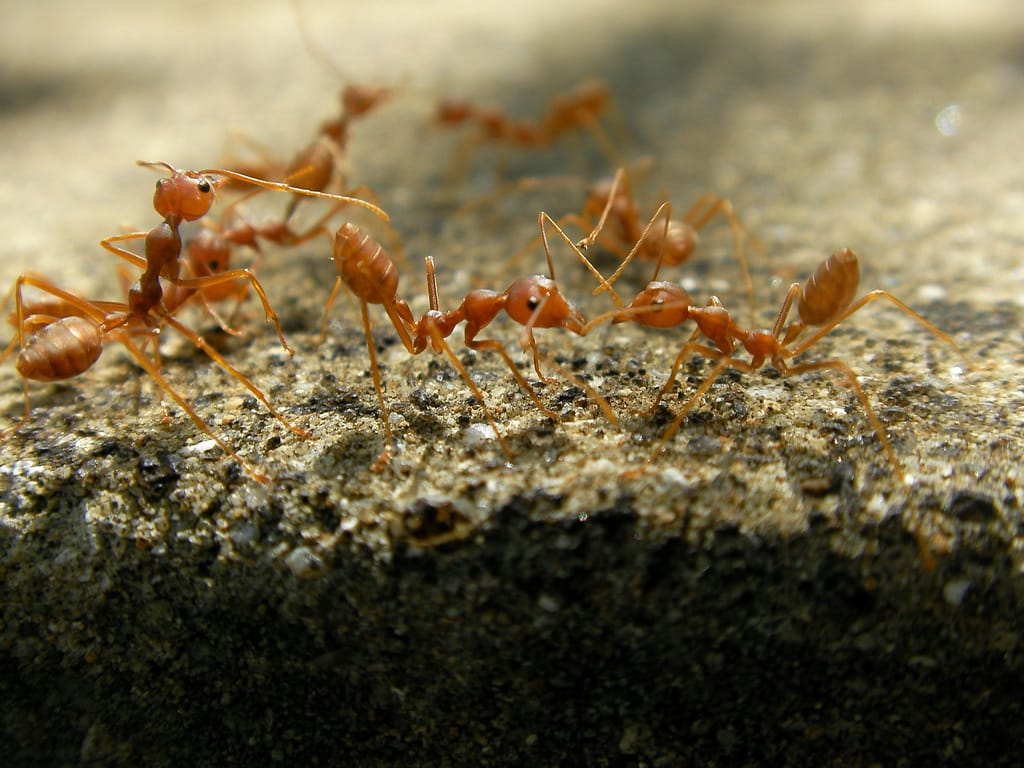
Bacteria enter the plant through blossoms, fresh wounds or natural openings. The disease is spread by rain and insects attracted to the bacterial ooze, such as bees, ants, flies, aphids and beetles. These insects inadvertently carry the bacteria to opening blossoms. Control of insects can reduce the spread of bacteria and the occurrence of infections. During bloom, bees can carry the fire blight bacteria during pollination. Do not use insecticides during bloom.

Fruit Plants

Apple

The recommended bactericide for susceptible apple trees is streptomycin which should be sprayed during bloom and when insects or mechanical means injure tender shoots. Use streptomycin as a preventative treatment only. The time between streptomycin application and fruit harvest must be a minimum of 50 days. Apply all chemicals according to directions on the label.

Pear

Pear trees can also be treated with streptomycin. Apply the first spray as soon as the blossoms open. Repeat at four- to seven- day intervals as long as blossoms are present. The time between streptomycin application and fruit harvest must be a minimum of 50 days. Apply all chemicals according to directions on the label.

Crabapple

Crabapple trees can be treated with one of the following: copper hydroxide, streptomycin, or a commercially available combination spray of sulfur and basic copper sulfate. Do not use streptomycin once fruit is visible. Copper should be applied before and after bloom. If applied during bloom, it will cause russeting on the fruit and possibly fruit abortion. Apply all chemicals according to directions on the label.

Note

Control of diseases and insects on large trees is usually not feasible, since adequate coverage of the foliage with a pesticide cannot be achieved.


Resource(s): Common Landscape Diseases In Georgia

Center Publication Number: 195

Herbicide Damaged Plants

Source(s): Stephen D Pettis


Powdery_mildewChemicals can damage plants in a number of ways. Chemicals can cause foliar burns, defoliation, leaf curl, and stunting when applied improperly. Household chemicals such as paints, cleaners, or solvents can injure plants but most often we see injury caused by agricultural chemicals such as fertilizers, insecticides, fungicides, and herbicides that have been misapplied.

Herbicide damage is by far the most common type of chemical plant injury. These agricultural chemicals have been designed to kill plants so as you might guess, are likely to injure desirable plants. Some herbicides kill all plants, and some kill only certain plants (grasses but not broadleaves for example). No matter, if the herbicide is applied at too high a rate or when the temperatures are too high, you can get damage on non-target plants.

Symptoms of herbicide damage can vary depending on the chemical applied and the plant affected. Some common symptoms include leaf curling or cupping, yellowing, dead or necrotic tissue, odd leaf texture, and reddening of leaf veins. Some plants are very sensitive to herbicides while others are not.

Herbicides are often very specific and damage can occur if you do not read the label carefully. The label always has detailed instructions on proper use and safety as well as what plants the product may be used on. For instance, if you used a preemergent herbicide labeled for centipede on a fescue lawn you would end up with yellow or dead grass. Or, if you applied this same fertilizer to the proper grass when the air temperature is over 85F, then you could get some damage. Preemergent herbicides must be applied at specific times of the year as well. If applied too early, you can end up stunted roots as shown in the picture to the right.

There is no way to reverse herbicide damage. Once plant tissue is damaged, there is no way to improve it. Most plants will recover by themselves if they are not severely injured by chemicals. Pruning out damaged branches or leaves can improve the looks of damaged plants sometimes and pruning initiates new growth. If you suspect chemical damage, inspectors from the Georgia Department of Agriculture’s Pesticide Division will investigate the situation if you request that they do so.


Center Publication Number: 149

Herbs in the Landscape

Source(s): Wayne McLaurin, Professor Emeritus of Horticulture, The University of Georgia, College of Agricultural and Environmental Sciences


Herbs aren’t just for the garden; many are attractive in perennial borders or even among foundation plantings. Pots of herbs add to the appearance of a porch or patio. They can provide traditional materials for landscaping that are both useful and ornamental.

4603835368_797269a444_b

Herbs offer bloom, color variation or texture in beds or perennial gardens. In early summer, yarrows lift dense flower heads while, in fall, pineapple sage displays showy, bright red inflorescence. Lavenders, artemisias, and lamb’s ears proffer gray-green or white mounds of foliage much of the year.

Herbs, such as germander, santolina, winter savory and chives can be used effectively as edging plants; various thymes (including woolly, creeping, and lemon thyme) are both fragrant and attractive growing between stones in the patio or sidewalk, or in niches in a retaining wall.

As with other landscaping plants, select herbs according to their foliage colors, size, cultivation needs and growth habits.

Herb Size

  • Tall/large herbs — anise, hyssop, yarrow, lemon verbena, fennel, mountain mint, bay
  • Medium/upright or mounding — basil, sage, lavender, artemisia, scented geranium
  • Small/upright or prostrate — thyme, stachys, germander, santolina

Container Plantings

Herbs grow well in urns, hanging baskets, strawberry pots, and other containers as long as the light, moisture, and fertility requirements are met. Use a good lightweight, well-drained artificial soil mix, not garden soil, for container-grown herbs. Container-grown herbs do not have access to surrounding soils, are more likely to dry out quickly, and must be watered regularly, even daily. Containers should have drainage holes so excess water can escape. Regularly empty any water in the saucers under containers to prevent roots from deteriorating. Uniform monthly fertilizing keeps herbs lush, but be careful to avoid fertilizer salts build-up. Water containers sufficiently so the water runs through the holes in the bottom of the container.

Note: Some herbs — French tarragon, chervil, cilantro, cumin, and chamomile — are particularly susceptible to humid southern springs and summers and may grow best in containers under more carefully controlled conditions.13853083_1f43661419

Indoor Plantings

Herbs can be grown indoors if the right amounts of sun and moisture are provided. Herbs need to receive at least four to six hours of sunlight each day. Do not assume that herbs near windows automatically receive enough light for growth. An average south-facing window should provide adequate light. Herbs will grow tall and spindly in inadequate light. Rotate the plants periodically so that all sides receive enough light and pinch them back to promote bushiness. Plants grown indoors will generally not grow as fast as those grown outdoors and there will not be as many leaves to harvest.

Herbs such as scented geraniums, patchouli, and bay are sensitive to cold temperatures; if they are planted in containers, they can be easily moved indoors during cooler weather.

Water herbs only when they are dry. If the soil feels at all moist 1 inch below the surface, do not water the plant. Over-watering increases the chance of disease and may eventually block necessary oxygen to the roots.


Resource(s): Herbs in Southern Gardens

Center Publication Number: 262

Fire Ants

Source(s): Beverly Sparks, Retired, Associate Dean of Extension, Extension Entomologist, The University of Georgia, College of Agricultural and Environmental Sciences.


However much you might wish it, fire ants are unlikely to disappear from the face of the earth. With a little planning and a lot of persistence, though, they can disappear from your yard.

The planning is simple; making fire ants get out and staying out requires only two steps.

The key, though, is persistence: this isn’t a one-time treatment; it’s a control program that takes diligence and determination.

The first step is to broadcast a bait insecticide over the entire area.

Fire ant baits consist of pesticides on processed corn grits coated with soybean oil. Two are readily available to homeowners (Amdro and Award).

The best time to apply a bait is in spring or fall, although you can apply them anytime when ants are actively foraging for food.

The best results, use fresh bait and broadcast it when the ground and grass are dry. If you use a hand-held seed spreader, set the spreader at the smallest opening and make one or two passes over the lawn at a normal walking speed ( the recommended rate is 1 to 1 1/2 pounds per acre).

The second step is to treat problem mounds with an approved product that kills the ants on contact. Treat these mounds no sooner than three days after you apply the bait.

Treat only the mounds causing immediate problems, such as those next to high-traffic areas such as sidewalks, play equipment or building foundations.

Most mounds that get only the slower action bait will eventually be eliminated, and leaving bait-treated mounds may actually help keep new fire ant queens from reinfecting the area as quickly.

To get rid of fire ant mounds with chemicals, target the queen and brood (egg, larvae and pupae) inside the mound. You can reach that target with drenches, granular products, dusts, liquid fumigants or injectable products.

Products such as acephate(Orthene), malathion and carbaryl(Sevin) are available as liquid concentrates for drenching fire ant mounds.

Drench mounds when the queens and brood are close to the surface (spring, fall, or after rain). Don’t disturb the mound before you treat it.

Dilute the product to the labeled rate and then gently sprinkle the solution around and then on top of the mound. If usually takes one to three gallons of the diluted solution to properly treat a mound.

Several granular products are labeled to treat individual fire ant mounds. To apply one, sprinkle the recommended amount on top of and around the undisturbed mound. Then water it in.

Products containing acephate (Orthene) are specially labeled for dusting fire ant mounds. To apply these products, evenly distribute the recommended rate over the top of each mound. You don’t have to water them in.

Some fire ant products (MC 96 Fire Ant Killer) contain methyl chloroform, a liquid that , when it is poured into a mound quickly volatilizes into a heavier-than-air gas that “fumigates” the mound. Ants inside are killed immediately, but ants out foraging won’t be affected. Plants around the treatment area maybe injured, though.

Products containing pyrethrin insecticides are made in aerosol containers with injection rods to reach deep inside the mound.

Fumigants and injectable products are expensive, but tend to be effective faster than mound drenches.

If you use this plan – broadcasting a bait, then treating problem mounds – expect greater than 90 percent of the fire ant mounds in the treated area to gone within 10-12 weeks.

However, the area will become reinfested by mated fire ant queens within six to twelve months if you don’t repeat the control programs on a regular schedule.

That’s where the persistence comes in.

To keep area free of fire ants, repeat the broadcast bait application every six months and then treat individual mounds as needed.


Center Publication Number: 9

Houseplant Help

Source(s): Randy Drinkard


Beautiful houseplants can add color and charm to any household. But providing the optimum growing conditions can often be a challenge for even the best of gardeners.

Low light, low humidity, dry air and too much soil moisture are the primary culprits that can weaken and destroy our indoor plants. Proper management of these growing factors, of course, is essential to your maintaining healthy, vigorous houseplants. How then, you may ask, do I know what to do to correct the problem before it is too late? That is a good question, but even inexperienced growers can look for certain danger signs that plants show when they are under stress. You can then usually tell what you are doing wrong and take corrective action to revive your plants.8083487753_02e9df65e0_o

Listed below are the eight most common symptoms expressed by ‘sick’ plants and help tips.

  1. Stems grow abnormally long; leaves become long and pale and new leaves are undersized; growth is weak or spindly: This is almost always due to insufficient light. Give your plants more light by placing them closer to a window or supply supplemental lighting via grow lights.
  2. Stems become soft or mushy, dark in color and rotten; lower leaves curl and wilt; soil at the top of the pot is constantly wet: Too much water is the cause. Do not water as frequently or water when the soil is dry to the touch approximately one to two inches below the surface. Sometimes the soil surface may be dry but the root zone may be saturated. Continuing to water plants that are growing in over-saturated soils will inevitably lead to root rot. Make sure that your pot’s drainage hole is not clogged and don’t let your plants sit in water-filled saucers for more than an hour.8083486437_069a407926_b
  3. Wilted foliage: This can actually be caused by underwatering or overwatering. Also, excessive amounts of fertilizers can draw water from the roots, causing the plant to wilt. If the plant has a root or stem disease, this will prevent water uptake, causing the plant to wilt. Other causes of wilting are low humidity, moving shock, a sudden change in light or temperature, cold or hot drafts, high heat or frost damage.
  4. Defoliation: Rapid defoliation may be caused by extremes in temperature, changes in light, overwatering or underwatering and exposure to cold and disease. Gradual defoliation, as when the lower leaves turn yellow and drop, can be caused by over watering(root rot), underwatering, lack of sufficient light, low fertility or disease. Keep in mind that an occasional leaf may drop due to natural aging. . .which is normal.
  5. Leaves yellowed, wilted and/or mottled: This is often caused by too much water which in turn causes root rot. As mentioned earlier, do not let your plants stand in water. Yellowing may also be caused by severe insect infestations(scale or spidermites),

    very low light, high temperatures or insufficient amounts of plant fertilizer. [Older plants may become pot-bound and a yellowed or wilted condition usually develops. In this case, repot to a larger container using fresh potting soil].

  6. Browning of leaf tips: Low humidity, excess fertilizer, water that is high in fluorine, spray damage from pesticides, unfavorable soil reaction(a high or low soil pH), air pollutants or root loss due to excessive water in the soil will cause tips to brown. Water that contains fluorine should be allowed to sit for several days before using so that the fluorine may bubble out. Simply trim away any brown tips with sharp scissors to improve the looks of your houseplants.
  7. Leaf edges are crinkly and brown: This is caused by low humidity. Increase humidity by grouping plants or by placing them on a bed of moistened pebbles in a tray. Misting helps, too. You may also want to consider placing a cool-vapor humidifier in your plant room to increase humidity.
  8. Rot at soil level: This is usually caused by over watering, yet plants that are set too deeply or a fungal or bacterial disease may be the problem. In most cases you will have to discard the plant, although you may be able to start new plants by taking cuttings from upper sections that are healthy.

Center Publication Number: 109

Fertilizing Lawns

Source(s): Gil Landry, PhD., Coordinator – UGA Center for Urban Agriculture, The University of Georgia.


Grass, like all other plants, requires nutrients for growth. Unfortunately, most soils in Georgia are naturally not rich in all these nutrients. Therefore, apply fertilizers to supply those elements not present in the native soil.

The three macronutrients are: nitrogen (N), phosphorus (P) and potassium (K). Of these, nitrogen is required in largest quantities, potassium second and phosphorus third. Most home lawn fertilizers sold in Georgia contain these three macronutrients in the largest amounts.

Fertilization programs should be based on turfgrass requirements, soil tests, maintenance practices, and desired appearance. For example, the bermudagrasses have a larger nitrogen requirement than most turfgrasses. A soil test is needed to determine the supply of phosphorus and potassium in the soil. When grass clippings are removed, the amount of fertilizer needed may be doubled. Increased irrigation on sandy soils will also increase fertilizer requirements. Finally, a higher quality, dark green lawn will require more nitrogen, as well as more clipping and watering.

Some considerations for determining what fertilizer material to use are ease of handling, price and availability. Since nitrogen is the key nutrient for lawn grasses, it is important to understand the differences in the nitrogen sources. There are three types of nitrogen carriers:

  1. synthetic inorganic,
  2. organic, and
  3. synthetic organic.

Synthetic Inorganic Nitrogen Carriers

Ammonium nitrate and ammonium sulfate are examples of synthetic inorganic nitrogen carriers. Some advantages are:

  • rapid initial plant response,
  • minimum temperature dependence, and
  • lower cost per unit of nitrogen.

Disadvantages are:

  • subject to loss by leaching in the nitrate form,
  • high foliar burn potential, and
  • a rapid surge in growth.

Natural Organic Nitrogen Carriers

This is nitrogen bound in complex organic compounds such as decayed living matter, sewage sludge, manures, and bone meal. Nitrogen released from these compounds is dependent upon microorganisms to break down organic matter. Advantages are:

  • low foliar burn potential,
  • longer lasting,
  • very little leaching and
  • more even growth of grass.

Some disadvantages are:

  • low analysis, thus requiring a great deal of bulk,
  • slow response and

at low temperatures, very little nitrogen is released through microorganisms activity.

Synthetic Organic Nitrogen Carriers

These nitrogen carriers are synthesized in the laboratory and can be divided into two groups:

  1. primarily water soluble compounds and
  2. primarily water insoluble compounds.

The water soluble compounds, such as urea, resemble the synthetic inorganic carriers in their activity, while the water insoluble compounds, such as urea formaldehyde, resemble the natural organic carriers in their activity.

Most mixed fertilizers contain more than one source of nitrogen. 12-4-8 is one example of a mixed fertilizer containing several different sources of nitrogen.

Guaranteed Analysis: 12-4-8

  • Total Nitrogen(N) = 12%
    • 6.50% Ammoniacal Nitrogen
    • 1.00% Nitrate Nitrogen
    • 0.90% Other Water Soluble Nitrogen
    • 3.60% Water Insoluble Nitrogen
  • Available Phosphate Acid(P205) = 4%
  • Soluble Potash(K20) = 8%
  • Total Available Plant Food, Not Less than = 24%

Fertilizer Programs

Applying fertilizer at the right time is as important as knowing what fertilizer to apply. Generally, spring and fall fertilization with a complete fertilizer (contains N, P and K) is recommended for the warm-season grasses. The spring application should be made about the time the grass begins to green-up and grow. The fall application should be made about 6 weeks before the average first frost date. Normally, the first frost date ranges from the latter part of October in the piedmont area to the end of November on the coast.

In the absence of soil test recommendations, the complete fertilizer used can range from 16-4-8 to 10-10-10 and 5-10-15, etc. Most of the warm-season grasses require 3 to 7 pounds of nitrogen per 1000 square feet per year to remain hardy and attractive. This fertilizer is usually applied in 3 to 5 applications during the growing season. A typical example would be 10 pounds of 12-4-8 per 1000 square feet in early spring when green-up begins, 10 more pounds in mid-summer, and 6-8 weeks before the average first frost date. This gives a total of 3.6 pounds of nitrogen.

Proper fertilization of centipedegrass is very important to its survival. Most people tend to over-fertilize centipede. One pound of nitrogen per 1000 square feet per year is ample nitrogen on most centipede lawns. On sandy soils in high rainfall areas, 2 pounds per 1000 square feet per year may be needed. Apply 5 pounds of 12-4-8 per 1000 square feet in early spring. If a second application is needed, apply 5 pounds of 12-4-8 per 1000 square feet in early August. Never apply lime to a centipede lawn unless soil tests show that the pH is extremely low. If the grass shows signs of iron chlorosis, which is observed by the yellowing of leaves, apply ferrous sulfate at the rate of one tablespoon per 3 gallons of water to each 1000 square feet of grass.

The cool-season grasses, such as tall fescue and Kentucky bluegrass, normally should receive the majority of their fertilizer requirements in the fall. An example of cool-season grass fertilization would be 10-15 pounds of 16-4-8 per 1000 square feet in early September and April. Additional nitrogen or complete fertilizer may be applied in November if desired.

Fertilizer Application

Listed below are some key points to remember when applying fertilizer.

  • Don’t apply fertilizer when the grass leaves are wet. This can increase the potential of leaf burn.
  • Use a mechanical spreader to distribute the fertilizer. Don’t apply it by hand. Use the two direction application procedure as described for seeding.
  • If possible, water all fertilizer applications thoroughly.

Soil Acidity

Another important factor in plant growth is the soil acidity level. This is measured in terms of a pH scale which is graduated from 0 to 14 with 7 being neutral. Any number below 7.0 is considered acid with 5.0 being more acid than 6.0. Any number above 7.0 is considered basic with 9.0 being more basic than 8.0. Most turfgrasses, with the exception of centipedegrass and carpet grass, grow best at a pH of 6.0-6.5. Centipedegrass and carpet grass grow best at a pH of 4.5- 5.5. A pH either too low to too high will reduce the availability of plant nutrients. Therefore, it is very important that a proper pH be maintained.

Lime

If the soil becomes too acid, correct this by applying lime. Use a good agriculture grade of limestone. In most cases, a dolomitic source of limestone should be used. Base all lime applications on soil test results.

More detailed information concerning fertilization can be obtained in the Fertilization for Lawns, Bulletin No. 710.


Resource(s): Lawns in Georgia

Center Publication Number: 136

Fertilizer Time: Don’t Be So Quick To Spread It

Source(s): Faith Peppers, Extension News Editor, College of Agricultural and Environmental Sciences.


What’s the first thing most homeowners are tempted to do when the world begins to bloom in the spring and their lawn is still winter brown?

Fertilize!

But stop! Test your soil before you fertilize.

Using the wrong fertilizer or using fertilizer in the wrong amounts at the wrong time can actually harm your lawn or garden, said Owen Plank, a University of Georgia Extension Service agronomist and soil scientist.

If you have a low nutrient level and don’t put enough fertilizer out, or if you have a high test level and you don’t need fertilizer, you can adversely affect plant growth,” Plank said.

“This is particularly true with some turf grasses, like centipede,” he said. “If you overlime or over fertilize centipede, it can go into centipede decline, and over a few years you can lose the lawn.”

The wrong fertilizer on vegetable gardens can also induce problems.

“With vegetables, like tomatoes, one problem often encountered is blossom end rot,” Plank said. “Several factors can cause it, including inadequate calcium or too much nitrogen. You can induce blossom end rot with improper fertilization.”

Sometimes it’s a matter of timing.

“With certain grasses, the timing of the fertilizer application is critical,” Plank said. “A soil test also tells you what months you should fertilize your lawn.”

A simple soil test can help eliminate fertilizing mistakes and fertilizer waste.

“If a lawn had low pH and the owner didn’t know it, and applied a complete fertilizer to the soil,” Plank said, “nutrients like phosphorus would only be about 50 percent efficient. By knowing the condition of your soil, you can improve fertilizer efficiency.”

One easy soil test can be the fertility gauge for lawns, shrubs, trees, flowers and vegetable gardens.

“The two main reasons to conduct a soil test,” Plank said, “are to find out if the soil needs lime added and to find the relative fertility status of the site, which determines how much fertilizer will need to be applied to raise it to a sufficient level.”

The first step in soil-testing your lawn or garden is to drop by the county Extension office and pick up a leaflet that outlines the proper procedure.

“The leaflet will describe how and when to take the sample and what tools to use,” Plank said.

Once you gather a sample, return it to the Extension office to be shipped to the University of Georgia Soils Lab. Your sample should be analyzed and results returned in about seven days.

“For lawns and gardens, one basic test will take care of 99 percent of the situations encountered,” Plank explained. “That basic test determines the soil pH, lime requirement, phosphorous, potassium, calcium, magnesium, zinc and manganese.”

From the soil test, recommendations are made regarding the amount and type of limestone to use and what fertilizer grade (10-10-10, 8-8-8, etc) to use.

Spring isn’t the only time for soil testing. A soil sample can be taken any time, depending on specific circumstances.

“People wait until early spring to send the samples in, and that’s OK,” Plank said. “But for those who need to lime their lawns or gardens, it’s preferable to test in the fall. You can lime over the winter and it can start reacting, so when the growing season arrives, the soil pH will be favorable for good growth.”

A soil test provides homeowners information essential for growing strong, healthy lawns. A routine soil test made through the Extension office is just $6.00.


Center Publication Number: 18

Fertilization of Citrus Plants in Georgia

Source(s): Gerard Krewer


Newly-planted citrus plants should not be fertilized until growth begins in the spring. If possible use a complete fertilizer such as 8-8-8 which contains micronutrients. Also, many garden centers now sell fertilizers that are especially formulated for citrus plants.

A suggested fertilizer schedule for the first three years is given in the Table below. Fertilizer applications should be made between August 1 and February 15 during the first two years to avoid inducing untimely growth flushes during the winter.

During the first year, spread the fertilizer in a 30-inch circle and avoid placing any against the trunk. In subsequent years the fertilized area should be gradually increased. A good rule of thumb to follow is to fertilize an area twice the diameter of the tree canopy.

Ordinary lawn and shrub fertilizer may be used for citrus trees. However, this type of fertilization may only contain the primary plant food elements nitrogen, phosphorus and potassium. For the best performance from citrus plants, a fertilizer which contains the secondary and micronutrients – magnesium, manganese and copper – is very beneficial. The latter two elements, plus zinc and boron as needed, may also be supplied through nutritional sprays. Some garden centers and nurseries sell special citrus fertilizers incorporating the micronutrients.

SUGGESTED FERTILIZER SCHEDULE*
(Pounds of 8-8-8 fertilizer per tree)
Growing Season March 1 April 15-16 June 1-15 July 15-30
First 1/3** 1/2 2/3 1
Second 1 1/4 1/2 1/4
Third 3/4 2 1/2 3

*This schedule is designed for citrus plants which develop into medium to large trees. Only 1/2 these amounts or less will be needed for small, shrubby citrus plants such as kumquats, limequats, calamondins, etc.
**Make this application after growth begins in the spring, usually 4 to 6 weeks after planting.


Resource(s): Citrus Fruits for Southern and Coastal Georgia

Center Publication Number: 172

Feeding Birds in Winter

Source(s): Charles Seabrook, Science Writer, The Atlanta Journal-Constitution.


This is the time of year when many people ask questions about feeding birds, such as: how do I get started? what types of feeders should I use? where should I locate my feeders? what kinds of food do birds like most?

Perhaps the onset of cooler weather prompts more folks to start thinking about the little birds and how these creatures will survive the winter. Indeed, bird feeding was once considered primarily a winter activity. Although feeder food is most beneficial to birds during the cold months when natural food can be hard to find, you can start feeding during the fall.

Now is an excellent time to begin bird feeding. Once you start, continue stocking bird feeders throughout the fall and winter. To help you get started, here is some advice from various experts. The recommendations also might be helpful to those who have already set up backyard feeders but are having trouble attracting birds to them.

Feeder Types

Begin using only one or two feeders. Don’t add others until birds begin regularly showing up in your yard. For a variety of birds, a single hopper feeder or platform feeder will attract everything from titmice to Carolina chickadees and blue jays to red-bellied woodpeckers. Tube feeders also are popular with many species, including titmice, chickadees, goldfinches, cardinals, nuthatches, pine siskins and pine warblers. Suet feeders will attract titmice, chickadees, nuthatches and woodpeckers.

The simplest feeder, though, is the ground. Just scatter some seeds on the ground for birds like mourning doves, dark-eyed juncos, kinglets, towhees, chipping sparrows and other ground feeders.

Location

Place feeders at least 10 feet from cover, such as shrubs and trees. This way, birds can easily escape predators. This also helps to keep squirrels away from feeders. If a feeder must be located close to a shrub or tree, encircle the feeder’s base with wire fencing. This helps reduce the chances that raptors, cats and other predators will capture the feeding birds. Also, offer feed at different levels. Some birds prefer to feed at elevated feeders.

Food

Black oil sunflower seeds and white millet seeds attract the greatest variety of birds. The seeds can be purchased separately, but many homeowners prefer a mixture containing large amounts of both seeds. If birds are slow to visit feeders, add pieces of white bread to the seed. White bread, in fact, may draw birds to feeders when no other foods will. For an excellent list of recommended winter food for birds, visit the following website: “Feeding Birds”.

Water

Providing clean water for birds in winter is just as important as offering food. In fact, sometimes birds suffer more from lack of water than food. Keep the water level in your birdbath no more than an inch and a half deep. A flat rock in the middle of it helps provide stable footing on what might otherwise be a smooth and slippery surface.

Other Helpful Hints

Keep feeders clean. Stock them with only enough food to last a couple of days to keep the food free from harmful bacteria and fungi. Periodically wash feeders in a solution of 2 ounces of household bleach to 1 gallon of water. Thoroughly dry the feeders before refilling them with seed.


Center Publication Number: 226

How to Attract or Release Beneficial Insects in Your Garden

Source(s): Karen Lutz, Cherokee County Master Gardener, with excerpts from various articles online


This explains how to use benefical insects for pest control in the garden

Harmful bugs account for only 1%-2% of the insect population. Here we review three basic ways to control pests in your garden without the use of chemicals but rather Mother Nature’s way:

Use of Carrot Family – Umbelliferous plants attract beneficial bugs

There are around 3000 species in the carrot family – mainly herbaceous plants native to temperate climates around the globe. What is common among them are their flower clusters, which resemble miniature flat-topped parasols. These are termed umbels from the latin word umbellula, meaning “umbrella.”

Niall Dunne of Brooklyn Botanic Garden notes that “Historically, unbellifers have been of enormous biological importance as crop plants. In modern times, however, they have something else going for them as well: they’re very attractive to beneficial insects – the so-called “good bugs” that act as pollinators, soil builders, or predators of pest insects in the landscape. Plants with umbels are magnets for predatory bugs in particular”.

Examples of umbellifers are: Dill, Coriander, Fennel, Parsnips, Cumin, Anise, Parsley, and Carrots. Lovage (Levisticum officinale) attracts ichneumon wasps, which parasitize the larvae of herbivorous insects. Fennel (Foeniculum vulgare) attracts lady beetles that prey on aphids, scale insects, thrips, mealybugs, and mites. Dill (Anethum graveolens) is good at drawing such insects as lacewings, whose larvae are known for devouring aphids.

What makes them so attractive to beneficial bugs? Dr. May Berenbaum, head of Entomology a the the University of Illinois , Urbana-Champaign, and author of Bugs in the System (Addison Wesley, 1995) says “Small flowers with accessible nectar and a nice landing platform.”

So gardeners interested in handling pests with natural predators are smart to incorporate members of the carrot family in their gardens.

Strategize – Increase the biodiversity of your garden

One would think that by simplifying things – spraying pesticides and growing just a few varieties of plants, would control pests, however, it actually encourages problems. By making the environment more complex (diverse), problems are less likely. Grow a wide range of plants (attracting beneficial bugs) and avoid broad-spectrum insecticides.

Release beneficial bugs

There are about 50 beneficial bugs raised and sold commercially today. They are either predators (eat or destroy other insects) or parasites (complete their lifecycles in a specific host). Examples include the following: ladybugs, lacewings, ground beetles, predatory stink bugs, spiders, wasps, dragonflies, damselflies, fireflies, praying mantis, predatory mites, minute pirate bugs, assassin bugs and predatory nematodes.

Releasing large quantities of good bugs in your garden can help in several ways. They may eliminate the pests right away, then disperse and die off. They may establish a local population of beneficial offspring that live from year to year reducing pests. Or, they may consume a few pests and fly away.

How you release bugs is dependent upon the type of beneficial bug you buy. You must consider the bugs’ lifecycles, local temperatures, time of day/night, food source and the method used to disperse the insects. Always keep purchased bugs cool and watered before release.

Some general examples: (excerpts from homestore.com/HomeGarden and Howard Garrett’s Basic Organic Program)

  • Wasps – Encarsia wasp parasitizes the whitefly especially well in greenhouses, but works outdoors as well when whiteflies attack tomatoes or other plants. Order this parasite as soon as you notice a whitefly population building. Good control occurs only when minimum average temperatures are at least 72 F (62 F at night and 82 F in day). At these temperatures the Encarsia wasp can develop as fast or faster than the whitefly population. Insecticidal soaps and horticultural oils that you might use on whiteflies don’t harm the wasps seriously. Two releases one to two weeks apart will last the whole season. Trichogramma wasps should be released from small containers or cards attached to plants that are having trouble with pecan casebearer, cabbage worms, tomato hornworms, corn earworms and other orchard pests. These beneficial insects are tiny, gnat-like parasitic wasps that kill the eggs of all sorts of caterpillars. Because it’s hard to spot pests’ eggs and because the Tricho wasps are usually cheap, the best strategy is to plan on weekly or biweekly releases to keep up with new egg laying. The wasps arrive ready to emerge from eggs of their insectary hosts, which are glued to a card. A succession of releases allows second generations to establish.
  • Lacewings – larvae are voracious and sometimes called aphid lions. They will eat anything they can subdue including thrips and small caterpillars. They are most commonly sold as eggs, mixed with a carrier like bran or rice hulls. You can also buy the larvae, however, they cost about ten times as much as eggs but may be a good value since ants and other predators often eat lacewing eggs. Purchased eggs or larvae are best used as a biological insecticide – sprinkle them near a serious outbreak of a pest. The larvae will feed in the area as long as there is plenty of prey, and then disperse. There is little point in buying adult lacewings. It’s more economical to attract one of the dozens of species native to North America. No matter where you live, there should be wild lacewings nearby, though not in as dense a concentration as you get when you release 500 or more eggs from a supplier. The adults feed on nectar and honeydew produced by sucking insects such as aphids, leafhoppers, whiteflies and mealybugs. You can build up populations of wild lacewings by applying a sugar and protein mixutre that simulates this honeydew. Dribble it onto the foliage near your garden and especially near a pest outbreak. Commercial preparations of these insect foods have names like Pred-Feed and Bug-Chow.
  • Beetles (ladybugs) – The most widely available biological control is the lady beetle, Hippodamia covergens, which feeds on small soft-bodied insects, especially aphids. These good bugs are field collected rather than reared in insectaries, largely because they aggregate in large masses in the foothills of California and are easily gathered when dormant. Releasing them in your garden is fun but does almost no good against a pest outbreak. Released preconditioned lady beetles (fed long enough to have mature eggs) will stay in your garden as long as the food supply lasts, eating aphids and laying eggs to produce larvae. Ladybugs can be purchased in mesh bags or in small box containers, which contain 1,500 bugs in a pint up to 70,000 bugs in a gallon. For aphid control, spray the foliage with water and release the bugs directly on the infested plants. Do it at dusk or early in the morning. You can concentrate local populations in your garden by attracting adults. Use the artificial honeydews and plant nectar and aphid- host sources, especially alyssum, legumes or flowers in the umbellifore family.
  • Predatory Mites – Various species of mites are sold to control spider mites and thrips, especially on greenhouse crops and indoor plantings. Some of them also work on outbreaks on roses, strawberries, fruit trees, eggplant and other garden plants. Each species has different requirements for temperature and humidity, so discuss your needs with the supplier when you order. All predatory mites require high humidity (70% or more). They also prefer to forage on plants without hairy leaves. Release predatory mites early in the season. Watch for incipient spider mite or thrips populations, then order predatory mites immediately by phone. The mites are perishable and require special shipping, around $20 per 1,000. Your concentrated population of mites will disperse when the food source becomes scarce, so you will need to order more mites if outbreaks occur later in the season. Mites are very susceptible to soap sprays and other insecticides, so use soaps only before the mites arrive.
  • Predatory Nematodes – Nematodes, or roundworms, teem in the soil of lawns and gardens. Some are major plant pests but the majority feed on soil microorganisms. A few prey on insects, injecting them with lethal bacterial, then feeding on the resultant “goo”. Several strains and species of predatory nematodes are produced and sold. Purchased nematodes generally need to be released annually to provide dependable control. New techniques of packaging mean nematodes can be stored several months at room temperature which is why they are showing up in garden centers.

Beneficial Insect Release Schedule (per acre or per residential lot)

  • April- May: Release trichogramma wasps @ 10,000 to 20,000 eggs weekly for four to six weeks. Release green lacewings @ 4,000 eggs weekly for four weeks.
  • May- September: Release ladybugs as needed on aphid infested plants. Release green lacewings @ 2,000 eggs every two weeks as needed.

The smart gardener can adequately control pests by incorporating all three of these methods into the garden landscape.


Resources

Center Publication Number: 85