Turfgrass Diseases

Source(s):

  • Lee Burpee, Plant Pathology Department, The University of Georgia.
  • Alfredo Martinez-Espinoza, The University of Georgia.

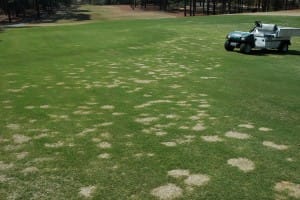
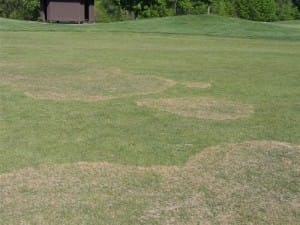
“Large Patch” and “Spring Dead Spot” appear on turfgrass during spring green-up. While symptoms appear in the spring, truly effective disease management starts in the fall.

Spring Dead Spot
Spring Dead Spot
Large Patch

Large Patch

Rhizoctonia large patch is likely to develop on zoysia, centipede and St. Augustinegrass during cool, wet periods in spring. Zoysia is particularly affected. Look for yellow or straw-colored patches a few inches to 10 feet or more in diameter. Turfgrass shoots at perimeters of patches will have leaf sheaths that are dark brown to black. Lush, fertile turf is highly susceptible to Rhizoctonia; therefore, delay nitrogen applications until mid-May or later. Sound cultural practices help control the disease; therefore avoid frequent light irrigation to reduce humidity. Allow time during the day for plant canopy to dry. Increase air circulation. Shrub and tree barriers contribute to shade and lack of air circulation. Reduce thatch (no more than 1 inch thick).

Fungicides can be applied in the spring to aid in the control of the disease. Fungicides that contain azoxystrobin, flutolanil, and pyraclostrobin, have provided 28 days control of large patch in tests at UGA. Repeat applications may be required if night temperatures less than 55oF persist after the grasses come out of dormancy. However the most effective management of large patch occurs in the fall.

Spring Dead Spot

Spring dead spot is typically more damaging on intensively managed turfgrass (such as bermudagrass greens) compared to low maintenance areas. Initial symptoms appear in the spring, when turf resumes growth from its normal winter dormancy. As the turf ‘greens-up,’ circular patches of turf appear to remain dormant, roots, rhizomes and stolons are sparse and dark-colored (necrotic). No growth is observed within the patches.

Recovery from the disease is very slow. The turf in affected patches is often dead, therefore recovery occurs by spread of stolons inward into the patch. The disease is caused by several fungi in the genus Ophiosphaerella (O. korrae, O. herpotricha and O. narmari). These fungi infect roots in the fall, predisposing the turf to winter kill. Research shows that freezing temperatures make the disease worse.

Spring treatment consists of encouraging growth so that the stolons will move into the dead area. Implement regular schedules of dethatching and aerification. These activities encourage growth and will help to control the disease.

Fall application of fungicides is essential for an effective control. Currently, fenarimol, myclobutanil, azoxystrobin, thiophanate-methyl, and propiconazole are labeled for spring dead spot control. Management strategies that increase bermudagrass cold tolerance such as applications of potassium in the fall prior to dormancy are thought to aid in disease management. However, researchers have recently found that fall applications of potassium at high rates actually increased spring dead spot incidence. Therefore, application of excessive amounts of potassium or other nutrients, beyond what is required for optimal bermudagrass growth, is not recommended.


Resource(s):

Twig Blight of Juniper

Source(s):

  • Austin Hagen, Extension Plant Pathologist, Auburn University.
  • Jacquelin Mullen, Extension Plant Pathologist, Auburn University.
  • Jean Williams-Woodward, Extension Plant Pathologist, The University of Georgia.

Phomopsis twig blight, which is caused by the fungus Phomopsis juniperovora, is a common and damaging disease of arborvitae, cypress, juniper, red cedar and related evergreens. Varieties of juniper most susceptible to Phomopsis blight include J. sabina var. tamarisfolia, “Nicks Compact Pfitzer”, “Andorra”, “Bar Harbor” and “Blue Rug.” Frequent shearing and heavy fertilization with nitrogen may increase the severity of Phomopsis blight.

twigblight

Symptoms

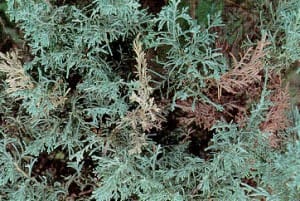
In late spring and through the summer, diseased shoot tips, that at first are light green in color, quickly turn yellow and then brown. The browning may spread down the shoot several inches from the tip. Gray cankers, which mark the original infection sites, often girdle the smaller shoots causing a twig dieback. Tiny black fruiting bodies (pycnidia) of the causal fungus may be seen on the gray cankers with a hand lens. Blighting is often seen first on the lower, inside branches. While seedling and container-grown junipers and red cedar may be disfigured or killed by Phomopsis blight, damage on junipers in landscape plantings is unsightly but rarely serious.

Persistence and Transmission

The causal fungus overwinters in cankers on diseased shoots. In late spring, masses of spores ooze from the fruiting bodies during wet, humid weather. Spores are spread to healthy shoots by splashing water or on pruning shears. Continuously wet foliage is needed for infection to occur. With favorable temperatures, the longer the foliage is wet, the more severe the symptoms. Soft, young shoots are much more sensitive to attack than mature foliage.
Control: Phomopsis blight is best controlled by using the following strategies:

Non-Chemical Control

  • Planting resistant cultivars is the most effective practice for controlling Phomopsis blight in landscape plantings on juniper.
  • Purchase junipers with good color and no dead or dying shoots.
  • Avoid planting junipers in heavy shade or on poorly drained sites.
  • Prune and space plants properly to encourage good air circulation and rapid drying of foliage.
  • Irrigate with overhead sprinklers in the morning or early afternoon to ensure that the foliage dries before nightfall. Avoid irrigating in the late evening or at night when foliage will not dry quickly.
  • Do not handle or prune wet plants.
  • Avoid injuries, such as mower damage.
  • Prune out diseased shoots as soon as they appear, but only when plants are dry. Make pruning cuts 3 inches below dead or dying tissue and then discard the diseased shoots.

Chemical Control

For effective prevention and control, a fungicide treatment program should start shortly after shoot growth has begun or anytime after pruning, and before symptoms are seen. In landscape plantings, additional applications should be made about every 14 days until the new growth matures in early to mid-summer. Always refer to the product label for information concerning application rates, directions, and precautions before applying any fungicide. See the Georgia Pest Management Handbook for current disease control recommendations.

Resistance to Phomopsis has been identified in juniper species. Results of resistance field trials may differ, but in general some Phomopsis-tolerant Juniperus species and cultivars include: J. chinensis cultivars ‘Iowa’, ‘Keteleeri’, ‘Pfitzeriana aurea’, ‘Robusta’, ‘var. Sargentii’, ‘Sargentii glauca’, and ‘Shoosmith’; and J. virginiana cultivars ‘Hillii’ and ‘Tripartita’. Cultivars and species of junipers that are susceptible to Phomopsis blight include: J. horizontalis cultivars ‘Bar Harbor’, ‘Blue Chip’, ‘Blue Horizon’, ‘Blue Mat’, ‘Emerson’, ‘Plumosa compacta’, ‘Prince of Wales’, ‘Procumbens’, and ‘Wiltonii (Blue Rug)’; J. chinensis cultivar ‘Spartan’; and J. conferta cultivars ‘Emerald Sea’ and ‘Blue Pacific’.


Resource(s):

Common Landscape Diseases In Georgia

Center Publication Number: 215

Twig Girdler (Oncideres cingulata)

Source(s): Jacob G Price


Twig girdlers are beetles that emerge from late September to October and girdle limbs from 6-18 mm in diameter. The cut encircles the twig and is seldom complete, leaving a jagged edge in the center upon breaking off. They also can remove large patches of bark while feeding. Preferred host trees are the pecan, hickory, persimmon, elms, and hackberry. If populations are high they attack oaks, and sometimes fruit trees.

twig
Twig Girdler

Description: Cylindrical, longhorn beetle with grayish-brown body and a broad ash gray band across the elytra. Eggs are elongate to oval, 2.5 mm long, and white. Pupa are legless grubs that reach 16-25 mm at maturity.

Biology: In Autumn, females girdle branches to provide a suitable medium for larval growth. Females insert 3-8 eggs into the bark or slightly into the wood of each girdled twig. The eggs hatch in three weeks but grow little until spring. Larvae feed inside the twig and emerge in the fall. The adults live 6-10 weeks and females lay from 50- 200 eggs each.

Control: Remove fallen twigs and stems from the ground and burn them to destroy the larvae. Imidacloprid will control certain borers. Although less effective, permethrins can be applied every three weeks as a barrier.


Resource(s):

Insect Pests of Ornamental Plants

Center Publication Number: 72

Cycad Aulacaspis Scale

Source(s): Jeffrey Webb, UGA Area Extension Agent – Commercial Horticulture Southeast District, Bamboo Farm and Coastal Garden, The University of Georgia, College of Agricultural and Environmental Sciences


The Sago Palm has long been considered one of those perfect, easy-to-maintain plants for modern landscapes. Known as the Sago Palm, King Sago or Cycad, Cycas revoluta was one of the most abundant plants on earth during the days of the dinosaur – and it has changed little in appearance over the past 250 million years.

Scale on Sago Palm
Scale on palm

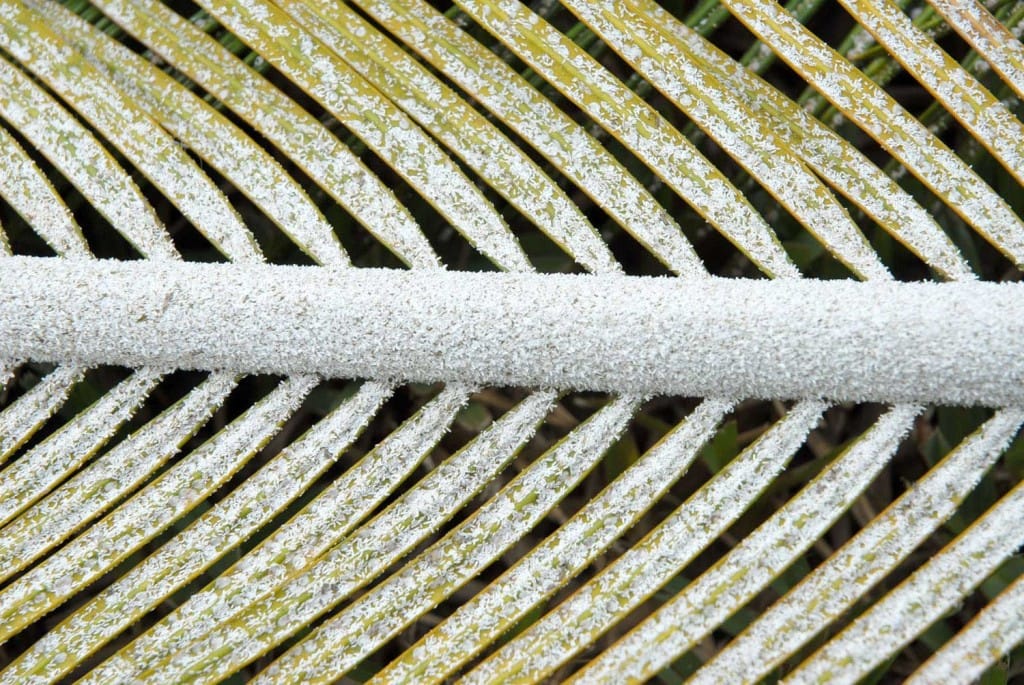
Healthy, mature, Sago Palms are worth a lot of money in the landscape and provide great design value. They are long-lived and thrive in harsh conditions. However, a small scale insect now known as the Cycad Aulacaspis Scale (CAS) is proving deadly to Sago Palms everywhere they grow. The insect was first identified in this country in Dade County (Miami) Florida in 1996. It is native to tropical regions of Southeast Asia and probably arrived in this country on legally imported cycads. It was first noticed infesting several valuable cycad species in a Florida botanical garden. From a small initial infestation, the insect has spread through Florida to Alabama, Georgia, Hawaii, Louisiana, South Carolina and Texas. Since the insect has a very limited ability to spread on its own, its spread to adjacent states has been attributed to infested plants sold by wholesale nurseries and by unlicensed roadside plant sellers. In addition, it is very likely that the insect spread on pass-along cycad plants that left Florida in the trunk of a car. It is now found in both landscapes and nurseries. This insect is deadly – a Sago Palm can go from initial infestation to death in under a year.

Cycad Aulacaspis Scale has some distinct traits that make it difficult to control and quick to kill even mature Sago Palms. Unlike most other scale insects, CAS can live on the root system up to 24 inches underground. When it hatches, it moves with greater speed and over greater distances than most other scale insects. Populations build up very fast and form layers of living and dead scales. (A heavy infestation will include up to 3000 scales per square inch.) There are no native predators or parasites and the insect infests all parts of the plant – fronds, cones, roots and stems. CAS enters a period of lower activity during the cooler, drier months of the year (late November to early May) but experiences a surge of reproductive activity in spring from surviving scales in leaf crevices and on roots (late May.) This year, drier weather probably held back egg hatching but now that rains and hot weather have arrived over much of southeast Georgia, the scale should be kicking into high gear. Now is the time to scout landscape and nursery plants for early detection of scale populations. Field identification is not especially difficult although CAS may be confused with False Oleander Scale (also known as Magnolia Scale.) Enough differences exist to make identification possible with the help of a 10x hand lens.

  1. The False Oleander Scale has a more elongated prosoma (body) beneath the scale-like covering than does CAS.
  2. Both the prosoma and egg mass of False Oleander Scale are yellowish while CAS has an orange prosoma and eggs.
  3. False Oleander Scale occurs in much smaller numbers and is most often confined to the lower surface of fronds. This scale is not a serious threat to the health of Cycads.
  4. CAS populations build very rapidly to high numbers and cover all portions of the plant. Infestations of CAS often begin in the crown and from old leaf bases. Crawlers spread quickly to cover the surface of fronds.

Oil sprays should be your first response; if used early and often this may be enough to control or eliminate the insect on your plants. Paraffinic oils or ultrafine horticultural oils such as Sunspray™ as well as fish oils – not fish emulsion – such as Organocide™ can to give effective control. Malathion™ mixed with oil has given good, low cost control but is hard on beneficial insects. Apply oil sprays to the entire plant at 10 days to 2 week intervals throughout the summer. Occasionally wash the plant with a strong stream of water to remove oily build up and layers of dead – and living – scale insects. This cleanup also helps keeps the plant looking good. Newer chemistry includes Distance™ or pyriproxyfen, an insect growth regulator formulated to be sprayed onto the foliage. Safari™ or dinotefuran is a systemic control that is water soluble and can be either drenched or applied twice a year to foliage to give excellent control. Cygon™ is no longer in production but it is still legal to use what you have on hand and gives good control. Please note: Merit™ and Marathon™ (imidacloprid) have not been effective or have given inconsistent control.

At first, horticulturists could predict only doom for the Sago Palm in the landscape. While it is true that early attempts at treatment were not effective, we now have a better idea of how to control CAS. Since the insect moves so quickly to build populations, and since an infestation can literally cover and kill a Sago Palm in a few month, the control technique of greatest importance is scouting. Nurseries and garden centers must detect and treat or destroy infested plants. Scouting for CAS should become a routine part of landscape maintenance in locations where CAS is present. If you manage landscapes that include Cycas revoluta, or if you produce them in a nursery, or if you sell them in a retail setting, begin NOW to scout for CAS. The life of these plants depends on your quick response to control CAS before populations explode.

For more information, contact your local county extension agent. To locate the UGA Extension Office in your county call 1-800-ASK-UGA1. You can also contact me at jkwebb@uga.edu or 912-921-5460 for more information on CAS control strategies.


Resource(s): Insect Pests of Ornamental Plants

Center Publication Number: 250

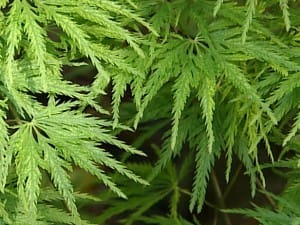
Cutleaf Japanese Maples, Refined and Delicate

Source(s): Stephen D Pettis


One of the loveliest of all the small trees is the group of trees known as Cutleaf Japanese Maples. These oriental relatives of our native maples exhibit traits that have been selected by Japanese gardeners and horticulturists for thousands of years. These are the most refined and most delicate of all the maple family.

Cutleaf Japanese Maples Cutleaf Japanese Maples

The Cutleaf Japanese maple gets its name from its deeply cut leaves. The lobes of the leaves are cut to the leaf petiole. Each lobe is finely serrated and each serration is further toothed. This delicate leaf morphology is colored in shades of either green or red and is the most attractive feature of the plant.

Japanese maples in general are rounded trees with smooth bark and undulating branches. The cutleaf varieties are all very small ranging from 3-9 feet in height. Their small size lends them to being excellent specimen trees near patios, homes and driveways. The tree can be used as an accent and even as a potted plant. Branches of the plant are layered much like many of our native trees such as redbud and dogwood. In deep shade this layering effect is pronounced and the tree takes on the wispy look of smoke drifting. The tree can be trained as either single or multi stemmed tree. Many of the cutleaf varieties will form a multi stemmed shrub-like tree that hides its branches behind a skirt of the wonderful leaves. In this form in makes a rounded mound of vibrant color.

Cutleaf Japanese Maple Requirements

Japanese maples have specific site requirements. These trees prefer dappled shade, although I have seen them in full sun. Japanese maples in the full sun tend to be stressed and pick up summer leaf spot diseases readily. Cutleaf Japanese maples require evenly moist well-drained soil conditions for best performance. These trees should be protected from winds and winter cold by siting them near structures, large trees or among a planting of other small trees and shrubs.

One drawback to Japanese maples in general is their relatively slow growth rate. Japanese maples grow very slowly their first few years after being planted but will pick up speed as the years go by. One can expect a cutleaf maple to achieve maturity in ten to fifteen years depending on growing conditions.

Japanese maples are generally very expensive. This is because propagating maples in general is not an easy task. Japanese maples are more difficult and the cutleaf varieties harder still. The plant is usually readily available but at substantial costs. It is worth it to own one of these gems. Most Japanese maples are grafted. Producers graft the cutleaf varieties onto rootstocks of other maples to improve their performance. You can sometimes see the junction between the upper portion or the scion and the lower portion or the rootstock. Sometimes the rootstock can send up its own trunk or sucker. These occasional suckers should be pruned and removed when they emerge, as they will look completely different than the upper portion of the tree.

When someone asks the best way to grow their own Japanese maples, I tell them to grow them from seed. Collect the seed or samara, a type of winged fruit, prior to their becoming dry. This is generally in June. Plant the seeds directly in moist peat. A relatively small percentage of the seeds should germinate the following spring. Sometimes, Mother Nature will do the work for you. Search under your favorite mature tree for seedlings and transplant them in one-gallon pots filled with general potting soil.

These rounded deciduous trees elicit comment from almost everyone who walks by one in the garden. There is a lovely example just outside the main entrance of the University of Georgia Botanical Gardens. Any time you visit, you will invariably see someone stooping over in front of it to get a look at the sign just beneath it so that they might identify this majestic plant.


Resource(s): Landscape Plants for Georgia

Center Publication Number: 148

Cultivation of Lawns

Source(s): Gil Landry, PhD., Coordinator – UGA Center for Urban Agriculture, The University of Georgia.


Proper cultivation of turfgrasses is essential in order to produce an attractive, healthy lawn.

Cultivation of turfgrasses includes vertical mowing, core aeration and topdressing. These operations reduce surface compaction and thatch accumulation, improve soil aeration and water infiltration, and promote root growth. All these benefits are essential to producing vigorous, healthy turf.

Vertical mowing or dethatching helps keep turfgrasses healthy by removing the dead vegetation from the thatch layer. This dead vegetation is lifted to the surface by the blades of the vertical mower. Vertical mowing can be done in early spring just before green-up occurs or when the grass is growing rapidly, yet not so hot that water requirements are high. Take care not to remove too much of St. Augustine and centipede grass lawns because they do not have underground runners.

Core aeration relieves soil compaction and increases air and water movement into the soil. It also stimulates thatch decomposition. Proper aeration is best accomplished by a power aerator, which has hollow tines or spoons so that it removes a soil core 2 to 3 inches deep and 1/2 to 3/4 inch in diameter. Aeration is best accomplished during period of active plant growth and when the soil is moist enough to allow deep penetration. Aeration, which is also called coring, should only be used to correct soil problems and not as a routine practice.

Topdressing is a management practice used to aid in the decomposition of thatch, to reduce surface compaction, and to smooth the surface. Topdressing involves spreading a thin layer of topsoil or other soil mix on the soil surface. It is often used to cover the planted material in planting operations. The topdressing material should be of similar texture and composition as the underlying soil. Topdressing rates may range from ½ to 2 cubic yards of material per 1000 square feet. This will produce a layer from 1/8 to 5/8 inch thick. However, it is important that distinct layers are not formed. The topdressing is usually worked into the turf by dragging, raking or brushing.

Fertilization after cultivation operations stimulates rapid turfgrass recovery and promotes a healthy, vigorous turf. These operations can be done at the same time if needed. However, neither dethatching nor aeration should be done during a period of heavy weed germination or appropriate weed control measures will be necessary.


Resource(s): Lawns in Georgia

Center Publication Number: 134

Crown Gall of Rose

Source(s): Randy Drinkard


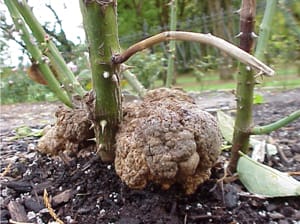
Crown Gall, a disease caused by a soil borne bacterium, can severely damage rose plants. Galls begin as small swellings, usually at ground level, that slowly increase in size. Infected rose plants become stunted and very often die.

Crown Gall of Rose
Crown Gall of Rose

Tissue overgrowths or galls can be found at or just below the soil surface on the crown and on the roots of plants. Galls are irregularly rounded and rough in texture. Galls vary in size from ½ inch to several inches in diameter. Young galls are light green or white, and the tissue is soft. Advanced galls are hard and brown to black in color. Roses severely infected become stunted, producing only a few blooms.

The crown gall bacterium enters plants through wounds made by transplanting, cultivation, grafting, and pruning. Other wounds caused by insects, animals or people can serve as avenues for infection to occur. Affected plants may be stunted, produce small chlorotic leaves and may become more sensitive to environmental stresses such as winter injury. Severely infected plants decline and eventually die. Crown gall can survive in the soil for 2 to 3 years.

To control crown gall, avoid wounding susceptible plants at or near the soil line. Prune infected branches and roots well back into healthy tissue. To prevent possible spread of the disease, sterilize pruning tools between cuts with a 10 percent household bleach solution. Plant removal may be necessary when galls are extensive. Chemical treatment may be practical for valuable landscape plants. Contact your local county agent for a list of chemicals.


Resource(s): Common Landscape Diseases In Georgia

Center Publication Number: 114

Crickets

Source(s): Jacob G Price


Crickets belong to the insect order Orthoptera, which also includes grasshoppers and katydids.

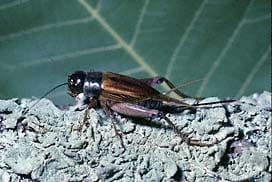
House cricket
House cricket

Description

House Cricket – About 3/4″ long with 3 dark bands on the head and long thin antennae. Body is yellowish-brown. Active at night; remaining hidden during the day. Eats and drinks almost anything that is available. Enters homes during July – September.

Field Cricket – Larger than the house cricket. Dark brown to gray or blackish in color. Feeds on soil and other material. Prefers to live outdoors where they feed on soft plant parts, but moves indoors when conditions are unfavorable (excess heat, cold or rainfall). Attracted to lighted areas at night.

Camel Cricket – An occasional indoor pest. Usually found in damp and dark basements which have a partial dirt floor.

Detection

Visual sighting. House cricket will chew and damage silk, woolens, (particularly if soiled), paper, fruit and vegetables.

Control

  1. Remove feeding and breeding (debris and high grass) sites outdoors.
  2. Exclusion: tighten screens, windows and doors, seal openings near ground level. Caulk cracks and other points of entry.
  3. Apply an insecticide containing one of the active chemicals: cyfluthrin, cypermethrin, deltamethrin, orthoboric acid, permethrin, propetamphos, tetramethrin, or tralomethrin. Read the manufacturer’s label to determine if product may be used outdoors only or both indoors and outdoors. Follow manufacturer’s use instructions. Look for these products at garden centers and feed and seed stores.
  4. Use sticky-traps in attics, basements and other indoor spaces.

Center Publication Number: 17

Creating Your Dish Garden

Source(s): Gary R Peiffer


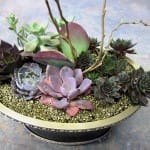
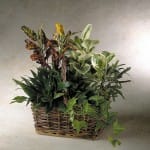
A dish garden is a collection of compatible plants growing and changing together over time in a small container. Using basic principles of design, you can create, in miniature, the feeling of a sumptuous full scale landscape. First select the location where the dish garden will grow; then select the plants suited to your location.

Careful location and plant selection is the key to successful dish gardening. For example, if you expect to grow your dish garden in the often dry and dark open atmosphere of the home or office, select plants suited to this environment.

What makes a Dish Garden?

A dish garden is composed of the

  • container
  • drainage materials
  • soil mix
  • plants and
  • decorations and trims.

Learn about each of these individual elements in the discussion below.

Unlike a traditional flower pot, there is usually no hole in the bottom of a dish garden container.Virtually any object that holds water and does not leak con contain a dish garden. Suitable containers include metal, china, glass, pottery, and plastic-lined wooden bowls, boxes, and baskets, and antique and reproduction items such as basin and pitcher sets.

Look at your surroundings. Cast-off and yard sale items often have interesting shapes and colors, including dishware, old gardening tools, outgrown toys, and bricks and concrete blocks.

A visually active container demands simple plantings. A container with simple lines and subtle colors permits the variety of exotic plants to catch the eye.

A rather wide and shallow vessel helps to create the illusion of a miniature landscape. Select a container deep enough to provide room for the roots, soil, and necessary drainage materials. Usually 3 inches deep is sufficient.

Drainage Materials

Loose materials, such as small rocks, pea gravel, marbles, and coarse sands, provide drainage for a container with no holes.

Coarse charcoal layered just above the rocks prevents sour soil, s common problem in dish gardens. Sourness results from too much water (H2O) and from a lack of air (Oxygen) between the soil particles. Roots need air too!

Soil Mix

Most foliage and dish garden plants thrive in a soil mix made of

  • sterilized soil
  • coarse sand and
  • peat moss or leaf mold.

You may either sterilize the soil in your oven or buy a commercial sterile soil mix.

For cacti or succulents, double the amount of coarse sand.

Remember: A container with no drainage hole in the bottom requires a well-drained soil mix and careful watering.

Plants

Plant selection depends on each plant’s compatibility with the others and its adaptability to the site conditions and the style of the container. Avoid mixing incompatible plants, such as cactus and coleus. Plants thriving under different conditions will not prosper together in a dish garden.

See the table at the end of this brochure for types of dish gardens, their plant selection, and special requirements.

Decorations and Trims

Miniature figures and ground objects, such as bits of wood, rocks, stones, and crystals make appropriate additions to a dish garden. Select shapes, colors, and sizes to create interest and contrast. Toe enhance your dish garden for gift presentation, attach a small ribbon duplicating a color already present in the container of the plants. As a rule, minimal decorations create the greatest charm and delight.

Planting your Dish Garden

The Day Before You Plant

On the day before you plant your dish garden, thoroughly water all the plants you expect to transplant.

Layering Your Container

Follow these steps to layer your container.

  1. Line the bottom of the container with loose drainage material to prevent the soil and roots from standing in water.
  2. Add a thin layer of coarse charcoal to prevent sour soil.
  3. Fill the container about 1/2 full of damp, but not wet soil mix.

Note: To test for proper soil moisture, squeeze a handful of soil. The moisture content is satisfactory if no water oozes out but the soil retains its shape when released.

Planning Your Design

Follow these steps to plan your design.

  1. Temporarily place and view the plants in the container.
  2. Look at your work from all sides and angles and from several distances.
  3. Try your decorations. A figurine can turn a few plants into a miniature landscape. To see this effect, place the figurine in among the plants.
    Viewed from eye level, the plants swell to the size of trees.
  4. On a sheet of paper, sketch a quick plan of your chosen arrangement or make an instant photo.
  5. Gently remove the plants and set them aside.

Note: Consider where you plan to display your dish garden. If it will be seen from all sides, check the views all around it. If it will sit next to a wall, you need only consider the view from the front or at most, three sides. If it will sit in front of a mirror, use this to your advantage. A dish garden viewed from table level benefits from a different plant arrangement than one seen from eye level. Carefully move the plants until you discover a pleasing composition.

Planting Your Dish Garden

Follow these steps to plant your dish garden.

  1. Begin to permanently plant your dish garden. Follow your sketch.
  2. Build a small mound in the dish for each plant and spread its roots over the mound. If a plant has an extremely large root root system, prune its roots a little. Place a little more soil over the roots to hold the plant in place.
  3. Following your sketch or photo, plant the remaining plants in this same way.
  4. Finish filling the container with soil.
  5. Water the soil and mist the leaves.
  6. Place your new dish garden in a warm, shaded location for two weeks to allow the fresh transplants to become established.

Maintaining Your Dish Garden

Follow these steps to maintain your dish garden.

  1. Test the soil moisture with your finger several times each week. Water slowly with lukewarm water.
  2. Turn the container every few days so the plants grow upright.
  3. Fertilize infrequently. Over fertilizing causes plants to outgrow the container.
  4. Repot when the plants grow too large for the container or after a year or so when the soil nutrients deplete.

Remember: Drainage does not exist in most dish gardens. Dish garden success depends on proper watering.

Types of Dish Gardens

Use this table to design and select plants for your dish garden.

Type of Dish Garden Plant Selection Ideas Sunlight Requirement Other Special Needs
Bog Ground & club mosses, small ferns Full to part sun
Desert Agave, aloe, cactus, crown of thorns,
echeveria, haworthia, house leek, jade, sun, kalanchoe, opuntia, panda plant, sedum, snake plant
Full to part sun, Sandy soil
Field and Meadow Ferns, fungi, grasses, hawkweed, juniper seedling, lichens, mosses, pussytoes, wild strawberry Full to part sun
Herbs Chives, creeping thyme, rosemary, other small herbs Full to part sun, Sandy rocky soil
Mediterranean Euphorbias, succulents, small cacti Full to part sun, Sandy soil
Tropical Aspidistra, birdsnest fern, bromelia, Chinese evergreen, croton, dracaena, English and grape ivy, neantha bella Tropical palm, peperomia, philodendron, pittosporum, podocarpus, pothos, pteris fern, sansevieria, snake plant, ti plant, wandering Jew Shade, indirect light
Violet Wild violets, small herbs Full to part sun
Woodland Ferns, grasses, club, hair-cap, & minum
mosses, hepatica, mountain laurel, Woodland partridgeberry, pipsissewa, rattlesnake plantain, rock polypody, wintergreen seedling yew, fir, pine, & hemlock

Center Publication Number: 4
Create Bird Habitats in Your Landscape

Source(s): Stephen D Pettis


Create suitable habitats for birds through landscaping. Gardeners can provide birds with the things they need to survive and birds can provide gardeners with hours of enjoyment in the backyard.

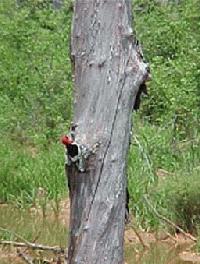
Woodpecker on Snag
Woodpecker on Snag
Make the environment inviting

Planning a landscape that is suitable for birds is easy. Sketch the existing landscape, making note of all structures, plantings and topographical features. Choose areas to plant trees and shrubs that birds can utilize. Annuals and perennials that flower throughout the season attract insects that birds may feed on. Standing dead trees will provide habitats for birds such as woodpeckers.

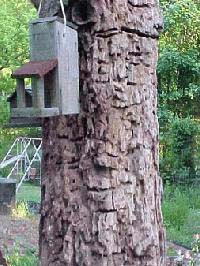
After making plant choices that provide food, shelter and cover for birds, artificial features should be considered. Water sources such as birdbaths, fountains and ponds may be added to landscapes to attract birds. The features should be in the open away from any place cats and other predators can hide. Rocks and water plants add to a water feature’s attractiveness to birds as well as keeping the water fresh. Man made birdhouses can be installed. These should be placed in sheltered spots near a shrub or tree. Finally, birdfeeders can be added. All bird feeders should be placed in the open near some sort of cover. Baffles and guards should be placed on mounting poles of both birdfeeders and houses to prevent predation.

Trees and Shrubs for Birds

Plant

Plant type

Feature

Birds attracted

Oak

Tree

Excellent nesting

Blue jays, sparrows, acorn woodpeckers

Pine

Tree

Excellent nesting

Robins, purple finches, mourning doves, warblers, sparrows

Holly

Large shrub

Shelter

Towhees, thrashers, mockingbirds

Elderberry

Large shrub

Summer fruit

Warblers, grosbeaks, goldfinches

Dogwood

Small tree

Nesting, late summer fruit

Bell’s vireos, summer tanagers

American Beautyberry

Shrub

Late summer fruit

Many birds

Native roses

Shrub

Nesting, cover

Many birds

Eastern Red Cedar

Tree

Nesting, winter fruit

Sparrows, robins, mock-ingbirds, many others

Winterberry Dec. Holly

Small shrub

Late winter fruit

Robins, blackbirds, cedar waxwings

Attracting birds to one’s yard by birdscaping can be rewarding. Birds are not only beautiful and fun to watch, but also provide control of adult insects, grubs, and caterpillars. By improving suburban and urban landscapes, people can help replace bird habitat that has been reduced or destroyed by development. To learn more about attracting birds to your landscape, contact the Gwinnett County Extension Service at (678) 377-4010.

Feeders

Squirrel proof feeders Spinners, flippers, trapdoors prevent pesky squirrels from robbing feeders
Platform feeders Feeds many birds at once
Tube feeders Plastic tube with staggered holes
Hummingbird feeders Glass feeders filled with sugar water (1 part sugar, 4 parts water; no red dye needed; boil and cool before use)
Suet feeders Wire suspended suet cake. Birds often hang upside down to feed.
Thistle feeders Narrow tube feeders
Peanut feeders Attracts woodpeckers
Window feeders Suction cups attach feeder to window

.


Resource(s):

Reviewer(s):

  • K. Lynn Davis, CEA- Turner County. The University of Georgia College of Agricultural and Environmental Sciences.
  • Brandy Wilkes, CEA- Cook County. The University of Georgia College of Agricultural and Environmental Sciences.

Center Publication Number: 105