Take Care of Garden Tools

Source(s): Stephen D Pettis


Winter is a tough time for avid gardeners. We struggle to find something to do in the yard after all of the leaves are raked, the perennials divided and the pruning is done. We turn to UGA football for some relief but, alas, it ends all too soon. We rack our brains and scour gardening books for ideas but eventually wind up wandering aimlessly around our yards in the months of January and February when the weather is nice enough to get outside.

Inevitably we wind up in the tool shed. There we see all our tools there still dirty and grimy from the summer’s toil. Your favorite shovel has red clay caked on it, the pruners are nearly stuck with sticky sap in the blades, and both are dull. Our hosepipe lies in a heap like a dead snake in the corner and the wheelbarrow has a flat tire. The spirit lifts now that some purpose has come back into the poor gardener’s existence. There are tools to be maintained.

The first tool to get the treatment should be our favorite shovel. This tool is, after all, the one instrument that sees the most use in the garden and serves us unfailingly all summer. Using a strong stream of water and a brush, remove any caked on mud and plant debris. Be sure to pay attention to the shank (the area where the handle inserts into the shovel blade) because bits of roots, soil, and plant debris can get stuck in there. This a good place for plant diseases to hang out until next year.

Next sharpen the business end of the blade to a working edge not a razor’s edge. A working edge is one that is slightly blunt (a 15-20 degree angle) and is not quite sharp enough to cut you. It will last much longer than a narrow edge. Use a wire brush or some steel wool to clean any remaining debris and rust from the blade. Apply a light coat of oil to the blade. If the shovel has a wooden handle, use sand paper to smooth any rough patches and oil with linseed or tung oils. Store your shovel for the winter by hanging it on the wall instead of standing it up in the corner to avoid damage to the edge.

After working on the shovel, tackle the pruners. Use a rag and a solution of bleach to clean the blades of bypass and anvil pruners. Scrub any difficult to remove crud with steel wool and oil the hinge and spring with a household lubrication product such as WD40. Sharpen the blade to a 40-45 degree angle with a metal file being extra careful not to cut yourself. ALWAYS WEAR GLOVES WHEN SHARPENING TOOLS! If the pruners have removable blades, consider replacing them. Store the pruners in a locked cabinet or drawer to prevent children from playing with them and getting hurt.

Finally, take care of that old wheelbarrow. Clean the tire, handles and the tray with water and soap. Tighten any nuts or screws that might have loosened over the summer. Read the tire pressure requirement on the side of the tire and fill it with air. Use a bicycle tire pump instead of an air compressor. A really powerful compressor can burst a wheelbarrow tire sending tire shreds flying. Most wheelbarrows have sealed wheel bearings so greasing or oiling the wheel isn’t necessary. On the off-hand chance yours has a grease fitting, use regular trailer grease and a grease gun. Store the wheelbarrow inside if you can or if you have to store it outside, turn it upside down to prevent water from standing in the tray.

There are many tools in our shed that we seldom use or that don’t really require much maintenance. Simply hose off your pick, mattock, flat shovel and rakes. Drain and roll up your hoses. Hang all of your tools if you have the means to keep them from taking up too much room in the corner. Hopefully, maintaining your gardening tools will keep you busy for a while and prevent you from wandering aimlessly around your yard…like I do.
Take-All Root Rot of St. Augustinegrass

Source(s):

  • Jeff Michel
  • Jacob G Price

Introduction

Take-All Root Rot, Gaeumannomyces graminis var. graminis, has recently emerged as a destructive disease in Georgia. The disease is a problem in many other southern states as well. Take-All Root Rot is most common in St. Augustinegrass lawns, but affects all warm season turfgrasses.

Symptoms/Signs

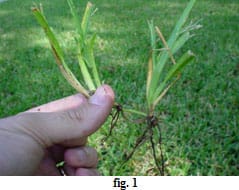
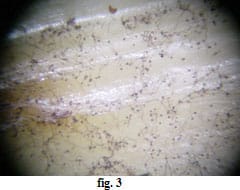
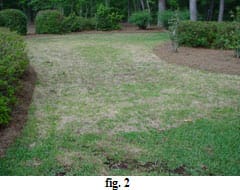
The naturally occurring pathogen first causes root damage which leads to noticeable symptoms such as yellowing leaf blades and dark roots (fig.1). In advanced stages (fig.2) the turf severely thins and begins dying in an irregular pattern. When the first disease symptoms are observed, the disease has been active for weeks. Dark, threadlike strands called hyphae along with anchoring structures called hyphopodia (fig. 3) can be seen under a dissecting microscope on the stolons, roots, and rhizomes of warm season grasses. The disease is primarily observed in spring and fall and is associated with high levels of moisture due to rainfall or irrigation.

Cultural Controls

If rainfall is not adequate and irrigation is used, water infrequently but deeply. Mow the turf at the correct height and remove only 1/3rd of the leaf blade per mowing. Core aerate to reduce thatch and relieve soil compaction. Use slow release fertilizers with equal amounts of nitrogen and potassium. Avoid high nitrogen applications in the fall. Texas A&M and UGA research has shown some benefit from applying ¼”of sphagnum peat moss or 2 pounds per thousand square feet of Manganese Sulfate. Avoid liming as the pathogen prefers a pH above 6.5. Avoid activities that stress turf such as herbicide applications. If turfgrass is not stressed, foliar symptoms may not be present.

Chemical Controls

This Disease is difficult to control and once advanced, there is no silver bullet. If Take-All Disease is known to be present, preventive fungicide applications may be of benefit after cultural controls have been implemented. Fungicides applied in early spring and fall such as Rubigan (fenarimol), Heritage (azoxystrobin), Banner Max (propiconazole), Bayleton (triadimefon), Cleary’s 3336 (thiophanate methyl), and Insignia (pyraclostrobin), may help control Take-All Root Rot. Apply these fungicides with 2.5-3.0 gallons of water, per thousand square feet to reach the root system or lightly water in the fungicide.


Resource(s):


Reviewer(s):

Ellen Bauske, Program Coordinator, UGA Center for Urban Agriculture, The University of Georgia College of Agricultural and Environmental Sciences.

Center Publication Number: 8

Tea Scale

Source(s): Patricia Cobb, Extension Entomologist, Alabama Cooporative Extension Service, Auburn University.


Tea scale is serious pest of camellias and certain other ornamental plants in Georgia. Scale insects pierce plant tissues and suck out juices which reduces the vitality of the plants. Heavy infestations result in unsightly plants, fewer and smaller blooms, twig dieback and possible plant death.

OLYMPUS DIGITAL CAMERA
Tea Scale on Camellia

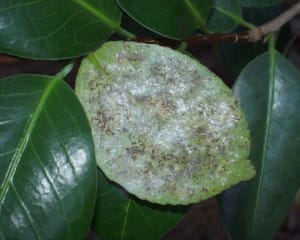
Tea scale is one of the most widely distributed and most damaging insect pest on camellias. Tea scale infestations are also quite common on large-leafed hollies. Tea scales feed underneath leaves. This usually causes the upper leaf surface to become yellow-splotched. When infestations are heavy, cottony filaments can be seen hanging from the leaves.

Identification:

A waxy covering develops over each scale as it grows. The females develop hard brown covers about 1/10 inch long. The males develop fragile white covers that are usually a little smaller than those of the females. Females lay eggs for several weeks and eggs hatch continuously. This results in overlapping generations almost year-round.

Control:

A major problem with tea scale control is that often damage has been done before the scale infestation is noticed. This means that in spite of control efforts, the damaged leaves will often be retained by the plant for at least a season or more. A 2- or 3-year program may be necessary to bring the infestation to a manageable level.

Beginning in April, use acephate (Orthene), carbaryl (Sevin), malathion, imidacloprid or other recommended insecticides according to label directions to control tea scale insects. Fall treatment may also be needed if infestations are heavy. Add a spreader-sticker to your spray mixture and be sure to direct the spray to the underside of leaves to obtain better contact of the insecticide with the scale insects.

Insecticidal oils may be effective in control of light to moderate tea scale infestations. Some oils can be used in the spring prior to or after blooming and in the fall prior to blooming. Highly purified oils such as SunSpray can be used during the growing season. Check the label for use instructions.


Resource(s):

Insect Pests of Ornamental Plants

Center Publication Number: 122

Test Your Mosquito ID

Source(s):

  • Centers for Disease Control and Prevention
  • Andrew Spelman, Harvard University School of Public Health
  • The University of Georgia Department of Entomology

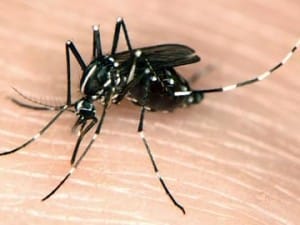
Asian tiger mosquito populations could be at record levels this year in Georgia according to leading mosquito experts.

mosq2

Increased humidity and moisture caused by frequent afternoon thunderstorms coupled with August heat make conditions perfect for outbreaks of mosquitoes, including the Asia tiger mosquito.

Test your mosquito IQ by answering the following questions.

  1. Mosquitoes only come out at night?
  2. Mosquitoes are worse now than they were 30 years ago?
  3. Some people never get bitten by mosquitoes, having a natural immunity to them?
  4. The life span of a mosquito is only a few days?
  5. Mosquito eggs can live for 20 years?

Answers

  1. FALSE. The Asian tiger mosquito, which appeared in Georgia in the mid-90s, is a dreaded day biter.
  2. FALSE. Mosquitoes have long been a threat to humanity, spreading deadly diseases such as yellow fever, malaria and encephalitis.
  3. FALSE. While it is true that mosquitoes prefer some people to others, and some are even attracted to their victims by the smell of their feet, it is not likely that some people are fortunate enough to go through life unbitten by mosquitoes.
  4. TRUE. Dehydration is the typical cause of death of mosquitoes. Because they are so small, mosquitoes can quickly dehydrate or dry out. Increased humidity helps them live longer.
  5. TRUE. Mosquitoes have been known to lay eggs in the desert that survive for years, until some water enters the environment and allows them to hatch.

Center Publication Number: 99

Thatch Removal

Source(s): Gil Landry, PhD., Coordinator- The Center for Urban Agriculture, The University of Georgia.


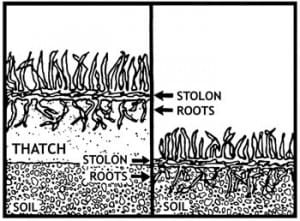
Thatch is defined as an accumulation of dead and living plant material (stems, roots, and shoots) that develops between the soil surface and the green leaves of a turf. Thatch development is a natural process that occurs during normal growth of turfgrasses. Although some thatch is desirable, thatch becomes undesirable when it exceeds a depth of 1/2 inch.

thatch-2
Thatch is the accumulated plant material between the soil surface and the green leaves of a turf.

Examine thatch depth by using a knife, spade, or soil probe to remove a small section of turf (soil included). If the thatch layer is thicker than 1/2 inch, dethatching is needed. Remember that thatch buildup is gradual and occurs over a period of years. Therefore, it’s logical that a thatch removal program should also be gradual.

The following cultural practices are effective methods of thatch removal:

  1. Topdressing once or twice a year with a 1/4 inch layer of topsoil is the most effective method of thatch reduction. This practice increases the thatch decomposition rate. Heavier applications of topsoil may cause layering, which restricts water, air and fertilizer movement in the soil. However, a top-dressing is also the least practical cultural practice because of the cost of specialized equipment, top-soil and labor. Topdressing can also be a source of weed seed.
  2. Vertical mowing is the most common method of thatch removal. This specialized mower has evenly spaced blades that revolve perpendicularly to the turf and slice into the thatch to mechanically remove it. It is very important to use proper blade spacing when vertically mowing different turfgrasses. Use a blade spacing of 1 to 2 inches for bermudagrass and zoysiagrass, 2 to 3 inches for centipedegrass, and 3 inches for St. Augustinegrass. Bermudagrass may be mowed down to the soil level in several directions without killing the lawn because of underground rhizomes. Centipedegrass and St. Augustinegrass should only be vertical mowed in one direction to avoid removing too much plant material and reducing the rate of recovery. If a thatch layer exceeds 1/2 inch depth, the turf area should be carefully vertically mowed and allowed to recover between mowings. Vertical mowing is best done in the spring after greenup where the grass is growing rapidly and when the weather is not so hot that turf water needs are high. Another good time to vertical mow is in early spring just before greenup occurs.
  3. Power raking uses the same mechanical principles as vertical mowing. Flexible, spring steel wires revolve at high speed vertically through the turf and loosens the debris for removal. Power raking can be useful for loosening debris, but it is not as effective as vertical mowing.
  4. Scalping is a poor substitute for vertical mowing, but its use, especially in early spring may delay the need for vertical mowing where build up is minimal. Scalping is a procedure in which the turf is mowed at a much lower height than normal. Scalping heights will vary with turfgrass species. Turfgrasses with rhizomes, like bermudagrass and zoysiagrass, may be scalped down to near the soil surface. Centipedegrass and St. Augustinegrass spread by above-ground runners called stolons. Removing these stolons would kill the turf. Zoysiagrass is not as sensitive to scalping as centipede and St. Augustine, but it is more sensitive than bermuda. Scalping below the crown or green growing points of zoysia will cause excessive damage.
  5. Core aeration benefits thatch decomposition primarily through the indirect effects that stimulate bacterial activity. Core aeration also relieves soil compaction and increases air and water movement into the soil. This is best accomplished by a power aerator that has hollow tines or spoons, so it removes a soil core 2 to 3 inches deep and 1/2 to 3/4 of an inch in diameter. Core aeration should be done during periods of active plant growth and when the soil is moist enough to allow deep penetration. Applying a fertilizer as recommended by soil analysis after a cultural practice will increase the rate of turf recovery.

Resource(s):

Lawns in Georgia

Center Publication Number: 139

The Amaryllis Weevil

Source(s): Jacob G Price


Introduction

The Amaryllis Weevil, (Coleoptera: Curculionidae), is an exotic and yet un-described weevil that was first found in Amaryllis plants in Tampa, Florida in 1989. The weevil was first documented in Amaryllis in Lowndes County, Georgia in 2006. The weevil has also been reported to have damaged Crinum Lilies and Spider Lilies in Lowndes County.

Life Cycle

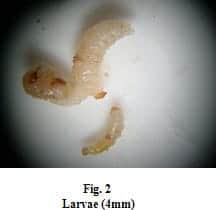
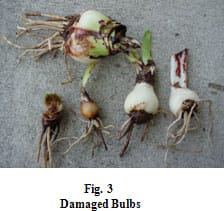
The adults, (fig. 1), may live up to two years, are shiny black, and measure 4mm in length and 2mm in width. Adults feed on foliage, but the most damage is from the larvae. Amaryllis Weevils lay eggs on the leaves which hatch and tunnel their way towards the bulb. The Amaryllis Weevil larvae, (fig.2), destroy bulbs by their feeding activity which usually begins at the base of the leaves and extends into the bulb (fig.3). With severe infestations the larvae will hollow out and destroy the bulbs. Larvae are believed to pupate in the surrounding soil and emerge as adults.

Controls

Adult weevils are believed to be weak flyers and are most likely spread from the transport of bulbs. Use caution when introducing new plants to your garden. In situations where infestations are severe, products containing imidacloprid (Bayer Advanced Tree & Shrub or Merit), should help control infestations. Removing all susceptible Amaryllis, Crinum Lilies, and Spider Lilies, for two years will also benefit.


Resource(s):

Insect Pests of Ornamental Plants

Reviewer(s):

  • Ellen Bauske, UGA Center for Urban Agriculture, The University of Georgia College of Agricultural and Environmental Sciences.
  • Randy Drinkard, UGA Center for Urban Agriculture, The University of Georgia College of Agricultural and Environmental Sciences.

Center Publication Number: 274

The Georgia Gold Medal Garden at Centennial Olympic Park

Source(s): Elizabeth Dickerson


Athletes aren’t the only top performers to win medals for excellence. The Georgia Gold Medal Garden at Centennial Olympic Park displays plants worthy of the coveted “Georgia Gold Medal” designation, an annual award program designed to promote “the best of the best” of Georgia’s horticultural gems.

garden6

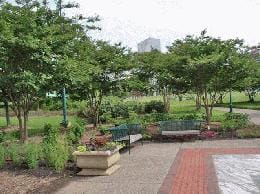
The Garden was established in 2003 as a joint project of the Central Fulton Master Gardeners and Centennial Olympic Park. In addition to beautifying the Park, the Garden serves to promote interest in home gardening by displaying the wide variety of ornamental trees, shrubs, perennials, and annuals that thrive in Georgia’s unique growing conditions. The Garden is centered on the Georgia Agricultural Plaza located at the northern end of the Park. The winning plants are labeled with their common and botanical names. Take-home educational material on these plants is located in the Park’s Visitor’s Center.

The Georgia Gold Medal Plant Program was founded in 1994 by group of horticultural experts including University of Georgia faculty, growers, and retail nursery owners. Every year the selection committee chooses one tree, one shrub, one perennial, and one annual to win the designation. Occasionally an outstanding vine or ground cover is also selected. The plants are judged on such criteria as prolonged seasonal interest, low maintenance requirements, and site adaptability. What better place to display these winners than at a park celebrating the pursuit of excellence!

Directions

The Georgia Gold Medal Garden is located at the northern end of Centennial Olympic Park in downtown Atlanta. The Garden is just across Baker Street from the recently opened Georgia Aquarium. Parking is available in numerous lots around the perimeter of the Park, as well as some metered spaces on the surrounding streets. A large nearby parking lot is the Green Lot of the Georgia World Congress Center. The parking fee for the Green Lot is eight dollars. Directions to Centennial Olympic Park are as follows:

From South of Atlanta

Take I-75/85 north to the Andrew Young International Blvd (Exit 248C). Turn left onto Andrew Young International Blvd. Turn right on Marietta Street. The Green Lot will be on the left, across the street from Embassy Suites.

From North of Atlanta

Take I-75/85 south to Williams Street (Exit 249C). Turn right on Alexander Street. Turn left on Marietta Street. The Green Lot will be on the right, across the street from Embassy Suites.

From West of Atlanta

Take I-20 east to Spring Street (Exit 56B). Turn left onto Spring Street, and then left onto Marietta Street. The Green Lot will be on the left, across the street from Embassy Suites.

From East of Atlanta

Take I-20 west to Spring Street (Exit 56B). Turn right onto Spring Street, then left onto Marietta Street. The Green Lot will be on the left, across the street from Embassy Suites.


Resource(s):

Landscape Plants for Georgia

The Hercules Beetle, A Real Bruiser of a Bug

Source(s): Jim Howell, Ph.D., Entomologist, The University of Georgia


What do the words elephant, rhinoceros, ox and Hercules have in common? Of course, they are all terms for something bulky and powerful. They’re also common names for a group of large, robust beetles in the family Scarabiidae.

herc

Description

Rhinoceros beetles include the largest beetles in the world, and they’re aptly named, because males have a characteristic horn (females have no horn) that extends forward from its pronotum (the body section behind the head). The gargantuan Hercules beetle – Dynastes hercules, from the rain forests of South America – can reach a length of 8 inches. Its been estimated that some species can lift 850 times their own weight – truly a Herculean feat.

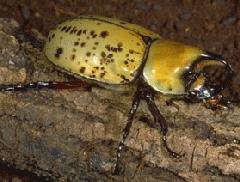
Georgia has several species, but the most common is the eastern Hercules beetle, Dynastes tityus. Specimens range from 1.5 to 2.5 inches long and are usually olive green to tan, with black splotches on the back. The large pronotal horn that extends forward in the males almost meets another horn projecting upward from the head. Adults of this species are the largest beetles in the eastern United States.

Biology and Distribution

The eastern Hercules beetle ranges from southeastern New York to Florida and from Illinois and Indiana to the Gulf of Mexico. Egg laying occurs in the summer, and development may take two to three years. Adults emerge in June and July. Adults are thought to feed mostly on rotten fruits and sap, and the larvae on rotting wood, but relatively little is known of their habits.

This species emits a foul odor to discourage predators but often falls prey to larger insectivores like crows and owls. Adult beetles are attracted to light and are often seen at night around streetlights and the large mercury vapor lamps in shopping centers.

Damage

Rhinoceros beetles do little or no economic damage. They are, instead, a lovely sight to see in our gardens (remember, beauty is in the eye of the beholder). Though these insects may appear foreboding and perhaps even terrifying, they are completely harmless and cannot bite or sting – and, unlike their African namesakes, they cannot gouge you with their horns.


Center Publication Number: 210

Tomato Pests and Problems

Source(s): Robert R Westerfield, College of Agricultural and Environmental Sciences, Extension Horticulturist Diseases and Insects


Although tomatoes are fairly tolerant of insect damage, they will occasionally have trouble from some common garden pests. Whiteflies, hornworms, aphids, leafminers, stinkbugs, loopers, cutworms and mole crickets (south Georgia) have been known to cause problems on tomatoes.

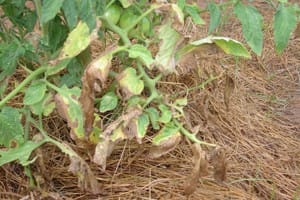
Early Blight on Tomato plant leaves
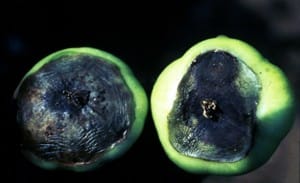
Blossom-end rot on Tomatoes

Insecticidal soap and Bt (Bacillus turingiensis) are used by many organic gardeners with fair success. Repeated applications and scouting for pests frequently are necessary for continued control. A general purpose garden insecticide applied according to label directions will control most of these pests. Use care, however, when spraying because these pesticides will also kill many of the beneficial insects that are protecting your garden naturally.

Diseases and viruses on tomatoes can be a real problem for the home gardener. For detailed information on tomato diseases, please refer to a separate publication available from your local county extension office. Cultural practices discussed earlier in this publication, and improved variety selection, will go a long way in preventing disease problems. It makes more sense to maintain a healthy plant and prevent disease problems, than to rely on spraying multiple chemicals for control.

Blossom-End Rot

Blossom-end rot can be a serious problem with tomatoes. The main symptom is a dark, sunken water-soaked area at the blossom end of the fruit. This physiological disorder is associated with a low concentration of calcium in the fruit. Blossom-end rot is also induced more often when there is drought stress followed by excessive soil moisture; these fluctuations reduce uptake and movement of available calcium.

To manage blossom-end rot:

Maintain the soil pH between 6.2 to 6.8 and supply adequate levels of calcium through applications of dolimitic limestone or gypsum.
Avoid drought stress and extreme moisture fluctuations by using mulch and deep, timely irrigation once or twice a week.
Avoid over fertilizing plants with high ammoniacal nitrogen fertilizers. Excessive nitrogen can depress the uptake of calcium.
Foliar applications of calcium with products such as Blossom End Rot Stop, are only short term fixes and often work poorly because of poor absorption and movement to the fruit area where it is needed.


Resource(s):

Tomato Wilt

Source(s): Willie O Chance


Taming the Dreaded Tomato Wilt

One word strikes fear in the hearts of tomato gardeners. That word is ‘wilt’. Imagine a long season of hard work ending in a yellow, dried up plant with no fruit. How disappointing! To comfort frightened tomato lovers, let me describe the tomato wilts. Though they are not curable, they can sometimes be prevented.

If a tomato appears wilted or stunted in the top of the plant, it may have Tomato spotted wilt virus (TSWV). This is a common tomato disease. It is spread by thrips. Usually the top of the plant looks stunted or wilted but the leaves are not limp as though they had no water. The young leaves may yellow and have red, brown or black discolorations in them. These discolorations may form a ring or circle. The veins on the underside of leaves may thicken and turn purple. Green fruit can have raised or flat rings, semi-circles or circles on them which yellow as the fruit ripens.

Once tomatoes get the disease, there is no control. Some varieties of tomato are resistant to TSWV, although they may not be completely immune. Resistant varieties include Amelia, Stiletto, Bella Rosa, Top Gun, Crista and Muriel (a Roma-type variety). Some resistant varieties may not be as flavorful as some other home garden varieties. Leaving them on the vine until they are fully ripe should help address this issue.

TSWV resistant peppers include Excursion II and Heritage. You can look for these and other TSWV resistant tomatoes and peppers in garden centers. Some seed sources include Harris Seeds (www.harrisseeds.com), Twilley Seed (www.twilleyseed.com), Clifton Seed Company (www.cliftonseed.com/), and Rupp Seeds (www.ruppseeds.com).

Later planted tomatoes may have fewer problems with TSWV. Since this disease over-winters in weeds – destroy weeds to reduce the disease. Weeds of particular concern include dandelion, annual sow thistle, chickweed, buttercup and plantain. For more information see http://craven.ces.ncsu.edu/index.php?page=news&ci=LAWN+14.

Spraying for the thrips that spread TSWV is not effective. Bag and destroy infected plants as quickly as possible early in the season to prevent spread. Late in the season you may want to just let the infected plants finish ripening the fruit they have.

If a tomato is wilting, as though it is running out of water, you may have one of several problems.  At least three diseases can cause this – Fusarium wilt, Bacterial wilt or Southern blight.

A fungus causes Fusarium wilt. It blocks the water conducting tissues in the plant. The leaves yellow and wilt, often starting at the bottom of the plant. This disease can affect just one side or one to several branches of the plant. The plant can die early producing no fruit. If you cut into the plant, the vascular system (just under the surface of the stem) will be brown.

Prevent Fusarium wilt by planting resistant varieties. The ‘F’ after the variety name (like Celebrity VFN) identifies these varieties. Fusarium wilt can survive in the soil. Do not plant tomatoes in infected areas more than once every four years. Rotate tomatoes to a new location each year. Do not plant them in the same area that you planted potatoes, eggplant or pepper last season.

Bacterial wilt causes a rapid wilting and death of the plant. The plant dies so quickly it may not have time to turn yellow. To identify Bacterial wilt, cut through the stem. Bacteria wilt browns the pith or middle of the stem. On bad infections, the pith may be hollow. Cut a short section of the stem and suspend it in a clear glass of water. You can often see a milky, bacterial ooze streaming out of the bottom of the cut stem.

There are no controls or resistant varieties for bacterial wilt. It also attacks peppers, potatoes and eggplant. Carefully dig out infected plants and soil and discard. Do not plant any of these vegetables in this area for at least four years.

Southern blight is a white mold that rots the stem at or near the soil line. The plant is stunted, wilts or dies. Look for the cottony fungus growth and the light brown BB sized fruiting structures of the fungus. The fungus may be at or slightly above or below the soil line. You may not see the white fungus growth if the weather is dry, even though the plant may still be infected.

To manage the disease, bury all plant residues before planting, plant vegetables farther apart, and treat with Terraclor at planting if you have a problem with Southern blight. Do not allow mulch to touch the base of the plant. Keep mulch at least 2 inches away from the stem of the plant. Some people wrap the stem near the soil line with foil to slow this disease. The foil should extend 2 inches above and 2 inches below the soil line.

Tomato wilts can be devastating, but you can learn to live with it. Knowing your enemy helps to remove the fear from dealing with this disease.

For more information:

Call your local Extension Agent at (800) ASK-UGA1 or locate your local Extension Office at http://www.caes.uga.edu/extension/statewide.cfm

Pest Management Handbook (Follow all label recommendations when using any pesticide) – www.ent.uga.edu/pmh/


Resource(s):