Fertilizer Calculations for Attractive, Healthy Lawns

Source(s): Clint Waltz, Extension Turfgrass Specialist, The University of Georgia


Applying the correct amount and type of fertilizer is essential in order to produce an attractive, healthy lawn.

Lawn fertilizer recommendations are generally made in pounds per 1,000 square feet of lawn area.

The square footage of a lawn area can be easily calculated. Simply walk off the length and then the width of the yard, taking 3-foot steps. Multiply the total number of steps in each dimension by 3. Then multiply the length times the width of the yard. Remember to deduct areas such as driveways and home area.

Lawn Fertilizer Calculations

Fertilizer Calculations

If a recommendation requires a complete fertilizer, any complete fertilizer of the same ratio can be used. Example:

  • 10-10-10 (1-1-1 ratio) can be used for 8-8-8.
  • 5-10-15 (1-2-3 ratio) can be used for 7-14-21.

A common recommendation for turfgrasses is to apply 1 pound of nitrogen (N) per 1,000 square feet. To determine how many pounds of fertilizer it would take to supply 1 pound of N, divide the percent nitrogen of the fertilizer into 100. (Note: This is only true when working on a 1,000 square foot basis.)

Examples: How many pounds of (1) 10-10-10; (2) 12-4-8; (3) 5-10-15; and (4) 16-4-8 are needed to apply 1 pound of N per 1,000 square feet.

(1)

100

=

10 pounds of 10-10-10

10

(2)

100

=

8.3 pounds of 12-4-8

12

(3)

100

=

20 pounds of 5-10-15

5

(4)

100

=

6.3 pounds of 16-4-8

16

In cases where you are substituting complete fertilizers of different ratios, the application rate should be based on the amount of that fertilizer needed to supply the recommended amount of nitrogen. Thus, all of the above fertilizers would supply 1 pound of nitrogen at those calculated rates.

This same calculation can be applied to other fertilizer materials.

Examples:

1)

Ammonium nitrate (33% N)

100

=

3 lbs. of ammonium nitrate will supply 1 lb. N

33

(2)

20% superphosphate (P2O5)

100

=

5 lbs. of superphosphate will supply 1 lb. P2O5.

20

These rates can be converted to a per-acre basis by multiplying by 43.5. Per-acre rates can likewise be converted to per-1,000 square feet by dividing by 43.5.

  • 10 pounds of 10-10-10 per 1,000 square feet equals 10 x 43.5 = 435 pounds per acre.
  • 435 pounds of 10-10-10 per acre equals 435 divided by 43.5 = 10 pounds per 1,000 square feet.

Resource(s): Lawns in Georgia

Center Publication Number: 138

Fall Armyworms

Source(s): Will Hudson, Extension Entomologist, The University of Georgia College of Agricultural and Environmental Sciences.


Georgia lawns are under attack. Fall armyworms are chewing their way through turf, leaving destruction in their wake.

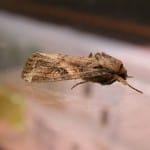
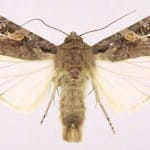
Fall armyworms are the larval or caterpillar stage of a nondescript, small gray moth which overwinters in Florida and the tropics. Each year, storms bring the adult moths north. The females lay masses of up to 700 eggs on just about everything. The eggs are cream-colored at first, but turn darker as the tiny caterpillars get ready to hatch.

The first battalion of females lays eggs in south Georgia. Succeeding generations march up the state, traveling on weather fronts and storms. Fall armyworms can’t overwinter in north Georgia. They may survive a mild winter in Florida and extreme south Georgia. The caterpillars hatch from eggs in two to four days, depending on the temperature. Eggs develop to fully grown larvae in two to four weeks. The larvae burrow into the soil and form pupae. Moths emerge in about 14 days.

The first sign that enemy armyworms are near might be large clusters of birds on your lawn. Look closer at the grass, and you may see several caterpillars munching on the turf blades. Although birds eat armyworm caterpillars, they are no match for hundreds of them on one lawn. When hundreds or thousands of armyworms are present, however, homeowners may opt to kill worms with an insecticide .

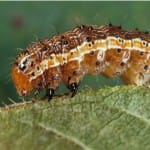
Young armyworms are one-quarter to three-quarters of an inch long. Mature ones are one and a half inches long. They are dark, with several light stripes down the length of the body. The head or “face” has an inverted Y on it. If you suspect your turf is being infiltrated but can’t find the caterpillars on the grass, use a soap flush to bring them to the surface.

Armyworms rarely kill grass, but some lawns may be severely weakened. Feeding damage, coupled with damage from the recent drought, may justify applying insecticides. In turf or pastures, finding five caterpillars per square foot is a signal to start treating for fall armyworms. Carbaryl (Sevin), pyrethroids and other recommended insecticides are effective caterpillar killers.

Products containing Bt (Bacillus thuringiensis) are effective only on little (a half-inch or smaller) worms. Irrigate before treating, to move the caterpillars out of the thatch. Treat in late afternoon, when the caterpillars are likely to begin feeding. If possible, mow before you treat, and then don’t mow for three days after the treatment.

For information on identifying armyworms, contact your local UGA Cooperative Extension office. See the Georgia Pest Management Handbook for more information on controlling fall armyworms.


Resource(s): Insect Pests of Ornamentals

Center Publication Number: 119

Fairy Ring

Source(s): Jacob G Price


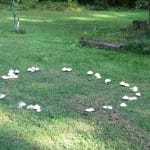
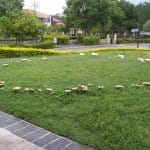
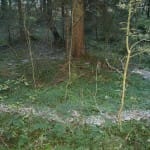
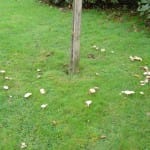
Fairy Ring (Clamp fungi mushrooms and approximately 50 Genera species of fungi) Fairy ring is caused by many types of basidiomycetes most of which produce mushrooms after heavy rains usually during late summer or early fall. Fairy ring can enlarge and cause severe damage or death to turfgrass. All turfgrasses are susceptible.

Disease Cycle

It is not known if the fungus begins by a piece of mycelium or by a spore. The fungus lives by decomposing organic matter in thatch or soil and moving radially outward. White thread-like mycelium from the fungus can grow 6 inches or more into the soil and form a hydrophobic mat which prevents water and nutrients from being absorbed by turfgrass roots. Fairy ring may also inhibit or kill turfgrass by releasing nitrogen from decomposed organic matter, which can cause a lethal accumulation of ammonia. Fairy rings may also produce toxic levels of hydrogen cyanide, directly infect roots, and weaken turf making it venerable to other diseases.

Symptoms

Dark green circular or semi-circular rings appear as a result of the fungus decomposing organic matter and making nitrogen available to the turfgrass. This usually occurs in dry sandy soils with a high quantity of buried organic matter such as stumps, leaves, and branches. Rings can persist for several years and increase in size each year.

Control

Fairy ring can be difficult to control. Core aerate the infected area or spike it with a pitch fork and water thoroughly before sunrise to leach fungal toxins deeper into the soil. Wetting agents will help better distribute the water into the soil. This will help break the hydrophobic mat of mycelium. ProStar 70WP used as labeled will help control Fairy ring if combined with the above practices.


Resource(s):

Center Publication Number: 63

Leaf Spots

Source(s): Laurene Hall


Leaf spot is a common descriptive term applied to a number of diseases affecting the foliage of ornamentals and shade trees. The majority of the leaf spots are caused by a variety of fungal pathogens, but some are caused by bacteria.

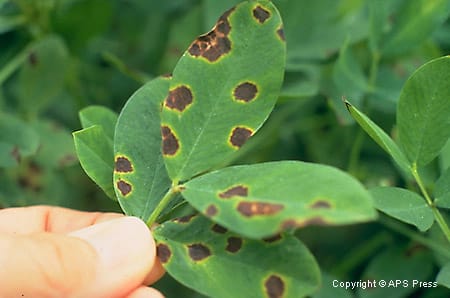
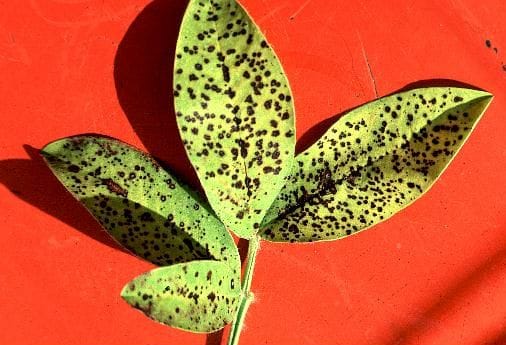
Cercospora arachidicola- Early Leaf Spot (fungus)

Leaf diseases, including rusts and various types of leaf spots are abundant at this time of year. The good news is these foliage diseases usually reduce only the aesthetic value of the affected tree. Occasionally, however, a severe outbreak may cause early leaf drop and dieback of tree parts. With repeated infection, trees become more susceptible to attack by other diseases, insects, and winter injury.
Correct identification is important, because leaf spot diseases can be easily confused with non-disease problems such as leaf scorch or other environmental abnormalities. If in doubt, bring a sample for identification to your County Cooperative Extension Service.

IDENTIFICATION

The primary symptom of a leaf spot disease is spots on foliage. The spots will vary in size and color depending on the plant affected the specific organism involved,and the stage of development. Spots can vary in color from red, purplish-brown, tan, or black. Concentric rings or a dark margin around the spot may be present. Fungal bodies may appear as black dots in the center of the spots. Over time the spots may combine to enlarge to form blotches. Leaves may yellow and drop prematurely.
Leaf rust is another common problem associated with fungal leaf diseases. It is characterized by yellow spots on the upper leaf surface. Close examination reveals small yellow-orange bumps filled with powdery spores on the leaves. As with leaf spot, rust infestations will become apparent in mid to late August.

APPEARANCE

Leptosphaerulina crassiaca- Pepper Spot (bacteria)

Active in late spring to late autumn. The fungal and bacterial agents that cause Leaf diseases often exist naturally in the air and in our soils. The organisms that cause leaf spots survive in fallen infected leaves and twigs. Some may remain in dead twigs on the tree. During wet weather, spores are released which may splash or be windblown onto newly emerging tender leaves where they germinate in the moisture and infect the leaf. Overhead watering late in the day or during the night, heavy dews and close spacing of plants prolong wetting of the leaf surface and provide more opportunities for fungal or bacterial infections.

HOSTS

All species of trees, shrubs, and other ornamental plants can potentially develop leaf spots, but some species are more susceptible than others. It is the presence of the correct factors that will decide whether or not a plant will develop a Leaf disease from causal agents.
Three critical factors or conditions must exist for disease to occur — a SUSCEPTIBLE HOST, a PATHOGEN, and the right combination of POOR ENVIRONMENTAL CONDITIONS. The relationship of these factors is called the DISEASE TRIANGLE.
If only a part of the triangle exists, disease will not occur. Understanding the disease triangle helps us understand why most plants are not affected by the many thousands of diseases that exist.
In some cases, it is important to only acquire specific varieties of plants that exhibit a resistance to diseases that are particularly fatal.

INTEGRATED PEST MANAGEMENT (IPM) CONTROL

Live with the disease. Leaf spots are largely an aesthetic problem as few leaf spots seriously damage the host. Here are some steps to follow that will help control the disease after the infection has started.

  1. Remove infected leaves and dead twigs. The fungi responsible for these diseases survive the winter in leaf debris on the ground. Wet spring weather stimulates spore production. The spores are blown and splashed from the ground to developing leaves. Foliage diseases are cyclic: bad years coincide with long-term moist weather. Raking up and disposing of infected leaves as they drop and pruning out dead twigs can help control the disease by removing spores that can re-infect the new leaves. This will not cure the problem but it can help minimize infections.
  2. Keep foliage dry. Avoid overhead watering. Use soaker hoses or water early in the day so the foliage can dry before night. Watering can also spread the disease by splashing. Prune plants and space plants to allow for good air circulation that promotes rapid drying of foliage.
  3. Keep plants healthy. Since most plants can tolerate some defoliation, keep them in good health so they can rebound quickly. Avoid over fertilization as it promotes a flush of young leaves that are more susceptible to attack by insects and disease.
  4. Replace the plant. For plants that chronically are plagued by leaf spots, gardeners find it more convenient to replace a plant with a different species or a variety that is more resistant or tolerant of disease.

CHEMICAL CONTROLS

Use fungicides wisely. Chemical control is usually not necessary and often unsuccessful if the fungicide is not applied properly. It is usually impractical and not economically feasible for homeowners to spray fungicides on trees. This is because many trees that are affected by leaf diseases are well-established and too large to spray. Additionally, mature trees may naturally develop leaf diseases more frequently as a result of the stress of old age; consequently, if healthy enough, the tree may recover from a leaf disease on its own and without a homeowner’s intervention. In rare cases of severe infection where the size and value of plants make it practical, applications of fungicides may be helpful.

Generally fungicidal control is warranted if:

  1. repeated defoliations occur in one year or subsequent years;
  2. the plant is under stress or in serious decline and showing no signs of recovery with improved environmental conditions;
  3. or there is serious danger of infection spreading rampantly to other uninfected plants.

Sprays will not cure the infection but protect leaves from becoming infected. To be effective, fungicidal sprays must begin at bud break before symptoms are noted and be continued at intervals specified by the label (usually 10-14 days) through the period of spring rains. Spraying after the infection is present will provide little benefit. Recommendations will vary with the disease and fungicide used. It is always good practice to have the disease identified before purchasing a control product. If you think your plant is suffering from a Leaf disease, bring a sample of the leaves on a branch with both healthy and diseased tissue to the Extension Office for proper diagnosis. A fungicide recommendation may be given if the problem cannot be corrected by cultural IPM practices. Always carefully follow label directions when applying chemicals and wear protective clothing if necessary.


Resource(s): Common Landscape Diseases In Georgia

Center Publication Number: 47

Lovebugs

Source(s): Will G. Hudson, Extension Entomologist, The University of Georgia


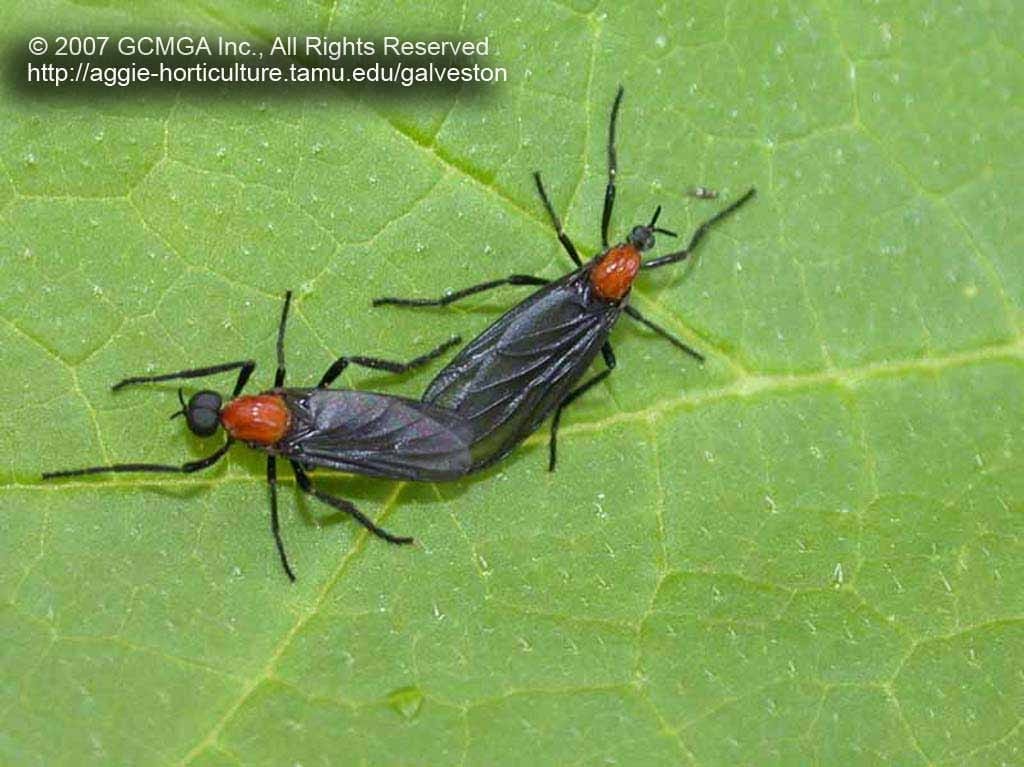
Lovebugs are small black flies with red thoraxes. They are members of the family Bibionidae. Several species of this family are native to the southeast, but lovebugs, Plecia nearctica, are relatively recent invaders from the west.

Southern Louisiana experienced flights of lovebugs during the 1920’s. First reports of their presence in Florida were made in 1947 from Escambia County. Since that time, flights have progressively moved southward. In 1974, specimens were collected in the Homestead area of south Florida. Lovebugs also have moved northward and infest parts of all states bordering the Gulf of Mexico, as well as Georgia and South Carolina.lovebug

Two flights of lovebugs occur each year. The spring flight occurs during late April and May, with a second flight during late August and September. Flights extend over a period of 4 to 5 weeks but individual adults live only 2 – 3 days. Mating takes place almost immediately after emergence.

Female lovebugs lay from 100 to 350 eggs. Larvae (immature stages) feed on decaying plant material, particularly in damp areas. They perform a beneficial function by helping recycle organic matter. After larvae mature, they pupate at the soil surface.

Lovebugs do not sting or bite. They feed on the nectar of various flowers. Adult flights are restricted to daylight hours (generally beginning around 10 AM) and temperatures above 68EF. The adults tend to congregate in open, sunny areas and are attracted to some components of automobile exhaust. At night, lovebugs rest on low-growing vegetation.

Lovebugs are a considerable nuisance to motorists. They congregate along highways and splatter on the windshields and grills of trucks and automobiles. Vision can be obscured, and the bugs can clog radiator fins causing vehicles to overheat. A screen placed in front of the grill will keep the radiator fins from clogging, and will protect the front of the car. Splattered bugs should be washed off as soon as possible. Soaking for several minutes with water makes the mess easier to remove. When the remains are left on a car for several days, the finish may be permanently damaged.

A number of insecticides have been evaluated for effectiveness in controlling lovebug larvae and adults. Most of the insecticides were effective in controlling the adults, and several controlled the immature stages. However, insecticidal control of the lovebug is impractical because infestations occur over such a vast area and adults are so mobile that retreatment would be required every few hours to keep a roadway clear. Most commonly available household insecticides will control adults in confined areas such as entryways and porches. Your county Extension Agent can help with the choice of materials for this purpose.

Lovebugs are not without enemies in nature. Larvae are found in extremely high numbers in pastures and other grassy areas, and make attractive prey for certain bird predators including robins and quail. Laboratory studies using invertebrate predators found in lovebug-infested pastures indicated they were voracious predators also. These included earwigs, beetle larvae and a centipede.

Lovebug populations may vary considerably from year to year, and some years are much worse than others. The reasons for these fluctuations are not known.


Center Publication Number: 197

Manage Phosphorus Carefully in Lawns

Source(s): Clint Waltz, Extension Turfgrass Specialist, The University of Georgia


From time to time, concerned citizens try to pressure lawmakers to eliminate phosphorus from lawn fertilizers. They mean well.They’re looking out for our water resources.

Unfortunately, they don’t understand how phosphorus enters aquatic systems or its role in plants and its behavior in soil systems. They fail to understand, too, that phosphorus is an essential nutrient. It’s a “must have” for plants to grow.

Soil phosphorus levels aren’t static, either. Low levels of phosphorus have to be applied each year to maintain proper soil nutritional balances.

Besides, applying phosphorus carefully while using “Best Management Practices” can greatly ease the environmental concerns.

Especially here

You have to apply phosphorus in the Southeast. Because it’s hotter and wetter here with a longer growing season than in most of the country, Southeastern soils have less phosphorus than in other regions.

And plants can’t do without it. It’s the second-most essential element, behind nitrogen, for plants’ growth. And plant roots readily extract it from the soil.

Phosphorus is in such high demand because plants use it in the metabolic processes of energy transfer. So it has to be added back to the soil for plants to keep growing well.

Too much of a good thing

In excess amounts, though, phosphorus can harm the environment. That’s especially true when it runs off into streams, ponds or lakes.

Aquatic plant life must have a balance of nutrients. But high phosphorus levels stimulate excessive growth of aquatic plants and algae.

The problem is that when this excessive plant life dies and decays, the process takes oxygen from the water. And when oxygen levels drop, fish and other aquatic animals die.

Pollution solution

It’s important to remember that the way most phosphorus reaches water bodies is in soil erosion. Nonpoint-source pollution of water bodies can be greatly reduced by managing soil erosion.

Of the phosphorus lost to lakes and streams through soil erosion, 75 percent to 90 percent is fixed to soil and organic matter. This fixed phosphorus has been shown to contribute to the growth of algae.

Turf grasses, which need phosphorus to grow well, can help the environment. Turf will greatly slow the flow of water across the soil surface and effectively reduce soil erosion.

A cover of turf will allow water to gradually infiltrate into soil, too. Once soluble phosphorus enters the soil, it’s quickly bound to soil solids and organic matter and becomes relatively harmless.

BMP’s

Nonpoint-source pollution from phosphorus can best be controlled by using best management practices.

Soil testing is one BMP that can help. But you have to use proper soil-sampling techniques. Your county University of Georgia Extension office can help you with this.

In general, it’s best to apply phosphorus according to soil test results. There are exceptions. A fertilizer with low rates of phosphorus may help a turf grass that’s stressed by cold or wet soil, for instance, or when root-rotting diseases have damaged the roots.

A second BMP is the use of fertilizers with low phosphorus levels. Many modern lawn fertilizers have been engineered to meet the needs of most turf grasses.

It’s not uncommon to see products with analyses like 29-3-4 or 27-4-4, in which the content is around 1 part phosphorus for every 8 to 11 parts nitrogen. Zero-analysis phosphorus fertilizers are also available.

A third BMP to keep phosphorus out of water resources is to not apply fertilizer to hard surfaces such as driveways, sidewalks and streets.

Remember, when water-soluble phosphorus contacts soil and organic matter, it quickly becomes immobile in the soil. So just sweeping or power blowing fertilizer that lands on hard surfaces can greatly reduce the amount of phosphorus moving through storm-water systems into reservoirs.


Resource(s): Lawns in Georgia
Center Publication Number: 152

Material to Compost

Source(s): Gary R Peiffer

Everything of an organic nature will compost, but not everything belongs in your home compost pile.

The following is a list of compostable materials:

Food

Other

Apples and apple peels

Cucumbers

Algae (pond weeds)

Leather waste and dust

Artichoke leaves

Egg shells (crushed)

Apple pomace (cider press waste)

Leaf mold

Asparagus bottoms

Grapes

Blood meal

Leaves

Bananas and peels

Grapefruit

Bone meal

Muck (marsh and swamp mud)

Beans

Lettuce

Corn stalks

Peanut hulls

Beet tops

Lemons

Cotton rags

Peat moss

Berries

Melons

Feathers

Pine needles (chopped)

Bread

Onions

Felt waste

Rope

Broccoli stalks

Oats

Flowers

Sawdust

Brussel Sprouts

Pears

Garden wastes (trimmings, plant remains)

Seaweed

Buckwheat hulls

Pineapple

Grape plant waste

Soil

Cabbage stalks and outer leaves

Potatoes

Granite dust

Straw

Carrot tops and scrapings

Pumpkins

Grass

String

Celery tops

Squashes

Hair

Weeds

Citrus rinds

Tea leaves and bags

Hay

Wood ash

Coffee grounds (and filters)

Turnips

Hops, spent

Wool rags

Corn cobs (chopped

Zucchini


Do not compost meats, fats and dairy products including:

Butter

Lard

Salad dressing

Bones

Mayonnaise

Sour cream

Cheese

Meat scraps

Vegetable oil

Chicken

Milk

Yogurt

Fish scraps

Peanut Butter


Common Organic Wastes You Can Compost (from around the community)

Coffee wastes – every restaurant has coffee grounds. Ask if they will save their grounds for you to pick up.

Leaves – you’ll find these bagged and waiting at neighbor’s curbside.

Food scraps – minus meat, bones, dairy or fatty foods. Ask your greengrocer or supermarket for their wastes.

Sawdust – don’t use any kind of treated lumber as it may contain toxic material.

Grass Clippings – are plentiful; landscapers are always trying to get rid of these.

Wood chips – a tree service may deliver a load if you are willing to take a large uantity. Use first on garden paths, then compost it after the initial decay.

Hair – very high in nitrogen


Non-Compostable Organic Materials

Everything of an organic nature will compost, but not everything belongs in your home compost pile. Some materials that create problems include:

Certain grasses with a rhizomatous root system, such as crabgrass. These may not be killed by the heat of decomposition and can choke out other plants when compost is used in the garden.

Plants infected with a disease or a severe insect attack where eggs could be preserved or where the insects themselves could survive in spite of the compost pile’s heat (examples are apple scab, aphids, tent caterpillars….).

Cat and dog manures, which can contain pathogens. These pathogens are not always killed in the heat of the compost pile.

Plants which take too long to break down, such as rhododendron and English Laurel leaves.

Several types of compost bins can be seen at the Fernbank Science Center Compost Garden, 186 Heaton Park Drive, Atlanta, GA 30307. The DeKalb County Extension Service has several compost demonstration sites throughout the county. 


Resource(s): Composting and Mulching

Center Publication Number: 20

Menacing Mice

Source(s): Jim Howell, Ph.D., Entomologist, The University of Georgia


House mice are one of the most troublesome and economically important pests in the United States. They consume food meant for human beings, pets and other animals; contaminate areas with their feces and urine; cause considerable damage to structures and property; and spread numerous diseases.

Identificationmouse

The house mouse (Mus musculus) is a small, slender, grayish-to-brown rodent having large ears, small black eyes and a slightly pointed nose. A house mouse weighs 1/2 to 4/5 ounce and is approximately 5 to 7 inches long, including the 3- to 4-inch tail. A house mouse lives about one year and reaches sexual maturity in 6 weeks.

Biology

House mice are found in and around homes and commercial structures as well as in open fields and agricultural lands. They came to the United States with the early Colonists and rapidly spread across the entire country.

They are generalist feeders but prefer seeds and grain. They also love foods high in fats, sugar and proteins, like bacon, chocolate candies and butter.

Mice are nibblers and though they may eat only about 3 grams of food a day, they destroy much more food than they consume. A single female may have up to five to ten litters a year, each litter having about five to six young. With that in mind, a single fertilized female can result in a large indoor population in a relatively short period of time.

Nests consist of fibrous material like cloth, rags or paper, usually in the form of a ball about 4 to 6 inches in diameter.

Mice are found in virtually any sheltered location. Indoors, they may be in a hole in the woodwork, or beneath some protective cover. Outside, they may nest in animal burrows, in collected plant material or beneath debris. When mice are present in significant numbers, their infestation is announced by a characteristic musty odor.

They are nocturnal and aren’t often seen by the homeowner, but their droppings, black pellets about 1/8 to 1/4 inch long and tapering on both ends, is a sure indication of their presence.

Damage

The house mouse is considered one of the most irksome and economically important pests in the United States. It gnaws on electrical wiring and may cause fires or failure to appliances; it pollutes clothes, food, furniture and other items with its droppings and urine; and it can spread disease when its waste products contaminate our food.

Control

The homeowner has a few options, including traps, rodenticides (poisons), and calling a licensed pest control company.

When populations are small, traps are the preferred method. They are less of a hazard for pets and children. and the mice can be removed promptly without the accompanying odor of animals dying in wall spaces and other inaccessible places. Snap traps are readily available at most grocery and hardware stores. Baiting with bacon or peanut butter gives excellent results.

Rodenticides should be used as a last resort because of hazards to children and pets. Extreme care should be taken to position these products in areas inaccessible to other animals and children.


Center Publication Number: 243

Microclimate

Source(s): Louise Weyer, Program Assistant, Northwest District – Cobb County, College of Agricultural and Environmental Sciences.


We are familiar with the saying, “Everyone talks about the weather, but nobody does anything about it.” Weather includes temperature, radiation, light, precipitation, fog, humidity, and wind. Surprisingly, we can modify some of these factors.

Plants undergo climatic influences on three different scales. The macroclimate encompasses large areas with fairly uniform conditions which are influenced by air masses moving over the earth’s surface. These air masses are modified by latitude, mountain ranges, bodies of water and the seasons. The mesoclimate is the local weather in a neighborhood, large park, farm or woods. It is modified by the local terrain, bodies of water, wind, cloud cover and land cover. The microclimate is the condition surrounding individual plants and/or plantings. If we study the dynamics of the mesoclimate and the microclimate, structural and cultural practices can be employed to modify them, making it possible to extend plant distribution and performance.

CLIMATE AND PLANTS

Both temperature and precipitation are dominated by macroclimate conditions. They are the most common limiting climatic factors in plant distribution and performance. It is important to understand the effects of temperature on plants and the factors that influence temperatures in the landscape. Excess precipitation and moisture can be just as damaging to plants as drought. With an understanding of these factors, we can employ cultural practices to use microclimates to advantage.

Sunlight is required for photosynthesis to convert carbon dioxide and water into carbohydrates and oxygen to sustain plant growth and health. High or low temperatures, low carbon dioxide concentrations and water deficits or excesses, can disturb the plant’s metabolism. High temperatures decrease photosynthesis and increase respiration (the breakdown of plant cells producing carbon dioxide). A soil-moisture deficiency can result in leaf-water deficits that cause the stomata (leaf pores) to close limiting the exchange of carbon dioxide. In addition to slowing photosynthesis, water deficits also cause leaves to wilt, to be smaller in size and to shed earlier. Excess water will fill the pore spaces in the soil, replacing the air. Since roots cannot survive in water-saturated soil, the plant will decline or die.

Low temperatures become a problem during the critical periods of spring, autumn, and the coldest part of winter causing frost injury and dieback. Leaves, leaf buds, flower buds are least resistant to low temperatures. Roots are less resistant to freezing than over wintering stems, but usually are adequately insulated by the soil. Minimum temperatures occurring after a warm period can be especially harmful. The fluctuating temperatures cause the bark to split and disrupt the flow of nutrients from the roots.

All plants will be injured or killed above maximum temperatures. Injury varies with species and the stage of plant development. Most plants exposed to temperatures of 104º – 113ºF for 4 hours will show signs of desiccation, summer branch drop, and begin to suffer root death. The soil one inch in from the side of a one gallon container exposed to afternoon sun will reach 110º – 115ºF and the roots on that side of the plant will die.

Trees alter the microclimate of a site. Heat rays are reflected off the surface of leaves. For example: if the air temperature is 84ºF, the surface temperature could be as high as 108ºF. If the area is planted with trees, the surface temperature may drop to 88ºF.

Also, temperature is modified by the reflective qualities of the surface covering in nonshaded areas. Asphalt and concrete absorb greater amounts of solar heat than turf and mulch, and these surfaces radiate more heat during the day and into the evening.

Since cold air is denser than warm air, it flows down a slope, accumulates in the lowest area creating a frost pocket and displaces the warmer air upwards. Plants grown in a frost pocket may have cold damage. They will emerge and bloom later than those planted elsewhere in the garden. Soil temperatures matter most if you are trying to encourage earlier blooms.

Wind affects plant growth by increasing transpiration (evaporation of water) and carbon dioxide uptake and decreasing shoot elongation. High winds can deform plants and seriously damage them. Changes in wind speed are accompanied by changes in air temperature and humidity.

Water runoff from paved surfaces, buildings and impervious subsoil strata accumulates in the pore spaces between soil particles reducing the oxygen, which is required for healthy roots to keep the plants supplied with sufficient nutrients for photosynthesis. Also, compaction caused by high usage decreases soil pore space, affects drainage and impairs root growth.

ANALYZING MICROCLIMATES

Do a microclimate analysis of your property. (1) Look at seasonal solar radiation patterns. Which areas are expose to direct solar radiation? (2) Which areas are shaded at different times of the day, of the year? (3) Analyze reflective qualities of surface materials in nonshaded or exposed areas.(4) Look at how the wind flows across your property, around structures, down corridors of buildings. (5) What is the direction of the prevailing wind? (6) Locate wet and dry areas, and the flow of rainwater.

Prepare a map of the property indicating the various climatic conditions. Highlight the areas that have different microclimate conditions. This will help determine various plant habitats and horticultural opportunities.

MAXIMIZING MICROCLIMATES

Having identified the various microclimates, one is able to plan and make changes to the landscape. Awareness of how temperature and wind affect plant growth will facilitate selecting plants that are suited for the intended site. Remember to consider the plant’s mature size when selecting plants.

Study the appearance, health, and growth of existing plants. If there appear to be problems, perhaps transplanting to a different microclimate site will revitalize the plant.

Change the location of containers and planters to protect plants from excessive heat and root loss.

Enjoy earlier blooms by placing plants next to paving or structures that radiate heat providing a few degrees of extra warmth. Extend the bloom season by planting in both warm and cool spots. Also a plant can be espaliered against a south wall to take advantage of stored heat and reduced radiation.

Two to three inches of mulch will cool the soil during the summer and retain moisture. On the other hand, several inches of mulch will protect plants from cold during the winter.

Use structural elements – buildings, fences, stonewalls – and landscape design elements – trees, windbreaks, berms – to limit sunlight and increase shade, and modify air movement. Air and ground temperatures will be changed by several degrees. On the other hand, removal of these elements will increase sunlight and decrease shade. Over the years as the trees and windbreaks mature, the microclimate will change offering new landscaping opportunities.

Wind is controlled to a distance of 2 to 5 times the height of the barrier in front of a wind obstruction and from 10 to 15 times the height leeward of such a barrier (30-foot high windscreen may reduce wind velocities for 100 yards in front and 300 yards downwind). Wind can be guided to the desired location by the angle of the planting. Shelterbelts are most effective when placed perpendicular to the prevailing winds.

A row of closely planted trees or shrubs, a solid fence, or a long building placed at right angles to a slope can act as a barrier to the flow of cool air but will create a cold pocket on the downward slope side. Plant on the leeward (downside) side.

Develop a low maintenance landscape feature by directing runoff water into a rain garden, which is an area in the landscape that captures a shallow amount of water and holds it for a short period of time, and allows it to seep slowly into the ground. Feature a mix of drought tolerant, wet tolerant and hardy plants such as ornamental grasses, shrubs and self-seeding perennials in this area. Or utilize wet areas for a display of moisture loving plants. If this is not part of your landscape design, install adequate drainage.

Consider macroclimate shifts in weather patterns from wet to drought. Utilize the property map to include xeriscaping techniques and irrigation to compensate for short rainfall.

In addition to enhancing the landscape, modifications can be used to decrease energy costs associated with the interior comfort of the home. Proper placement of trees shade the home, channel air movement and create cooler temperatures near the home in the summertime. Deciduous trees permit solar radiation, effectively lowering heating costs. Also, windbreaks and fences deflect cold winds. Vines grown on masonry walls insulate against cold winter winds and hot summer sun. The outer surface temperature difference may be 8ºF, and the indoor difference as much as 20ºF.


Resource(s):

  • Arboriculture, Integrated Management of Landscape Trees, Shrubs, and Vines, Richard W. Harris, Regents/Prentice Hall, Englewood Cliffs, N.J.
  • Nature’s Design, Carol A. Smyser, Rodale Press, Emmaus, PN
  • “Managing Microclimates,” Renee Beaulieu, Fine Gardening, July/Aug. 1996
  • Enviroscaping to Conserve Energy: A Guide to Microclimate Modification,” A. W. Meerow and R. J. Black, Cooperative Extension Service, University of Florida
  • Tree Maintenance, P. P. Pirone, Oxford University Press, New York, NY

Center Publication Number: 61
Mildew

Source(s): Jacob G Price


Many garden plants are affected by mildew, both woody and herbaceous.

DESCRIPTION

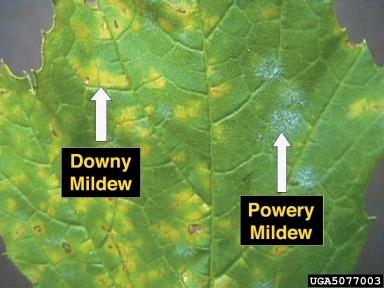
Downy (False Mildew): Grows from within the plant and sends branches out through the plants stomata to create pale patches on the leaves. It is a fungal disease with a white to purple, downy growth, usually on the underside of leaves and along stems which turns black with age. Is encouraged by cool, wet nights, and warm, humid days. Overwinters on diseased plant refuse in the soil.

Powdery: Lives on the leaf surface. Sends out hollow tubes into the plant to suck out nutrients. It is a fungal disease with a white to grayish powdery growth, usually on the upper surfaces of leaves. Small black dots appear and produce spores that are blown by wind to infect new plants. Worst in hot,dry weather with cool nights (Night: 61oF with relative humidity 95-99%; Day: 81oF with relative humidity 40-70% Powdery growth is viable two days after infection. Growth is enhanced by low light levels that accompany cloudy or foggy periods. Cannot survive if there is a film of water on leaves or stems.

DETECTION

Downy – The best time to examine plants is early in the morning while dew is on the leaves. The first symptom is sunken, water-soaked spots on leaves, either yellowish or grayish in color. Spots later become covered with a downy purplish mold growth which may eventually be blackened by a second fungus.

Powdery – Starts on young leaves as raised blister-like areas that cause the leaves to curl, exposing lower surface. Infected leaves become covered with a grayish-white powdery fungus growth. Disease prefers young, succulent growth; mature tissue is usually not affected. Unopened flower buds may be white with mildew and never open. Leaves will become brown and shrivel when mildew is extensive. Fruits ripen prematurely and have poor texture and flavor.

CONTROL

Downyboth types

  1. Plant resistant cultivars.
  2. Prune to improve air circulation and remove infected branches.
  3. Use a three -year rotation.

Powdery

  1. Prune or stake to improve air circulation.
  2. Dispose of infected plants before spores form.
  3. Apply a weekly water wash during periods of active growth. Wash both upper and under surfaces of the leaves. Do in early afternoon because that is when spores are most likely to be moving on air currents.
  4. Apply sulphur weekly to susceptible plants. Be certain to cover the tops and underside of leaves, paying special attention to the growing tips. It is best to begin applications early in the season, since sulfur is more effective at preventing disease than at curing it. If the temperature exceeds 85oF, do not apply sulfur since it may burn the leaves.
  5. Apply lime sulfur to dormant plants to kill overwintering spores lodged in unopened buds or on canes.
  6. Treat with Clearys 3336, Banner Maxx, Bayleton or Mancozeb.

Resource(s): Common Landscape Diseases In Georgia

Center Publication Number: 28