Controlling Argentine Ants in the House

Source(s): Willie O Chance


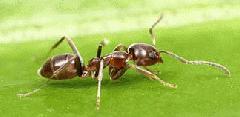
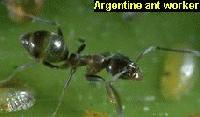
Argentine ants are busy, 1/8 inch long ants which are often found crawling in long, well-organized trails looking for food. They will go up tree trunks and into buildings. One Argentine ant colony can consist of hundreds of thousands of ants and one or more queens. They have few pests and are hard to kill. They are very good at finding food, so good in fact that they can keep fire ants from establishing themselves in an area.

ar1 ar2

Argentine ants do not bite or sting, but often come inside searching for moisture or food. They like sweet things like soft drinks and syrup.

Argentine ants like to make their nests in mulched beds or potted plants. Ants in mulched beds are harder to kill. They can live in walls in the winter. It is hard to get insecticides to these ants. Even pest control companies have trouble killing these ants. Is this too much bad news so far? Well, the good news is that there are some things you can do to try to control them.

A single Argentine ant looks for a food source. Once it finds it, the ant tells the other ants and the colony forms a trail to the food source. To control these ants, remove food sources and try to keep ants outside. Spraying ant trails inside will do little to control them and may even make them worse.

Thoroughly empty and rinse all containers (e.g., soda cans) before putting them in the trash or recycle can. Seal stored food in insect resistant containers. Thoroughly clean cabinets. Do not let garbage sit out for a long time. Seal it up well in plastic bags.

Control insects on ornamental plants that create honey dew that the ants eat. Honey dew is a sticky sweet substance put out by aphids, scales and whiteflies. Select plants that are not susceptible to these pests. Clean up all dead insects on window sills and on floors. Ants can use them as food.

Keep all vegetation (limbs, leaves and branches) from touching the outside of your home. Ants can come in this way. Seal any entry points you see. Check potted plants to make certain no ants are nesting in them.

Do not over-water mulched areas. Let them dry slightly between waterings. Water once a week with one inch of water or twice a week with three-quarter inches of water.

Do not use too much mulch. Keep it two to four inches deep. Try to avoid mulched beds around the house. Pull the mulch away from the house a foot or so. Treat this narrow strip with insecticide.

Once you have done these things, you can try spraying points of entry around the house. Treat window sills and door thresholds. With severe infestations, you may want to spray a perimeter around the house. Spray a couple of feet up on the house and four to six-foot of the ground next to the house. You can use Permethrin, Demon or others or have a pest control company do this for you. Treat any trails you see. Sprays will help to keep the ants out but will not kill the colony.

One of the best ways to kill the ants is to use baits. Look for ant baits containing slow acting toxins like fipronil, hydramethylnon, and sulfluramid. The ants will feed on them and take them back to the nest. This will take some time but should kill the colony. Some of these chemicals may be labeled as fire ant baits and these should work for Argentine ants outside the home. Apply baits when ants are out and actively looking for food.

A new chemical may be a great way to control the ants long- term. You can try treating mulched beds or the entire lawn with Over and Out. This product contains the active ingredient fipronil. It is labeled for fire ants but should also give control of Argentine ants. Over and Out controls fire ants for up to one growing season. I do not know exactly how long to expect this chemical to control Argentine ants, but I would expect similar control for Argentine ants as for fire ants.

Be patient and persistent. Read and follow all label directions on the pesticide package. If at first you do not succeed, try again. You cannot expect to kill all the ants in the yard, but you should be able to keep them out of your house.


Center Publication Number: 87

Care of Holiday Plants

Source(s): Willie Chance, UGA Extension Agent, Houston County.


Live Holiday gift plants require care to bloom and maintain health.

2605-red-amaryllis-planter-L

Poinsettias need a daytime temperature of 65 to70 degrees Fahrenheit. Reduce this to low 60’s at night. Put poinsettias in bright light but never in full sun. Select areas where the plant will not dry out. If placed in a window, remove it at night so it will not get too cold. Let the soil surface dry slightly between waterings and then water until it runs out of the bottom of the pot.

Poinsettias are very sensitive to environment. Drafts, cold, heat, dim light, low humidity or improper watering may cause these plants to wilt or shed leaves and flowers.

Amaryllis require bright light, cool conditions and moist soils like other flowering plants. Bulbs bloom four to six weeks after planting. Individual flowers last three to four days but a plant may have two flower stalks with three to four flowers per stalk.

To re-bloom an amaryllis, let the leaves grow normally in a well-lit warm location. Put them outside in the spring and summer. Fertilize and water as needed. Once leaves begin to die back, slowly and eventually stop watering. Store the bulb in a cool, dry place for four to eight weeks before beginning growth again by watering.

Holiday Cacti come in three types which bloom at different times of the year. Depending on type, they flower at Thanksgiving, Christmas or Easter. All three require bright light, well-drained soils and moderate moisture levels. South facing windows are good places for holiday cacti. After bloom, remove faded flowers and fertilize. They can be grown outside in spring and summer in shady locations. Stem pieces of three segments or more root easily.

Holiday cacti flower based on day length and temperature so they should bloom at the same time every year. Strong artificial lighting and high temperatures can delay or prevent bloom. You may need to restrict very bright artificial lights at night during the time of blossom development (September and October for Thanksgiving and Christmas Cacti or February and March for Easter Cacti). Thanksgiving and Christmas cacti need 12 to 14 hours of uninterrupted dark during the night for about six weeks to develop blooms. During bloom development keep temperatures cool – 55 to 65 degrees at night and 5 to 10 degrees higher in the day. Keep the plants slightly on the dry side. Return slowly to normal watering after flower buds develop. Sudden changes in environment may cause the plant to shed flower buds.


Reviewer(s):

  • Allison Perkins, Bartow County Agent, The University of Georgia.
  • Paul Pugliese, Cherokee County Agent, The University of Georgia.
  • Mary Carol Sheffield, Paulding County Agent, The University of Georgia.

Center Publication Number: 229

Blossom-End Rot of Tomatoes

Source(s): Willie O. Chance, UGA College of Agricultural and Environmental Sciences Extension Agent, Houston County.


Many home gardeners have been disappointed and frustrated when they picked that first ripe tomato and turned it over to find blossom-end rot.

blossomendrot

Blossom end rot (BER) usually shows up first as a small dark or water soaked area on the bottom of the fruit. The spot can get larger until it covers the entire bottom half of the fruit or it may remain just a small spot. Affected fruit may begin to ripen earlier than other fruit. If the area gets larger it gets darker and sinks in. Blossom end rot is bad on tomatoes but it also affects peppers, eggplants and some melons.

Blossom end rot is caused by a calcium deficiency. Calcium is an essential nutrient for plants and for some reason; the tomato did not get enough calcium as it was growing.

Several things may cause BER. Calcium levels in the soil may be low. Since calcium moves into the plant with water, BER is worse in very wet or dry years. Other causes are poor rooting, improper watering, low soil pH, or using too much ammonia- containing fertilizer.

The main culprit is generally dry soils. It is especially important to keep plants well watered during early fruit development. Most of the calcium a tomato has enters the tomato fruit before it is the size of a quarter. During this early development, dry soils will cause BER, which shows up in the fruit near harvest time.

For these reasons, BER is better prevented than cured. Prevent it with these tips.

  • Before planting, soil sample and lime to bring the pH up to 6.0. Add lime one to three months before planting.
  • Add gypsum (calcium sulfate – one cup per plant or one to two pounds per 100 square feet) to the soil before planting. Gypsum works more quickly than lime to supply calcium to the plant. To find gypsum, call farm supply dealers or feed and seed and hardware stores.
  • Plant in soils that are well drained and tilled at least eight to twelve inches deep.
  • Water established plants with three-quarter inches of water twice a week. Do not waterlog plants or let them suffer from drought, especially early in the development of the tomato fruits. Water plants deeply and then let the soil dry slightly before watering again.
  • Mulch around plants to keep the soil from drying out. Pull mulch slightly away from the main stem of the plant.
  • Side dress tomatoes once every five weeks if necessary. Fertilizers can supply nitrogen in two forms – ammonium and nitrate. Use calcium nitrate, 5-10-15, 10-10-10 or similar fertilizers and look for fertilizers that have a higher percentage of nitrate nitrogen and lower levels of ammonium nitrogen. Read the fertilizer label to find this information. This is especially important when fruit are small. Try to wait until tomatoes are the size of a quarter before you side dress.
  • Be careful when hoeing or cultivating. Damaged roots will not take up calcium well. Do not heavily prune tomatoes. This can make them more susceptible to BER.
  • Once you have BER there is nothing you can do for affected fruits. Use these practices to prevent BER in new fruits. Often the first tomatoes are affected and later fruits are okay. In other words – the condition may get better as the plant matures.
  • There are some calcium-containing sprays for BER. Sprays applied to the leaves do not control BER well because calcium usually enters the plant through the roots and should be applied to the soil. Calcium is not moved around in the plant well and may not make it into the fruit if we apply it to the leaves. If you want to treat affected plants with calcium, pour solutions of calcium chloride or the Blossom End Rot sprays around the tomato plant’s roots. The plant can take up calcium more readily this way.
  • Another option is to sprinkle one-half cup of gypsum around the plant and water it in. Expect slower results using gypsum as compared to treating the soil with calcium chloride. If you cannot find gypsum – you can use lime but expect even slower results.

Blossom end rot is a disappointing beginning to the tomato harvest season. Fortunately, it is usually less of a problem as the year progresses. Use these tips to prevent this problem next year and to perhaps help the plants that you have now.


Resource(s): Vegetable Gardening in Georgia

Center Publication Number: 58

Azaleas’ Leaves Turning Yellow and Dropping?

Source(s): Willie O Chance


As we head toward the end of the year, gardeners want their landscapes to look their best. But sometimes, in spite of our best efforts, the leaves on certain evergreen plants turn yellow and unsightly! This is especially true of azaleas, gardenias and hollies.

Azaleas' Leaves Turning Yellow?

Why Are My Azaleas’ Leaves Turning Yellow?

One of the main questions at this time of the year is – “Why are so many of the leaves on my azalea plants turning yellow?” This year, it appears many azalea plants have more yellow leaves than green leaves! Usually we see a few older leaves yellowing with the younger leaves remaining green. However, in some cases, many leaves are turning yellow. Why is this condition so bad this year?

Remember, a plant losing some of its leaves is a normal process. The older leaves die and younger ones replace them. You would only be concerned if most of the leaves are yellow.

The traditional reply is that the plants have run out of fertilizer – particularly nitrogen. Nitrogen-deficient azaleas will shed older leaves. This is certainly a possible cause. And why did this happen? Azaleas may have missed their last fertilization in July or August or just never took up the fertilizer available.

Don’t worry about these plants. They should bloom normally in the spring. Fertilize them after the danger of frost is past – about April 1. Do not fertilize them now. This may cause the plant to start growing again. And this new growth, in turn, will be cold-tender and may be burned back by our winter weather.

Our unusual weather may be causing a problem with azaleas. Azaleas are a Southern favorite, but they are somewhat temperamental. Their fine fibrous roots like well-drained but moist soils. This year’s summer drought, followed by a wet autumn, may have damaged these roots. This is especially a problem in areas not suited for growing azaleas. Azaleas do not like wet or very dry soils or full sun locations.

There is not much we can do about this now. Fertilizing now will not fix this problem, and in fact, could further complicate the situation. Proper planting and maintenance will help prevent this problem in the future.

Plant azaleas in well-drained soils in partially shaded locations. The shade provided by planting them next to a building is not always enough shade. If they must be planted in the sun, they prefer the morning sun. Plant azaleas in slightly raised beds, if possible. Plant them no deeper than they originally grew.

The roots may be pot-bound when you buy them. This is when the roots are tightly matted together. Pot-bound roots form a tough ball that the roots may never grow out of. Cut the root ball or break the roots down four sides of the root ball if the plant is pot bound. Spread the roots out as you add soil.

Also, plant azaleas in beds, if possible, and not individual holes dug in the ground. Till the area well. You do not need to add compost to the soil. Put a three-inch mulch over the entire bed after planting. Water the soil well to settle the roots. Plant in fall and winter for best results.

Proper planting and watering are critical steps in assuring success in growing azaleas. Azaleas and other shrubs must be watered for best results. This is especially true during the first year. Water the soil so as it keeps it moist but not wet for the first six months. After that, water when soil dries out, wetting the soil to a depth of twelve inches. Water three-quarter to one inch a week during drought conditions. After plants are established, do not water every day or every other day! Frequent watering can kill plants.

Two other leaf problems with azaleas are: 1)iron deficiency and 2) lace bugs. An iron deficient azalea will have yellow or white younger leaves. The leaf will be yellow with green veins. Use a soil applied iron fertilizer at the labeled rate. If the iron deficiency returns quickly or repeatedly, the azalea may have root injury or the soil pH may be too high.

Lace bugs make the leaves look speckled or silvery. The underside of the leaves will be brown speckled. Wait until March and treat the plants with Orthene or other recommended insecticides. Read and follow all label directions.

Enter the New Year with healthy azaleas. Azaleas may look sad and unsightly now, but they can return to healthy plants with proper care.


Center Publication Number: 230

Look at this too from our friends in Cobb County: Azalea Leaves Turning Yellow, Dropping?

Argentine Ants

Source(s): Willie Chance


When outdoor temperatures get hotter and conditions get drier, humans aren’t the only ones coming indoors. Argentine ants are marching inside, too.

ant1

If you have them, you definitely know it. They travel in trails into kitchens, offices and bathrooms searching for food and water.

These pests are usually Argentine ants which are small, just an eighth of an inch long. Native to South America, they were accidentally introduced into the United States more than 100 years ago in New Orleans coffee shipments.

They are one of the most difficult-to-control ants in the U.S. A single colony can consist of hundreds of thousands of ants.

University of Georgia entomologists say you can reduce your chances of having these ants in your home. To discourage them, rinse all drink cans before placing them into the garbage or recycling bin and by empty garbage containers often.

And, don’t leave any food or drinks out. Argentine ants love sugar and will show up to dine on it, literally by the thousands, overnight.

UGA experts don’t recommend using over-the-counter insect killer. You can use spray products for the ‘revenge factor,’ but you’ll never get rid of them all. You have to hit the nest, where all the queens are.

A bait that can be used indoors is Terro bait. It’s a liquid you can buy at most home-improvement and lawn-and-garden stores. Another effective bait is Combat Ant-Killing Gel. Use the product’s syringe and place small dabs anyplace you see ants.

If you reach a point of desperation, UGA entomologists say call a professional pest control company for help.


Center Publication Number: 266

Fall Interseeding and Overseeding: Not One and the Same

Photo by Wayne Hanna, Professor, UGA Crop & Soil Sciences

Clint Waltz, Ph.D., UGA Turfgrass Specialist

It’s nearing that time again, time to think about fall interseeding and overseeding.  These two practices are similar but technically not the same.  Interseeding is the practice of seeding the same species into itself for the purpose of increasing stand density and recovery of lost grass.  For example, tall fescue is interseeded into tall fescue in the fall to improve the overall stand which may have declined through the summer stress period.  Different cultivars may be used but the turfgrass species remains constant.  Adding centipedegrass seed to a thin centipedegrass lawn in the spring is another example where like species is seeded into like species.

Prior to interseeding, particularly with tall fescue, core aeration is a common practice.  The benefits for core aeration are numerous (e.g. soil air exchange, relieving compaction, improved water infiltration, etc.), including improving a planting or seed bed conditions.

Overseeding, however, is the practice of temporarily introducing a second turfgrass species – typically a cool-season grass – into a permanent species – typically a warm-season species – for the purpose of winter color or traffic tolerance.  An example of overseeding would be incorporating a second, or temporary, species into a permanent species, as in overseeding a bermudagrass baseball field in the fall with perennial ryegrass to have a green field in the early spring.  The second species can compete with the permanent species for light, water, space, and nutrients, so overseeding can become an additional stress that has to be managed.  Of the warm-season turfgrasses, bermudagrass is best adapted and tolerant of overseeding.  It is ill-advised to overseed solely stoloniferous grasses like centipedegrass and St. Augustinegrass.

Successful overseeding involves growing healthy grass prior to overseeding, proper seed and seeding rate selection, overseeding timing and preparation, post planting maintenance, and spring transition.  It is particularly important to maintain proper soil fertility, to relieve soil compaction, and to prevent excessive thatch development.

Overseeding selection involves selecting grasses that have characteristics suited to the particular needs.  Annual ryegrass has been replaced by perennial ryegrasses, because of improved turf quality, color, stress and pest tolerance, and manageability.  The “intermediate” ryegrasses tend to perform as the name implies somewhere between annual and perennial ryegrass, unfortunately most are more like annual ryegrass, not half way between the two.

Overseeding rates generally range between 5 and 10 pounds per 1000 ft2 in lawns.  In higher traffic situations, like sports fields and golf courses, the seeding range is between 8 and 12 pounds per 1000 ft2.  Using high quality “Certified” (blue tag) seed that is free of weed species is important to maintaining quality turf.  It is also important to use seed treated with fungicides such as Apron particularly for early fall overseeding since seedling blight diseases can be a problem.

The ten pound seeding rate generally provides a rapid stand for fall use, while the five pound rate provides a thinner stand and may not provide much coverage until spring.  Seeding rate generally relates to desired appearance and intended traffic or use.  Higher trafficked areas need higher seeding rates.  However, higher seeding rates may lead to more difficult spring transition.  Balancing seeing rate with need and desired appearance is a management decision that can affect bermudagrass the following fall, so seed appropriately.

Proper timing of overseeding should result in a gradual transition from the warm-season turf to cool-season turf.  Some common indicators that tell us it is time to overseed include:  soil temperatures at a four‑inch depth approaching 75° F, night temperatures falling into the 50’s, average midday temperature in the mid-70° F, or 2 to 4 weeks before the average annual first killing frost date.

The objective to insuring a successful overseeding is good soil to seed contact.  Seedbed preparations generally consist of close mowing or scalping, with some light vertical mowing, and blowing, sweeping, or vacuuming the loose plant debris from the soil surface.  Generally, the more the turf is opened, the better the establishment rate, but the more competitive the cool-season turf will be in the spring.  Seed which germinate in thatch or above the soil surface are more likely to dry-out and die before becoming established.

After dragging the seed into the soil, begin lightly irrigating to maintain good surface moisture and get the seed to germinate.  This generally means irrigating three to five times per day until the seedlings are well established, but the total amount of water applied during a day would seldom exceed 0.5 inches.  This irrigation practice should be done without causing puddling on the soil surface, free water encourages disease.  After germination, gradually reduce the frequency and increase the time of irrigation until a normal irrigation program can be established.

Begin mowing when seedling height is 30% higher than desired.  Use a mower with sharp blades and mow when the grass is dry to reduce seedling injury.  Because first-mowed grass is tender and succulent a reel-type mower tends to lay seedlings over and not cut them.  Using a rotary-type mower is commonly used for the first mowing with the fear of “ripping” seedlings being unfounded or insignificant.  Transitioning to a reel-type mower after the second or third mowing can provide a high quality appearance.

Wait to fertilize after seedling emergence (generally three weeks after seeding) since earlier fertilizing may encourage warm-season turf competition.  One pound of N per 1000 ft2 per month is adequate with less (e.g. 0.25 to 0.75 lb N / 1000 ft2) commonly used.  Use a soil test report to guide phosphorus needs but it is typical to apply some phosphorus shortly after seeding to improve rooting.

2013 reports show ryegrass and tall fescue seed crops being harvested earlier and faster than normal.  This may not indicate a bountiful year for seed production.  In fact, the forecast is for an average yield with a reduced quality due to more contaminants (i.e. weeds) in the seed fields.  Combine these factors with short carryover inventories and reduced acres in production, the result may be higher seed prices for 2013.

Fall is rapidly approaching and seeding, be it interseeding or overseeding, will again be part of turfgrass management programs.  Proper preparation prior to seeding and sound management afterward can provide a turfgrass surface that performs well and is attractive throughout the winter.

Emerald Ash Borer found with a foothold in North Georgia

EAB Debbie Miller, USDA Forest Service
Emerald Ash Borer, Debbie Miller, USDA Forest Service, Bugwood.org

Sandi Martin and Merritt Melancon,  University of Georgia 

For years foresters and invasive insect experts have been on the lookout for the arrival of an unwelcome guest in Georgia. Now that it’s here, they hope the public will help restrict its spread within Georgia.

The small, iridescent-green beetle has killed millions of ash trees across a wide swath of Canada and the upper Midwest since it was first detected in 2002. The emerald ash borer — Agrilus planipennis— has spread south and west from infested areas over the last decade.

In July, researchers found adult emerald ash borers in survey traps in DeKalb and Fulton counties. A follow-up ground survey found larvae in nearby ash trees, confirming an established emerald ash borer infestation.

EAB larvae David Cappaert, Michigan State University
Emerald Ash Borer larvae in tree, David Cappaert, Michigan State University, Bugwood.org

Since 2005 University of Georgia invasive species experts have conducted an extensive trapping program in Georgia to screen for the emerald ash borer.

Georgia’s five species of native ash trees usually grow along stream banks. While ash only makes up about 1 percent of Georgia forests, they play an integral role in preventing the erosion of stream banks and keeping silt out of natural waterways. Ash is also a popular landscape tree, with 2.9 million trees planted around Georgia homes, businesses, parks and greenways. The value of these city trees in Georgia is estimated to be around $725 million.

EAB exit hole Penn. Dept. of Conservation & Natural Resources - Forestry Archive
Emerald Ash borer creates a D-shaped exit hole, Image from Penn. Dept. of Conservation & Natural Resources – Forestry Archive, Bugwood.rog

Although the adult beetle is an active flyer, it is believed that the primary way the beetle spreads is by hitching a ride on infested ash firewood, logs and nursery stock. Emerald ash borer larvae kill ash trees by burrowing serpentine tunnels in the inner layers of bark, preventing the tree from transporting water and nutrients to and from the tree canopy.

The Georgia Invasive Species Task Force will launch a public outreach plan to try to curb the spread of this pest in the near future. This task force consists of the Georgia Department of Agriculture, the Georgia Forestry Commission, UGA, the Georgia Department of Natural Resources and the USDA Animal and Plant Health Inspection Service.

People can help slow the spread of this beetle through Georgia by not moving firewood and by helping others to understand how dangerous it can be to move firewood from one area to another.

“To prevent the spread of emerald ash borer, it is important not to move firewood in which the insect can hide,” said Kamal Gandhi, associate professor in the UGA Warnell School of Forestry and Natural Resources. “Buy local firewood, whether camping or for your home.”

To help reduce the spread of the emerald ash borer in Georgia, homeowners with ash trees should have a certified arborist check their trees for signs of emerald ash borer infestations.

Suspected infestations should be reported immediately so that foresters or arborists can understand how the infestation is spreading. This will aid in the development of effective methods to reduce its spread and impact.

“The faster (scientists) can track the spread of the insect, the faster they can work to stop it,” said Joe LaForest, integrated pest management and forest health coordinator at the UGA Center for Invasive Species and Ecosystem Health.

The public can report suspected infestations by:

For more information about the emerald ash borer and how to protect ash trees, visit www.gainvasives.org/eab.

For more information about spotting signs of emerald ash borer infestations, watch this.

(Sandi Martin is the public relations coordinator with the University of Georgia Warnell School of Forestry and Natural Resources. Merritt Melancon is a news editor with the University of Georgia College of Agricultural and Environmental Sciences.)

Other information:

Emerald ash borer factsheet

Emerald Ash Borer 2013 Update

Frequently asked questions about EAB in Georgia

Destructive tree pest discovered in Georgia

New bee advisory on neonicotinoid pesticides

See original article from the Southern Region IPM News here

In an ongoing effort to protect bees and other pollinators, the U.S. Environmental Protection Agency (EPA) has developed new pesticide labels that prohibit use of some neonicotinoid pesticide products where bees are present. (This announcement affects products containing the neonicotinoids imidacloprid, dinotefuran, clothianidin and thiamethoxam. – Editor’s note)

“Multiple factors play a role in bee colony declines, including pesticides. The Environmental Protection Agency is taking action to protect bees from pesticide exposure and these label changes will further our efforts,” said Jim Jones, assistant administrator for the Office of Chemical Safety and Pollution Prevention.

Bee advisory box from EPAThe new labels will have a bee advisory box and icon with information on routes of exposure and spray drift precautions. Today’s announcement affects products containing the neonicotinoids imidacloprid, dinotefuran, clothianidin and thiamethoxam. The EPA will work with pesticide manufacturers to change labels so that they will meet the Federal Insecticide, Fungicide, and Rodenticide Act (FIFRA) safety standard.

In May, the U.S. Department of Agriculture (USDA) and EPA released a comprehensive scientific report on honey bee health, showing scientific consensus that there are a complex set of stressors associated with honey bee declines, including loss of habitat, parasites and disease, genetics, poor nutrition and pesticide exposure.

The agency continues to work with beekeepers, growers, pesticide applicators, pesticide and seed companies, and federal and state agencies to reduce pesticide drift dust and advance best management practices. The EPA recently released new enforcement guidance to federal, state and tribal enforcement officials to enhance investigations of beekill incidents.

More on the EPA’s label changes and pollinator protection efforts: http://www.epa.gov/opp00001/ecosystem/pollinator/index.html

View the infographic on EPA’s new bee advisory box: http://www.epa.gov/pesticides/ecosystem/pollinator/bee-label-info-graphic.pdf

Largest Mushroom Species in the Western Hemisphere Found Growing in Georgia

Jeff DeLong, Undergraduate Researcher, Department of Plant Pathology
Marin Talbot Brewer, Assistant Professor, Department of Plant Pathology

See the original article here

Mushrooms from clusters of M. titans

Macrocybe titans is the largest gilled mushroom of any species in the Western Hemisphere, with caps in excess of 100 cm (3 ft). These giant mushrooms often occur in clusters within the tropics and subtropics of the New World, with previous sightings reported in the Caribbean, Central America, Mexico, South America, and only in Florida within the USA. Confirmation of this species in Georgia now extends the previously known range of M. titans. To our knowledge, this is the first report in Georgia. The mushrooms were discovered in October 2012 in the yard of an abandoned house in Athens. The fungus was identified as M. titans based on morphological features, habitat where it was found and DNA sequence similarity with known specimens.

The large, cream to buff-colored mushrooms were found growing in three large, dense clusters of eight to 10 mushrooms each (Figure 1). Single caps were 20-30 cm (8-12 in) across and convex with incurving at the margin. Younger mushrooms (Figure 2) had more convex caps than those of older specimens that became flattened with age. The smooth, dry surfaces of the caps were cinnamon-buff in color at the crowns fading to cream toward the margins. The inner flesh of the caps was white. The spore print, which was obtained by placing a cap on half white and half dark-colored paper and covering it with a bowl overnight, was creamy white (spore prints are necessary for proper mushroom species identification).

The stipes (stems) of the mushrooms were cream to buff measuring 30-45 cm (12-18 in) in length (Figure 3). They were club-shaped, tough and fibrous with bent-back scales and striations that curved around the stipe like stripes on a candy cane. The dense clusters of mushrooms were formed by the attachment of individual stipes at the base. Several miniature mushrooms less than 2.5 cm (1 in) in height were found attached to the base of the clusters. The cream to dull-yellow gills of the mushrooms were wavy, crowded and attached to the stipes. The species of the mushroom-producing fungus was confirmed as M. titans by sequencing a region of its DNA.

The mushrooms of M. titans, like the fruiting bodies of any fungus, are the reproductive structures where the spores are produced. The majority of the fungus is actually growing as filamentous hyphae underground and out of sight in decomposing dead and decaying plant matter in the soil. The three nearby clusters that were observed likely came from a single individual growing in the soil beneath the tall grass. M. titans is saprotrophic, which means that it decomposes dead or decaying plant matter and does not cause disease or rot on living grasses or trees.

It is not clear why or how this fungus found its way into Georgia. The mushrooms were close to landscape ornamental grasses and it may have arrived with the container plants, as Florida is a large producer of ornamental landscape plants. Or, it may be expanding its geographic range into Georgia due to climate warming or some other factor. This species was previously known as Tricholoma titans, but in 1998 was renamed Macrocybe titans, which literally translates from Latin into “giant large head.” The mushrooms are reportedly edible; however, never consume a wild mushroom without identification confirmation by an expert. Contact your county Extension office should you happen to encounter the giant mushrooms of M. titans.

We thank Kirk Edwards for discovering these mushrooms and contacting us about their identification.

References:

Bessette, A.E., Roody, W.C., Bessette, A.R., and Dunaway, D.L. 2007. Mushrooms of the Southeastern United States. Syracuse University Press, Syracuse, NY.

Bigelow, H.E., and J.W. Kimbrough. 1980. Tricholoma titans, a new species from Florida. Mycotaxon 11: 425- 429.

Pegler, D.N., Lodge, D.J., Nakasone, K.K. 1998. The pantropic genus Macrocybe gen. nov. Mycologia 90: 494-504.

Wood decay and falling trees are of great concern

Jean Williams-Woodward, UGA Extension Plant Pathologist

Damage from past years of drought has taken a toll on our trees. Drought stress, construction injury, soil compaction and root girdling injures tree roots and provides an entry point for wood decay fungi. Storm damage, improper pruning, and wounding of trunks and branches also leads to wood decay fungi entry and infection.

Wood decay fungi can be classified into two broad categories: white-rot and brown-rot fungi.

White-rotters are those fungi that rapidly breakdown lignin and eventually cellulose. The infected wood becomes soft, spongy and stringy. It is usually a root and butt rot by a white-rot fungus that causes hardwood trees to fail and fall (see images of Inonotus dryadeus).

Brown-rotters are those fungi that breakdown cellulose and eventually lignin. Wood crumbles and shrinks. These rots are often referred to as a cubical or dry rot.

Regardless of the type of rot and what fungus is infecting the tree, if you see conks or mushrooms growing on the tree trunk or root flare, then the tree is in advanced stages of infection and decay and there is a concern for possible tree failure. It takes years for infection and growth of the fungus in the wood to produce outward signs of conks and mushrooms.

At present, methods to accurately detect how much rot is present in the wood do not exist. There are methods to detect internal cavities in trees to determine the thickness of a trunk shell, but measurements of spongy wood is difficult. There is no cure for wood decay. The best management approach is preventing injury to trunks, branches, and roots.