Mildew

Source(s): Jacob G Price


Many garden plants are affected by mildew, both woody and herbaceous.

DESCRIPTION

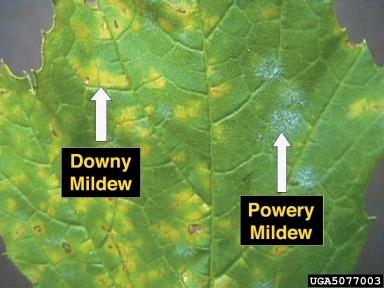
Downy (False Mildew): Grows from within the plant and sends branches out through the plants stomata to create pale patches on the leaves. It is a fungal disease with a white to purple, downy growth, usually on the underside of leaves and along stems which turns black with age. Is encouraged by cool, wet nights, and warm, humid days. Overwinters on diseased plant refuse in the soil.

Powdery: Lives on the leaf surface. Sends out hollow tubes into the plant to suck out nutrients. It is a fungal disease with a white to grayish powdery growth, usually on the upper surfaces of leaves. Small black dots appear and produce spores that are blown by wind to infect new plants. Worst in hot,dry weather with cool nights (Night: 61oF with relative humidity 95-99%; Day: 81oF with relative humidity 40-70% Powdery growth is viable two days after infection. Growth is enhanced by low light levels that accompany cloudy or foggy periods. Cannot survive if there is a film of water on leaves or stems.

DETECTION

Downy – The best time to examine plants is early in the morning while dew is on the leaves. The first symptom is sunken, water-soaked spots on leaves, either yellowish or grayish in color. Spots later become covered with a downy purplish mold growth which may eventually be blackened by a second fungus.

Powdery – Starts on young leaves as raised blister-like areas that cause the leaves to curl, exposing lower surface. Infected leaves become covered with a grayish-white powdery fungus growth. Disease prefers young, succulent growth; mature tissue is usually not affected. Unopened flower buds may be white with mildew and never open. Leaves will become brown and shrivel when mildew is extensive. Fruits ripen prematurely and have poor texture and flavor.

CONTROL

Downyboth types
  1. Plant resistant cultivars.
  2. Prune to improve air circulation and remove infected branches.
  3. Use a three -year rotation.

Powdery

  1. Prune or stake to improve air circulation.
  2. Dispose of infected plants before spores form.
  3. Apply a weekly water wash during periods of active growth. Wash both upper and under surfaces of the leaves. Do in early afternoon because that is when spores are most likely to be moving on air currents.
  4. Apply sulphur weekly to susceptible plants. Be certain to cover the tops and underside of leaves, paying special attention to the growing tips. It is best to begin applications early in the season, since sulfur is more effective at preventing disease than at curing it. If the temperature exceeds 85oF, do not apply sulfur since it may burn the leaves.
  5. Apply lime sulfur to dormant plants to kill overwintering spores lodged in unopened buds or on canes.
  6. Treat with Clearys 3336, Banner Maxx, Bayleton or Mancozeb.

Resource(s): Common Landscape Diseases In Georgia

Center Publication Number: 28
Mondo Grass

Source(s):

  • Marjan Kluepfel, HGIC Information Specialist
  • Bob Polomski, Extension Consumer Horticulturist, Clemson University

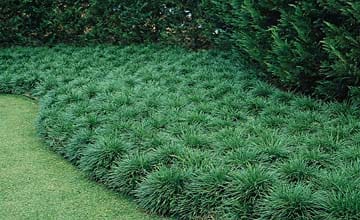
Mondo grass, also known as monkey grass (Ophiopogon japonicus), is an evergreen, sod-forming perennial. The scientific name is derived from ophis = snake, and pogon = beard, most likely referring to the flower spike

Descriptionmondo_1

Plants are tufted, grasslike and 8 to 16 inches high. The ½-inch leaves are dark green and fine to medium in texture. They are erect to arching, smooth and grasslike. The flowers are usually white or white tinged with lilac. Flowering and fruiting occur from July through September.

Mondo grass is quite often confused with liriope (Liriope muscari). However, the leaves of mondo grass are more narrow than those of liriope, the smaller flowers are hidden by the leaves, the fruits are blue compared to the black fruits of liriope and mondo grass is less cold hardy.

Landscape Use

Mondo grass is primarily used as groundcover. It is also attractive as a border along paths, between stepping stones or flowerbed and lawn, or in rock gardens. It grows well along streams and around garden ponds. Mondo grass competes well with the roots of other plants. Under trees or shrubs it makes an excellent shade-tolerant lawn that never needs mowing.

Cultivation

Mondo grass grows well in ordinary garden soil, requiring minimum attention once established. Plants thrive in filtered sun to full shade and prefer moist soil. The foliage is usually light green when plants are grown in filtered sun. Plants growing in the shade have dark green leaves.

Propagate by dividing large clumps. Be sure to include as many roots as possible and eight to 10 leaves on each section for planting. The plants are easily established and require little effort. The plants do not need heavy feeding. Mondo grass looks attractive year-round. However, the leaves may become ragged by late winter. Shear back the shaggy old leaves in early spring before new growth starts.

Cultivars

  • The cultivars ‘Aureovariegatus,’ ‘Variegatus’ and ‘Vittatus’ have longitudinally striped leaves with white or yellow and green stripes. The variable variegated foliage usually makes it difficult to distinguish one cultivar from another.
  • The cultivar ‘Caeruleus’ has dark green leaves like the parent species and violet blue flowers.
  • ‘Kioto’ or dwarf mondo grass grows only to about 4 inches high. Flowers are small, 2 to 3 millimeters long and light lilac to white.
  • ‘Nippon’ is very small (2 to 4 inches tall) and has whitish flowers in the summer.
  • ‘Gyoko-ryu’ is even shorter and more compact than ‘Nippon.’

Related Species

  • Black mondo grass (Ophiopogon planiscapus) is an interesting introduction from England. The dark purple leaves appear almost black. The plants are about 6 inches tall. In South Carolina, black mondo grass should be planted in partial shade. Cultivars ‘Nigrescens’ and ‘Ebony Knight’ do not differ very much.
  • O. jaburan is coarser than O. japonicus, with light purple to white flowers. Plants grow 15 to 18 inches tall but are not as good a groundcover as O. japonicus.

Problems

A fungal disease known as anthracnose is the most common problem. Remove infected leaves and/or apply a recommended fungicide.


Resource(s): Ground Covers

Center Publication Number: 204

Mosquito Control

Source(s): Walter Reeves, College of Agricultural and Environmental Sciences, Former County Extension Agent – DeKalb County


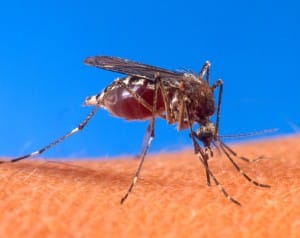
Buzzzzzzzz…SMACK! Spring and summer rains can cause a population explosion of mosquitoes! Two kinds of mosquitoes are commonly seen (and felt!): the ” swamp” or “Egyptian” mosquito, which feeds at dusk and the Asian tiger mosquito, which feeds during the day. The tiger mosquito has tiny white stripes around its rear legs. Since the tiger mosquito flies and feeds during the day, it is the one that causes the most distress to gardeners and others.

Although they can be blown into your yard by the wind, it is likely that the mosquito biting you has come from just a few yards away! Adult mosquitoes lay eggs in damp soil or rotting vegetation. The eggs remain dormant until rain saturates the area. A small, hidden pool of rainwater that remains for just ten days may produce hundreds of ravenous pests.mosq

Many people have seen the fogging trucks which operate at dusk in communities along the coast of Georgia. The insecticide fog stays close to the ground and kills most of the night feeding swamp mosquitoes. Unfortunately, it is VERY difficult to control Asian tiger mosquitoes with fogged or sprayed insecticides. Since these blood-suckers feed during the day, fogs and sprays are quickly dispersed by the wind.

NO STANDING WATER

The BEST first step toward control for either type of mosquito is to look for pockets of water outdoors and drain them. An organized search among neighbors may turn up dozens of mosquito hiding places. Look for clogged gutters, leaf-filled drains, drain outlets from air-conditioners, plastic wading pools, dog dishes, soft drink cans, plastic bags, old tires, birdbaths, potted plant saucers, standing water in tire ruts, stumps, tree holes, puddles hidden under English ivy and pools left by flooded streams.

TREAT PUDDLES

If a pool of water can’t be permanently drained, i.e. bird baths and landscape water features, a special organic mosquito control can be used. The mosquito disease spore Bacillus thuringensis (B.t.) is sold at garden centers. A common brand name is “Mosquito Dunks”. These can be put in pools of standing water, where they provide control for several weeks. The active ingredient has no effect on birds or animals.

FOGGERS? MAYBE

Temporary relief outdoors can be had by using a fogger (not a garden sprayer) made specifically for mosquito control. A special insecticide will be sold for use with the fogger. Use it a few hours before an outdoor activity is planned. It will not be very effective on a windy day.

MOSQUITO PLANTS

In recent years, a plant advertised to repel mosquitoes has appeared in garden centers. This citrosa plant is actually a scented geranium. It has not been proven effective for repelling mosquitoes. The herb lemon balm also is reputed to repel insects. It is possible that if you rub the plant leaves on your skin, insects will be kept away for a short time. One experimenter estimated plant oils to be only 40 – 60 percent as effective as DEET, the active ingredient in most mosquito sprays (Off, Cutters, etc.). If you depend on the citrosa plant to keep mosquitoes away from your patio, the results may be much less than you desire. The citrosa is grown as an annual in Atlanta. It may be perennial in places where frost is rare.

CITRONELLA CANDLES

Citronella oil is extracted from citronella grass, which is grown in the tropics. The oil can be vaporized by mixing it with wax and manufacturing a candle to be burned outdoors. Citronella oil is effective for repelling insects. However, the smoke and odor may be too strong for some people’s taste. Several candles must be used to be effective outdoors.

ULTRASONIC REPELLERS

These gadgets are a perfect example of the quotation “If it sounds too good to be true it probably is. ” In fact, the ultrasonic mosquito repellers are absolutely useless. Do not waste your money on ultrasonic mosquito, flea, rat or squirrel repellers!

REPELLENT SPRAYS

Sometimes the best you can do is to station cans of mosquito repellent spray near the garden, lawn and deck. The active ingredient, DEET, is a proven insect repellent. Questions have arisen concerning the safety of the chemical, so avoid heavy application to your skin. Lightly spray exposed flesh plus sock tops, pants cuffs and t-shirt collars. The repellent sprays may be our only hope when all else fails.


Center Publication Number: 29

Moss Management

Source(s): Randy Drinkard


You may have noticed when cutting your grass recently that what was once your nice, thick, green lawn has turned into a not-so-nice, thick, green something else? What is this “stuff” that is taking over the lawn? And can it be stopped from spreading over your entire yard? Most likely the problem is moss, although in some cases it may be algae.

Moss and algae replace turfgrass when growing conditions for turfgrass are poor and conditions for moss and algae are favorable. Neither moss nor algae are parasitic on turf and they do not kill turf as diseases do.

mossMoss and algae are simply plants looking for a home and if the right conditions are provided, they can quickly take up residence and do well. This is the way nature intended it, so let’s see what created the conditions for these two turf pests to occur in the first place.

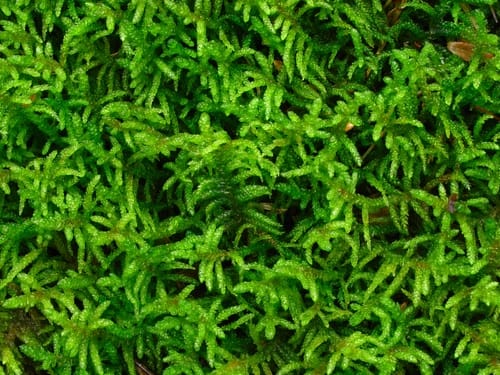
Mosses are small plants which produce a mass of fine stems that can survive under very shady conditions. Moss will take over and grow where the shade is so dense during the summer that not enough light is present to support growth of a turfgrass such as fescue. Moss also thrives during periods of high humidity and in water-logged soils like we had earlier this year due to heavy summer rainfall amounts.

Algae is a very simple plant that has no vascular system. It usually forms a dense green mat or scum over the soil surface, although reddish or brownish forms may also occur in some situations. Algae needs plenty of water and lots of sunshine for growth. When the soil dries, algae forms a black crust which becomes hard and relatively water-resistant.

The best solution for either of these problems is the use of a soil aerator that removes plugs of soil from the ground, thus enhancing soil drainage. However, if the affected area has very little grass, it is better to start over. Till the soil to a depth of 6 inches to break up the restrictive layer. Tilling will also facilitate incorporation of lime and fertilizer into the soil. A soil test should be taken to determine plant nutrient needs. Soils with low fertility and low pH (acidic) lead to poor growing conditions for grass and make it easier for algae and moss to become established.

Improving the drainage with the incorporation of organic matter is also beneficial. Low areas that do not drain well should be contoured. In some cases, the use of drain tiles can help remove excess water and improve growing conditions for turfgrasses. Sometimes we may create water problems by watering too much. Irrigation systems should be adjusted to match the soil conditions and plant needs.

Moss can become very thick under heavy shade conditions. Thinning trees or pruning limbs to improve light conditions and increase air circulation is often helpful. If grass won’t grow in these areas it may be necessary to utilize a shade-tolerant ground cover or simply cover the area in mulch.

Some chemicals are available to eliminate moss. Their effect is only temporary and the problem will likely return if conditions do not favor turfgrass growth. Iron sulfate can be applied at the rate according label directions. This product can be purchased at local garden centers and nurseries, farm supply dealers or building supply stores. The only sure method of eliminating moss is to remove it by hand raking.


Center Publication Number: 118

Mowing Lawns

Source(s): Gil Landry, PhD., Coordinator – UGA Center for Urban Agriculture, The University of Georgia.


Proper mowing of turgrasses is essential in order to produce an attractive, healthy lawn.

Proper mowing will have tremendous effect on the appearance of a lawn. Height of cut, frequency of cut and type of mower used are all important factors to consider when mowing a lawn. For the best appearance, a grass should be kept at its best height for growth.

Reel mowers are best suited for the hybrid bermudas and zoysiagrass. The other grasses can satisfactorily be cut with a rotary mower. Dull mower blades tear leaves instead of cutting them, thus producing a poor appearance and increasing the possibility of disease problems.

As a general rule, a grass should be mowed often enough so that you never remove more than 1/4-1/3 of the plant material. Example: If a bluegrass lawn is cut at a height of 2 inches, the grass should be cut when it reaches 3 inches. Removal of too much plant material can shock the grass.

The most damaging mowing practice is a sudden reduction in mowing height. This upsets the balance between the grass leaves and roots. It also gives a scalped appearance and usually injures the grass. If the grass becomes too tall between mowings, gradually reduce the cutting height until the recommended height is reached.

During stress periods, such as summer heat, it is a good idea to raise the height of cut slightly. This is especially helpful to the cool-season grasses because it reduces the stress on the grass. After the stress is gone, lower the height of cut gradually. Grasses in shaded areas should be cut higher than normally suggested for better growth. Raising the mowing height of warm-season grasses as fall approaches will help the grass survive the winter months.

If lawns are properly fertilized and mowed, grass clippings will not promote thatch accumulation. In fact returning the clippings to the soil will recycle plant nutrients and reduce fertilizer requirements. However, on high level maintenance lawns, such as hybrid bermuda and zoysiagrass lawns, clipping removal is advised, otherwise thatch will accumulate. This “thatch layer” (Figure 10) is an accumulation of dead plant material at the soil surface. It prevents penetration of water into the soil, harbors insects and disease organisms and leads to a shallow root grass which is heat, cold and drought susceptible. Many people like a dense soft mat of turf on their lawns, but this is usually a sign of excessive thatch and generally leads to problems.

Scalping or lowering the lawn mower cutting height and mowing the lawn in several directions just prior to spring “green-up” will help prevent thatch accumulation. The removal of this dead plant material will also encourage early spring growth. Centipede and St. Augustinegrass are spread by above ground runners or stolons, thus they should not be scalped as low as the other grasses or they may not recover. For more information on thatch refer to Cooperative Extension Service Leaflet No. 394, Thatch Control in Turf.


Mowing Height for Lawn Grasses in Georgia

Grass

Cutting Height (inches)

Tall Fescue

2-3

Bluegrass

2-3

Common Bermudagrass

1-2

Hybrid Bermudagrass

0.5-1.5

Zoysia

0.5-1.5

Centipedegrass

1-1.5

Carpetgrass

1-2

St. Augustine

2-3

Ryegrass

1-2


Resource(s): Lawns in Georgia

Center Publication Number: 132

Mulching Vegetables

Source(s): Wayne McLaurin


Few jobs in the vegetable garden are as rewarding as mulching. Time spent applying mulch to pepper, tomatoes, squash, eggplant and other vegetables will mean extra dividends at harvest time. Mulch prevents loss of moisture from the soil, suppresses weed growth, reduces fertilizer leaching, cools the soil and keeps vegetables off the ground. Fruit rots sometimes occur when vegetables touch the ground.

Mulching Advantages

  • Serves as a barrier between the plant and soil and helps prevent fruit rots.
  • Reduces labor since less cultivation is required. Emerging and small weeds perish under their bark barrier. Therefore, it reduces the need for tillage and the use of weed-control chemicals.
  • Conserves water by reducing evaporation of soil moisture, in turn lowering the soil temperature. Water absorption by a mulched soil is greater than that of unmulched soil. Mulch also prevents the formation of soil crusts. Soil loss from heavy rain and wind is decreased. In effect, mulches are excellent conservation agents.
  • Improves root growth by acting as an excellent insulator and preventing drastic fluctuations in soil temperature. Mulch keeps the soil cooler in summer and warmer in winter, improving both root growth and nutrient availability. At the end of the growing season, organic mulches can be tilled into the soil to further increase the organic-matter content and the water holding capacity of the soil.
  • Makes the garden neater and reduces the incidence of mud-splashed flowers and vegetables after heavy rains.

Choosing the Right Mulch

A practical mulch should be easily obtained, inexpensive and simple to apply. Availability and cost vary from region to region. Mulching materials may be available from materials in your own yard such as leaves, bought from garden centers and obtained from tree service firms. A suggested depth is 3 to 4 inches, bearing in mind that too little will give limited weed control and too much will prevent air from reaching roots.

Bark

Small pieces of bark are preferred over large chunks. Bark mulches vary, but all are attractive, durable and suitable for foundation shrub plantings. Contact with wood framing is to be avoided, since bark can be a termite vector. The high carbon- to-nitrogen ratio of bark requires prior application of nitrogen fertilizer.

Coffee grounds

Coffee grounds cake badly; a depth of 1 inch is recommended. Coffee grounds contain some nitrogen.

Compost

An especially good mulch, compost has fertilizer value and soil-like appearance. It is also a good organic amendment for tilling into the soil after the growing season ends.

Leaves

Leaves are free, readily available in many areas, release some nutrients upon decomposition and spread easily. However, they have a tendency to from a soggy, impenetrable mat. This problem can be overcome by mixing leaves with fluffy materials, such as hay or straw, or by shredding the leaves.

Newspaper

This is certainly readily available and economical, but somewhat difficult to apply. The high carbon-to-nitrogen ratio necessitates the prior application of nitrogen fertilizer. A good use for newspaper is as an under-mulch; that is place 2 to 3 sheets under a thin layer of attractive, more expensive mulch.

Peanut shells (NOT RECOMMENDED)

Peanut shells are carriers of Sclerotium rotfsii, also known by the common names of Southern blight and white mold which can be a major problem in the garden. Peanut hulls may also be infested with nematodes and nut sedge seeds and/or tubers.


Resource(s):

Needle Blight

Source(s): Laurene Hall


There are several types of Needle Blight diseases that effect plants. Pestalotiopsis sp. is a type of needle blight fungal disease that is considered usually a minor disease. It attacks foliage that has been injured or weakened by unfavorable weather or growing conditions. Usually, the killed foliage is near the base of the plant and where foliage is relatively dense. The disease may kill the smaller twigs where the infected needles died.

needle

IDENTIFICATION

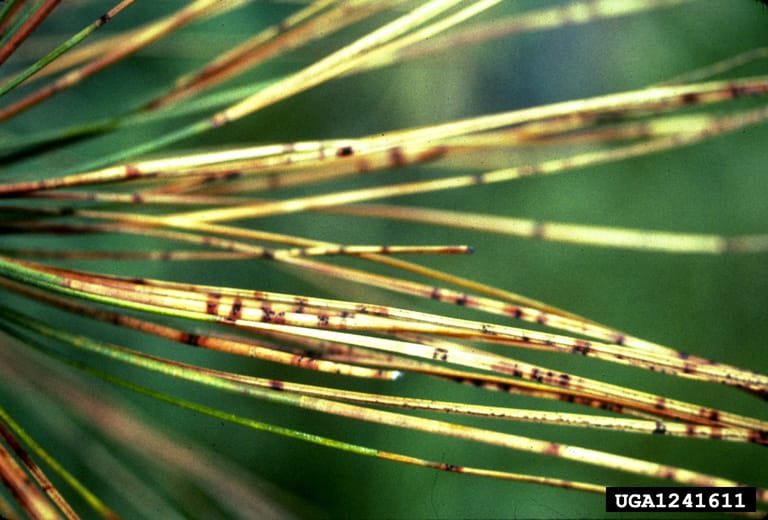
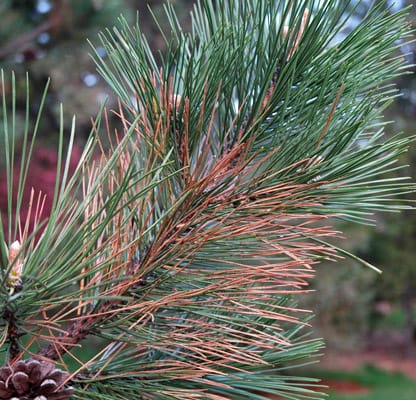
The Blight usually starts at the tip of the foliage and progresses towards the leaf base. The color of the foliage goes from green to yellowish, then to a dark brown that can look almost black. Twig tips turn tan to brown in color and have black, pimple-like fungal fruiting structures dotting their surface

APPEARANCE

Infections can occur anytime of the year. In the spring, when weather conditions are favorable, fungal populations can increase very rapidly and disease losses can be severe. Factors that favor disease include frost during early shoot development; cool, wet weather in spring or fall; pruning wounds; and heavy vegetative growth early or late in the season brought on by high nitrogen applications. Most importantly, this disease often affects trees that have suffered from stress (whether it is cultural, mechanical or environmental).

needle2_0

HOSTS

Various species of trees, shrubs, and other ornamental plants can potentially develop the disease. However, some plants are more susceptible than others. Particularly, needled evergreens, conifers, and some varieties of juniper are most susceptible. The presence of the correct environmental factors will decide whether or not a plant will develop this disease from causal agents. Additionally, wind-driven rain, insects and contaminated pruning tools all spread the fungus from plant-to-plant

INTEGRATED PEST MANAGEMENT(IPM) CONTROL

Control is to prune out dead foliage and twigs as soon as possible. Reduce winter injury by minimizing dehydration. Do not allow snow to accumulate or remain up and around the base of the plant for any length of time – especially during melting. Avoid over crowding the plants to allow sufficient sunlight and air circulation. Keep plants healthy by maintaining good cultural practices (i.e. proper watering, fertilization and minimal mechanical damage) and, when possible, protecting plants from other environmental stresses such as drought.

CHEMICAL CONTROLS

Use fungicides wisely. Chemical control is usually not necessary and often unsuccessful if the fungicide is not applied properly. It can also be impractical and not economically feasible for homeowners to spray fungicides on trees. This is because many trees that are affected by Blight are well established and too large to spray. Additionally, mature trees may naturally develop the disease more frequently as a result of the stress of old age. Consequently, with the proper pruning and removal of infected material the tree may recover from the blight on its own and without the use of a fungicide.
If you think your plant is suffering from blight, bring a sample of the leaves on a branch with both healthy and diseased tissue to the Extension office for proper diagnosis. A fungicide recommendation may be given if the problem cannot be corrected by cultural IPM practices. Always carefully follow label directions when applying chemicals and wear protective clothing if necessary.


Resource(s): Common Landscape Diseases In Georgia

Center Publication Number: 48

Nuts and Bolts of Water Gardening

Source(s): Tony Johnson, College of Agricultural and Environmental Sciences, Horticulturist, UGA Research and Education Garden


Location, Location, Location. No, this is not about Real Estate. Planning and site selection are the most important steps in building a water garden. Poor planning causes many of the problems of installing and maintaining a water garden. Before you put a shovel in the ground know what you want to create.

waterfallDO NOT locate your water garden in a low area. You must make sure that surface water does not get into your pond and contaminate the system with fertilizers, chemicals and silt which will, in turn, damage water quality, fish and plants.

If you want a water garden with lots of blooming plants, the site must have a minimum of 6 hours of sunlight per day.
It is possible and sometimes desirable to have a water garden in a shaded area, but be careful not to damage tree roots; and remember, you will have to cope with more leaves and debris. Water gardens can be landscaped with woodland plants and the shade will help reduce the free-floating algae.

If you want a waterfall or stream effect, make sure you have some type of background such as an existing slope or one created with the soil you excavate. Use some type of evergreen planting to soften the slope.

The water will always be level. Make sure the edges of your water garden are level, too! Spend time making sure your water garden is level and the rest of the installation will go much smoother.

Be sure to use liners that are fish safe, such as Permalon or EPDM. Liner Size = Maximum Length of the pond + 2 x Depth of the pond + 1 Foot x Maximum Width of the pond + 2 x Depth of the pond + 1 Foot.

In the south, a depth of 18 to 24 inches will be fine for fish other than Koi. Koi ponds need to be deeper (3 to 4 feet). Amount of water in pond (Length x Width x Depth) x 7.5 gallons. Other organic material, such as leaves and dead plant material becomes food for free floating algae.

If your water garden is in full sun, 60% of the surface should be covered in plant material. This will shade the free-floating algae. Black dye can also help shade the pond in early spring before the plants fill out. Use one bunch of anacharis per sq.ft. of surface area.

Hardy Water Lilies will survive winter but tropicals will need to be protected or replaced each season.
A skimmer is recommended to help keep leaves and other debris under control. Also it is a convenient way to hide and protect the pump.

Some type of bio-filter is recommended to help keep the water quality safe for fish and to help remove excess nutrients. Most UV lights only cover up problems with water clarity. If you have enough plants and do not have an over population of fish or over feed them, you should be able to keep you water clear.

Set pond plants in pots with solid sides and bottoms, use a non-organic soil and then cover the pot with river stone to prevent the fish from stirring up the soil. This will help keep the water from being cloudy.

Fertilize plants once a month during the growing season with plant fertilizer tablets.

DO NOT drain your pond each year. Take about 20% from the bottom. Use a dechlorinator to remove the chlorine from the water you use to refill or top off your pond.

Most aquatic plants can be invasive, never discard plants around or in natural water systems, such as streams or lakes. The best place to dispose of them is your compost pile.


Center Publication Number: 88

Off-Season Sodding

Source(s): Clint Waltz, Extension Turfgrass Specialist, The University of Georgia


Dormant transplanting of trees and ornamentals in the Southeastern United States is a common practice; likewise, warm-season turfgrass sod can be successfully established during dormancy.

Research has shown that bermudagrass root growth is significantly reduced when average soil temperatures drop below 60 degrees F. In the Atlanta area, this would generally occur the first of November. Generally temperatures would not reach 60 degrees F. until the latter part of April. These observations generally agree with the normal dormant period of most warm-season turfgrasses and are commonly recognized as a risky period for sodding. However, substantial quantities of sod are transplanted during this period of slow growth or dormancy.

Off-season or dormant sodding (October-April) provides the following advantages:

  1. Provides for instant landscape;
  2. Improves the environment by reducing erosion, mud, dust and weeds around buildings;
  3. Increases occupancy rates of newly finished construction projects such as homes and buildings;
  4. Extends the producer’s and landscaper contractor’s production time, thus reducing the peak demand season.

Recommendations for normal sodding also apply to off-season sodding. Rootzone preparation is critical for success. During site preparation and prior to turf establishment is the best time to take a soil sample to determine pH and nutrient needs. Modification of soil pH is most beneficial when lime (used to raise pH) or sulfur (used to lower pH) can be incorporated into the soil. Loosening the soil to a depth of 6 inches by tilling is usually ideal for turfgrass establishment.

Also, corrections of soil nutrients deficiencies like phosphorus(P) and potassium(K) are more easily made prior to establishment. While all essential nutrients are required for turfgrass growth, there is inconsistent information on P and K needs during establishment and winter. Some studies report decreased winterkill and disease occurrence with the addition of P and K, while other researchers have reported no differences in cold hardiness or pathogen resistance due to increased rates of P and K.

Next, the tilled soil should be leveled, smoothed and moistened. The soil should be lightly watered, but not saturated. Ruts from foot traffic or equipment can occur when soils are excessively wet and are more difficult to repair after the sod is laid. To prevent drying and potential cold injury of roots, sod should be installed within 48 hours after harvest. Also, the radiant heat from the earth may offer some protection from cold injury when compared to turf exposed to the elements when left on a pallet. Sod should be laid tight and rolled to minimize creases. If creases are apparent once the turfgrass has been laid, the sod should be topdressed to fill low spots, conserve moisture and potentially retain heat near the soil surface.

The survival of off-season transplanted sod is dependent upon avoiding winter desiccation and low temperature injury. Due to a limited root system, desiccation can be a significant problem. The warm dry winds of late winter and early spring increase the demand for water, but the combination of low soil temperatures and a limited root system will reduce the plant’s ability to obtain water and nutrients. Direct low temperature injury can be a problem because the crowns, stolons and shallow rhizomes may be killed. Unfortunately, newly sodded turf lacks deep rhizomes and the expansive root system necessary to recover from winter stresses.

Research and practical experience has shown that warm-season turfgrasses may be successfully sodded during the off-season (October-April) when the grass is dormant or slowly growing. However, the cooler climates in and north of Atlanta may adversely influence some species. Increased winter injury has been observed on zoysiagrass and centipedegrass compared to bermudagrass sodded late in the year.

Nonetheless, successful transplanting is highly dependent on a healthy sod, which is difficult to determine when the sod is dormant or overseeded. Overseeding sod with ryegrass may reduce bermudagrass vigor and quality. While overseeded turf may look appealing during the winter months, during the spring the more heat-tolerant perennial ryegrasses can compete with the warm-season turf for water, nutrients and light, resulting in a poor transition and delayed green-up of the warm-season species. This is more common in ryegrass that has been heavily fertilized in the spring. To assist spring green-up and stimulate turfgrass growth, fertilize with 1.0 to 1.5 pounds of nitrogen per 1000 square feet once night temperatures consistently reach the mid 60s F. Also to further encourage warm-season species growth, the mowing height can be lowered. This practice opens the turfgrass canopy, allowing more sun to the permanent warm-season species while stressing overseeded grass. Resume accepted maintenance practices once conditions are favorable for warm-season turfgrass growth.

In summary, successful sod transplanting depends on proper soil preparation, good soil-to-sod contact, avoiding low temperature injury, and most important, proper water management to prevent desiccation.


Resource(s): Lawns in Georgia

Center Publication Number: 142

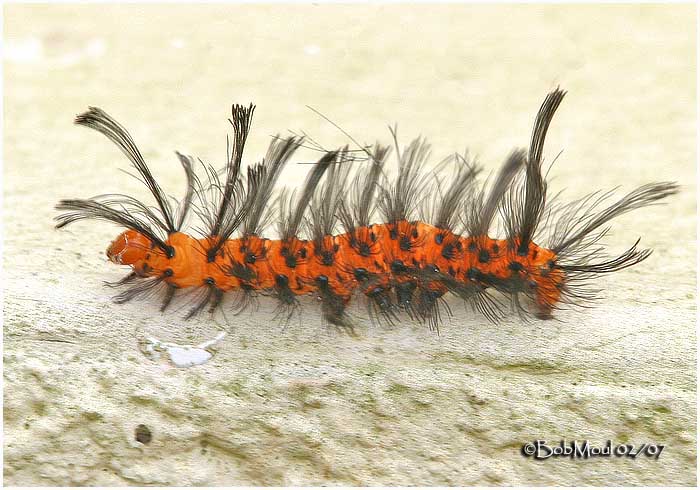
Oleander Caterpillar (Syntomeida epilais jucundissima)

Source(s): Jacob G Price


Introduction: The Oleander caterpillar is a serious problem along the southern coast of Georgia. This pest feeds only on Oleander, a horticulturally important plant that is poisonous to most animals.

oleanderLife Cycle

Three generations per year occur in our area with the damaging larval stage pictured above right, usually present in March, December, and July. The moth stage of this pest is bluish-purple with white dots on black wings. Female moths lay oval, light yellow eggs on the undersides of leaves. Upon hatching, the young caterpillars first eat their shells, then begin feeding on the underside of the leaf. Fully grown larvae are usually about an inch long. The entire life cycle is completed in about 60 days.

Control

A number of control measures are available for leaf eating caterpillars. The best control measure is locating and removing eggs prior to hatching. If hatching caterpillars are found products such as acephate (Orthene), malathion, and carbaryl (Sevin) can be used. A natural bacteria called BT (Bacillus thuringiensis) can be used as well. BT is sold under the trade name Thuricide or Dipel. It is best when caterpillars are less than 1/4″. Read the product labels for mixing instructions. Some formulations of chemicals are labeled for effective control of this pest while other formulations are not. Scouting for this pest is important, it can devour an oleander shrub in a short period of time and is very difficult to control when larvae are larger.


Resource(s): Insect Pests of Ornamental Plants

Center Publication Number: 40