Bonsai, An Ancient Art

Source(s): Stephen D Pettis


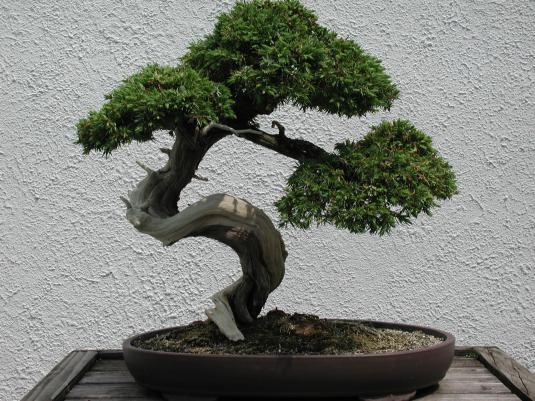
The art of bonsai is very old indeed. The first people recorded to practice the art were the Chinese who, in the 14th century, collected naturally dwarfed plants from the wild and transplanted them into containers.

bonsai-tree-3preview

These ancient gardeners appreciated the wild, contorted beauty of the plants that were stunted by the harsh extremes of altitude and poor soil. They brought this beauty into their homes and gardens through ingenuity, cleverness, and an understanding of plant physiology.

The word bonsai literally means ‘plant in a tray’. The concept is simple; restrict the growth of a plant’s roots and shoots, allowing the trunk to grow. The end result is a plant that appears to be a miniature representation of its relatives in the wild.

The actual mechanics of bonsai are simple enough that anyone could become an enthusiast. The skill that most of us are lacking is the patience that is needed to allow a plant to properly develop. Bonsai trees can take years to develop. There are many trees in existence today that are over one hundred years old. In nature, trees grow relatively slowly and even slower when cultivated as a bonsai. Achieving a dwarf plant that is a true mimic of a tree in nature in one of the specific styles is the art of bonsai.

There are many styles of bonsai. The simplest would be the formal upright or erect style. The trunk is encouraged to grow straight and the tree is usually pruned into a symmetrical form. Another simple design is the informal upright. The tree is trained vertically but is not forced to grow straight. Other upright designs include the double trunk and the leaning.

There are more challenging designs for advanced gardeners. Using a trailing groundcover shrub, the cascade design allows the plant to hang over the edge of the pot and grow toward the ground. Other very interesting styles are the roots-over-rock style where the tree is planted so that it grows over stone and the windswept design where the plant is pruned to make it appear as though it is growing in the desert.

Things You’ll Need for A Simple bonsai: Grow or purchase a tree seedling or rooted cutting such as Red Maple, Japanese Maple, Chinese Elm, River Birch, Chinese Zelkova, Pine or Juniper in a 4 inch container. Obtain a shallow container, well-drained soil, very small BB sized gravel, and copper wire. Tools needed include small pruners, a trowel, a clean spray bottle with water, a pan of water, and a small paintbrush.

Planting: Remove the plant from its original pot. Using your hands, dislodge all the soil from the roots of the plant until the roots are bare. Using the paintbrush, finish cleaning the roots. Dip the roots in clean water and gently the wash them. Keep the roots moist throughout the planting process by misting with a spray bottle.

Using the pruners, lightly trim the roots and the shoots or branches. Trees need to maintain a specific ratio of roots to shoots. Prune the roots and the shoots to balance the ratio to 1:1. If you plan to train your tree, install the copper wire now. Wrap the end of the wire around the crown or the tree (the area where the roots meets the trunk) and gently coil the wire around the trunk until you reach the top. Cut off the extra wire at the top of the plant and wrap the wire loosely to the end to the central branch. Now the trunk may be bent to the form you wish your bonsai plant to take. The same may be done with the branches by attaching wire to the main trunk and wrapping the branches with wire.

Planting the tree correctly is important. In a shady spot, begin by lining the bottom of the tray with one-half inch of gravel and a layer of soil. Spread the roots over the soil layer so that the roots are extending in all directions. Cover the roots with soil being careful not to cover the crown of the tree with soil. After you firmly press the soil with your fingers, the soil level should be one-half inch from the top of the tray. Sprinkle a thin layer of gravel on top of the soil and arrange any stones, moss, or other decorations on the surface. Fertilize with a balanced tree fertilizer. Remember, bonsai are not houseplants. Most bonsai trees need plenty of sun so place the tree in a partly sunny to sunny outdoor location.

After Planting Care:
 The new bonsai plant may need periodic pruning or pinching. Prune or pinch back any errant branches to keep the plant in its proper form. Remove leaves to reduce the demand on the roots for water and nutrients. Pinch new shoots and the buds from old shoots to keep the amount of new growth to a minimum.

Bonsai trees need regular care. Due to the restricted roots and relatively small amount of soil, the plants can dry out rapidly. Daily, irrigate the tree thoroughly. On very hot days, the plant may need water twice a day if it is in full sun. Fertilize with a diluted liquid fertilizer every couple of weeks.

Replanting:
 Bonsai trees are generally repotted every two or three years in the late winter or early spring. Re-use the old pot or use a slightly larger new pot. Repeat the root cleaning process discussed during planting so the roots are washed thoroughly. While keeping the roots moist, prune the roots and the shoots to maintain an even balance between the two. Adjust the copper wire to prevent it from becoming too tight as the tree trunk grows. Re-pot in the same manner as before except now it may be necessary to wire the roots to prevent your growing tree from toppling out of the pot. Run copper wire through the drain holes in the bottom of the tray. Fasten these over the roots. Again, finish re-potting by sprinkling gravel over the soil surface and fertilizing. To learn more about bonsai, contact the your County Extension Service.


Center Publication Number: 104
Blossom-End Rot of Tomatoes

Source(s): Willie O. Chance, UGA College of Agricultural and Environmental Sciences Extension Agent, Houston County.


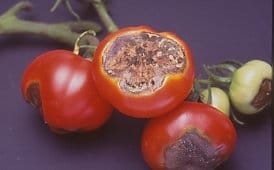
Many home gardeners have been disappointed and frustrated when they picked that first ripe tomato and turned it over to find blossom-end rot.

blossomendrot

Blossom end rot (BER) usually shows up first as a small dark or water soaked area on the bottom of the fruit. The spot can get larger until it covers the entire bottom half of the fruit or it may remain just a small spot. Affected fruit may begin to ripen earlier than other fruit. If the area gets larger it gets darker and sinks in. Blossom end rot is bad on tomatoes but it also affects peppers, eggplants and some melons.

Blossom end rot is caused by a calcium deficiency. Calcium is an essential nutrient for plants and for some reason; the tomato did not get enough calcium as it was growing.

Several things may cause BER. Calcium levels in the soil may be low. Since calcium moves into the plant with water, BER is worse in very wet or dry years. Other causes are poor rooting, improper watering, low soil pH, or using too much ammonia- containing fertilizer.

The main culprit is generally dry soils. It is especially important to keep plants well watered during early fruit development. Most of the calcium a tomato has enters the tomato fruit before it is the size of a quarter. During this early development, dry soils will cause BER, which shows up in the fruit near harvest time.

For these reasons, BER is better prevented than cured. Prevent it with these tips.

  • Before planting, soil sample and lime to bring the pH up to 6.0. Add lime one to three months before planting.
  • Add gypsum (calcium sulfate – one cup per plant or one to two pounds per 100 square feet) to the soil before planting. Gypsum works more quickly than lime to supply calcium to the plant. To find gypsum, call farm supply dealers or feed and seed and hardware stores.
  • Plant in soils that are well drained and tilled at least eight to twelve inches deep.
  • Water established plants with three-quarter inches of water twice a week. Do not waterlog plants or let them suffer from drought, especially early in the development of the tomato fruits. Water plants deeply and then let the soil dry slightly before watering again.
  • Mulch around plants to keep the soil from drying out. Pull mulch slightly away from the main stem of the plant.
  • Side dress tomatoes once every five weeks if necessary. Fertilizers can supply nitrogen in two forms – ammonium and nitrate. Use calcium nitrate, 5-10-15, 10-10-10 or similar fertilizers and look for fertilizers that have a higher percentage of nitrate nitrogen and lower levels of ammonium nitrogen. Read the fertilizer label to find this information. This is especially important when fruit are small. Try to wait until tomatoes are the size of a quarter before you side dress.
  • Be careful when hoeing or cultivating. Damaged roots will not take up calcium well. Do not heavily prune tomatoes. This can make them more susceptible to BER.
  • Once you have BER there is nothing you can do for affected fruits. Use these practices to prevent BER in new fruits. Often the first tomatoes are affected and later fruits are okay. In other words – the condition may get better as the plant matures.
  • There are some calcium-containing sprays for BER. Sprays applied to the leaves do not control BER well because calcium usually enters the plant through the roots and should be applied to the soil. Calcium is not moved around in the plant well and may not make it into the fruit if we apply it to the leaves. If you want to treat affected plants with calcium, pour solutions of calcium chloride or the Blossom End Rot sprays around the tomato plant’s roots. The plant can take up calcium more readily this way.
  • Another option is to sprinkle one-half cup of gypsum around the plant and water it in. Expect slower results using gypsum as compared to treating the soil with calcium chloride. If you cannot find gypsum – you can use lime but expect even slower results.

Blossom end rot is a disappointing beginning to the tomato harvest season. Fortunately, it is usually less of a problem as the year progresses. Use these tips to prevent this problem next year and to perhaps help the plants that you have now.


Resource(s): Vegetable Gardening in Georgia

Center Publication Number: 58

Black Spot on Roses

Source(s):Nina Eckberg


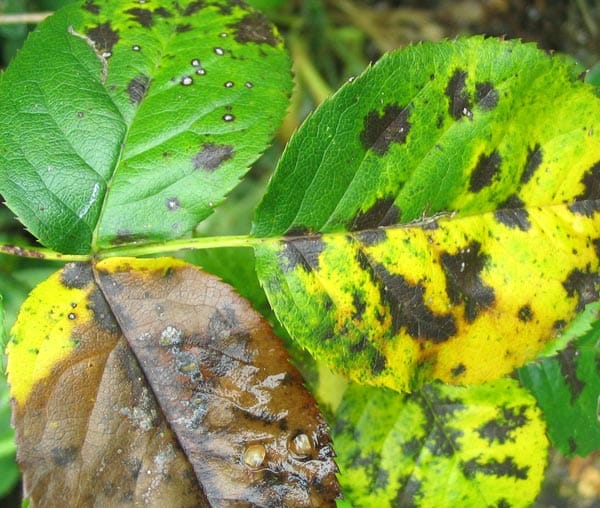
Identification of Black spot on roses.

black spot

Appearance

Black spots 2-12mm in diameter develop on upper leaf surfaces. Leaf tissue surrounding the spots turns yellow and the yellowing extends throughout the leaf. On resistant roses, only tiny black flecks may form and leaves remain green. Raised, purple-red blotches develop on immature wood of first-year canes of susceptible roses.

Hosts

Rose varieties such as teas, hybrid teas, briers and polyanthas are quite susceptible. Rugosa, moss roses and wichuraianas are more resistant to the disease.
SEASON:Leaves are most susceptible while still expanding (6-14 days old). Fungal spores must be immersed in water and continuously wet for at least 7 hours while temperatures are between 70º-80º F.

Damage

When black spot is on a plant, the leaves can begin to fall off. Some plants become completely defoliated, but if cared for,will survive. Black spot lesions on the rose canes are small and seldom kill the plant, but are important in the survival of the disease over the winter.

Integrated Pest Management

Several steps can help control black spot on roses:

  • Air circulation around bushes speeds up drying and reduces black spot.
  • If possible, do not water plants overhead with sprinklers. Leaves must not be allowed to remain wet or in high humdity for more than 7-12 hours.
  • Sanitation is extremely important in controlling black spot. Remove leaves from the ground and prune canes that have lesions to reduce overwintering of the disease.
  • Fungal sprays can be used during periods of the year when conditions are favorable for black spot. Preventive spraying can begin in March until leaves are mature, then spray fungicide as needed. Call the Extension Office for the type of fungicides that control black spot and remember, READ THE LABEL of the product you choose.

Comment

If you think you have black spot on your roses, bring in a plant sample to the Extension Office for diagnosis.


Resource(s): Common Landscape Diseases In Georgia

Center Publication Number: 57

Bermudagrass Lawns

Source(s): Gil Landry, PhD., Coordinator – UGA Center for Urban Agriculture, The University of Georgia


Bermudagrass lawns are grown throughout Georgia. Bermudagrasses (also called Bermudas) grow vigorously during the warm months (80 degrees-95 degrees F) of spring, summer and early fall and become brown and dormant in winter.

Bermudagrasses(Cynodon Spp). All bermudas thrive in hot weather but perform poorly in shade. Bermudas spread so rapidly by both above-and-below-ground runners that they are difficult to control around flower beds, walks and borders. If fertilized adequately, they require frequent mowing. The bermudagrasses are adapted to the entire state and tolerate a wide soil pH.

Common Bermudagrass(Cynodon dactylon). Common bermudagrass,commonly planted by seed, is drought resistant, grows on many soils, and it makes a good turf if fertilized and mowed right. Common bermudagrass produces many unsightly seedheads, but in spite of this fault, it is frequently used on home lawns due to the ease and economy of establishment. Common bermuda may be planted from either seed or sprigs and with intensive management will provide a high quality turf. However, the newer hybrid bermudas are generally far superior. Newer and improved seeded bermudagrasses include Princess 77, Riviera, Yukon and many others.

Hybrid Bermudagrasses. Compared with common bermuda, these grasses have more disease resistance, greater turf density, better weed resistance, fewer seedheads, finer and softer texture and more favorable color. They also produce no viable seed and must be planted by vegetative means.

The hybrids also require more intensive maintenance for best appearance. Frequent fertilization and close mowing, edging, and dethatching are needed to keep them attractive.

All of the improved bermudas described here have been developed and released cooperatively by the University of Georgia Coastal Plain Experiment Station and U.S. Department of Agriculture. They are products of the grass breeding program of Dr. Glenn W. Burton, Principal Geneticist.

Tifway(Tifton 419) Bermudagrass. Tifway has several outstanding features that make it an ideal turf for lawns and golf fairways and tees. It has a dark green color and stiffer leaves than Tifgreen. Tifway is more frost resistant than other bermudagrasses. Therefore, it will usually remain growing and green longer in the fall and will develop color earlier in the spring. This trait, along with its ruggedness, has led to its use on football fields.

TifSport is an improved hybrid with similar texture and color of Tifway. However, TifSport has superior cold hardiness when compared to other available hybrids and provides a high-density grass when mowed at 1/2 inch. The variety has shown mole cricket non-preference in side-by-side comparisons to Tifway.

Tifton 10 is a bermudagrass that originated in Shanghai, China. It is vegetatively propagated, sheds pollen but produces few seed. Foliage is coarse texture with a natural dark bluish-green color. It rapidly reproduces from stolons and above ground stems which limits weed invasion. Tifton 10 is suited for roughs, roadsides, athletic fields, commercial landscape areas and lawns.

Other older varieties of bermudagrass include Tifgreen, Tifdwarf, and Tifway II.


Resource(s): Lawns in Georgia

Reviewer(s): Ellen Bauske, PhD., Program Coordinator and Randy Drinkard, Technical Writer – UGA Center for Urban Agriculture, The University of Georgia. April 2008.

Center Publication Number: 125

Beat the Heat this Summer

Source(s): Randy Drinkard


Are your flowers and shrubs ready for the heat this summer? If you rely on municipal water to irrigate your landscape, you may be prohibited from using it to keep your outside plants green and healthy. Start drought-proofing your landscape now so that it can survive with little to no supplemental water this summer.

page21576

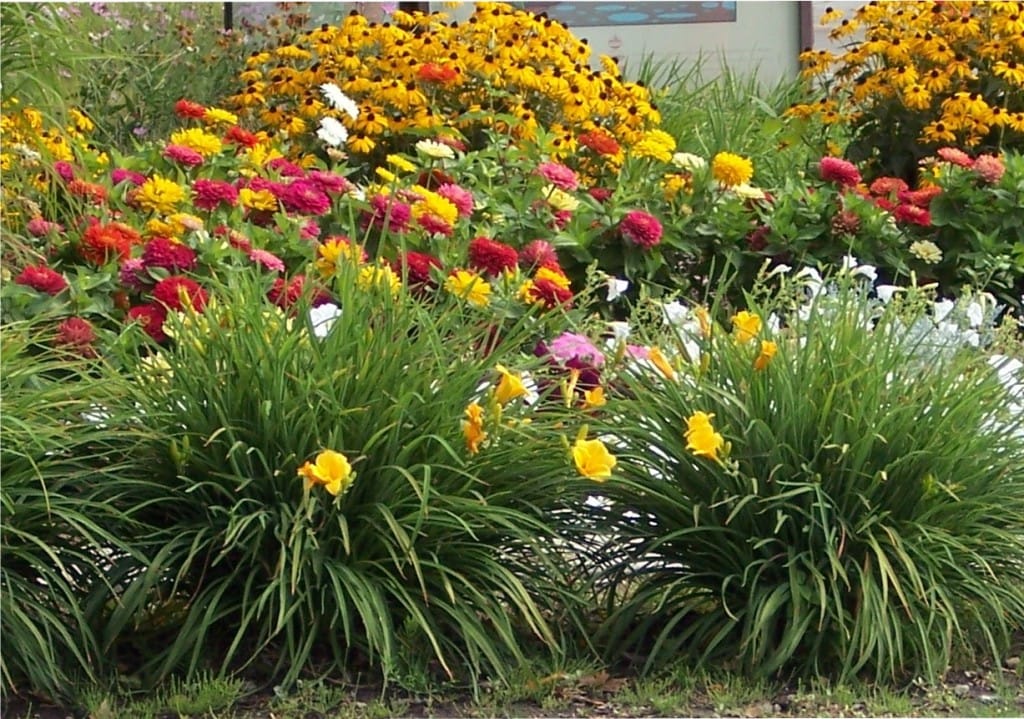
First, consider what areas require the most water and think of ways you can reduce the water use. For instance, an irrigated area might be replaced with some large beds of drought-tolerant ground covers, such as spreading junipers, like ‘Blue Rug’, ‘Sargents’, ‘Prince of Wales’ or ‘Blue pacific’. Other good, drought-hardy ground covers include, liriope, Asiatic jasmine, Carolina jasmine, trumpet creeper, day lilies and creeping raspberry.

To save money when planting a large area, ask your local nurserymen about ordering liners. Liners are small, rooted cuttings that are available bare-root or in 2-inch pots. Many Georgia growers produce liner plants, and some garden centers can get them, too, if you ask.

There are also a number of excellent drought-tolerant shrubs, such as dwarf yaupon holly, Indian hawthorn, dwarf crepe myrtle, glossy abelia and ‘Miss Huff’ lantana. And don’t forget the ornamental grasses, including maiden grass, fountain grass and Japanese silver grass. Ornamental grasses are tough as nails and are unaffected by drought conditions.

Georgia flower growers are right on target with their production of drought-tolerant color plants, including sedum, verbena, Purple Heart, gaura, wave petunias, and ‘New Gold’ lantana.

Although they sometimes shut down during periods of extended drought, these plants bounce back with renewed vigor when the rains return.

You don’t have to invest a lot of money to make your landscape more drought-tolerant. Consider putting in some sweeping beds of pine straw, pine bark or shredded wood mulch in the place of irrigated landscape. Many municipalities make shredded mulch materials available now that they can no longer put yard wastes in the landfills.

Also, old newspapers can make an excellent mulch around ornamental shrubs, flowers and vegetable plants. Use a leaf rake to gently pull back your existing mulch, wet or dip newspapers in a bucket of water and then spread papers two sheets thick on the ground. Put the mulch back over the newspaper to conceal it and hold it in place. Newpapers not only help hold moisture in the soil but add organic matter as they slowly decompose.

When retrofitting your landscape with more drought-tolerant plants, the key is to get the plants established before summer heat and watering restrictions arrive. Water your plants as needed to get them established for the first six to eight weeks after planting, then turn off the tap and let Mother Nature provide the water for the remainder of the year. By gradually reducing the amount of water supplied to the landscape and garden you will be helping to reduce the plant’s reliance on supplemental watering later this summer when temperatures and drought conditions become more severe. By slowly weaning your plants from excessive moisture, their root systems will be encouraged to grow more deeply in search of water.


Resource(s): Care of Ornamental Plants in the Landscape

Center Publication Number: 92

Be a Plant Detective

Source(s): Gary L Wade


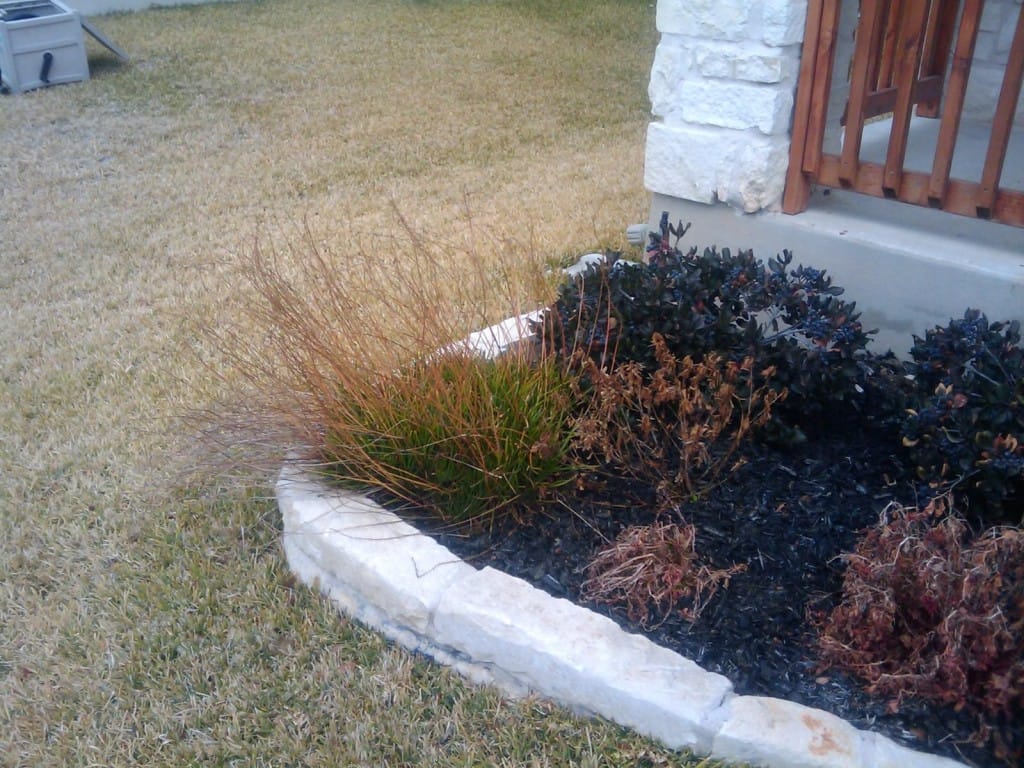
Plants in the landscape cannot talk, but they will let you know when they are sick by the symptoms they express. Wilted or discolored leaves, dying branches and premature leaf drop are just a few of the symptoms of plant stress.

1234028824114

Often plant problems occur when a plant is not able to adapt to the site in which it is planted. For instance, junipers are extremely drought-tolerant once established, but they cannot tolerate poorly drained soils. Shade-loving plants like azalea, rhododendron and hosta often have problems when planted in areas that receive hot, mid-afternoon sun. Forcing plants to grow in harsh or unsuitable sites weakens them and encourages secondary insect and disease infestations.

At other times, plant problems result from poor cultural or management practices. We can literally kill plants with kindness by applying excess quantities of fertilizer or water. Planting too deeply is a common cultural mistake. When plants are set too deeply in the soil, the lower portion of the root system becomes deprived of oxygen and dies. When attempting to diagnose and remedy a plant problem, be a detective and gather all the clues before attempting a cure. Ask yourself these questions:

  • What has the recent weather pattern been? Has there been heavy rain or drought?
  • Are other plants in the vicinity showing the same problem, or is this just an isolated case?
  • What are the soil drainage patterns? Does the soil stay wet for a long period after rain or irrigation?
  • What is the light level in the area and is the plant well- suited to the amount of light it receives?
  • Has there been a chemical or fertilizer spilled in the vicinity of the plant?
  • Have there been any chemicals sprayed on the plant recently?

If you cannot diagnose the problem, seek help from your county extension agent or nurseryman. A sample of a live plant showing the symptoms and a soil sample (of at least 1 pint) taken from around the plant will help these professionals provide an accurate diagnosis of the plant problem. Taking the time to properly diagnose a plant problem before trying a cure will save you time, effort and money.


Resource(s):Care of Ornamental Plants in the Landscape

Center Publication Number: 249

Bahiagrass

Source(s): Jacob G Price


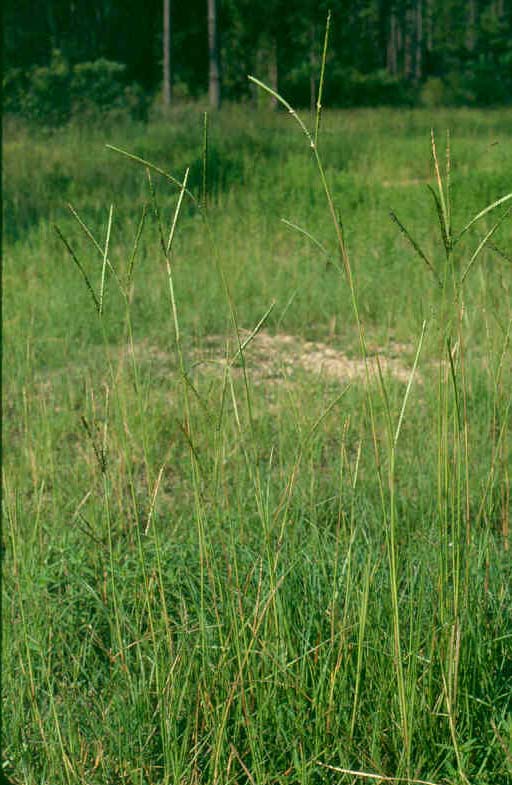
Bahiagrass is an aggressive mat-forming perennial in many southern lawns. It is a warm season grass that spreads by seeds and shallow underground rhizomes. It is native to South America and is common in the Gulf States.

0211bahiagrass

Description

Bahiagrass is best know for it’s seedhead which normally has two branches that form a “Y” shape. The rhizomes are usually thick and have a purplish or reddish color. Leaves are somewhat folded and smooth on both surfaces.

Pre-emergence Control

For Centipedegrass, St. Augustinegrass, dormant Bermudagrass, and Zoysiagrass. Apply Atrazine as labeled for fair, (70-79), supression. Do not apply Atrazine near the root zones of ornamentals or during spring green-up.

Postemergence Control

For St. Augustinegrass, Centipedegrass, Zoysiagrass, and Bermudagrass, Manor (metsulfuron) may be used for good control. For Centipedegrass only, apply sethoxydim, (Vantage), for fair suppression. Apply Vantage no sooner than three weeks after greenup. May be applied at low rate to newly planted centipedegrass after stolons have grown three inches. Do not mow 7 days prior to or 7 days after application. Repeat treatment 10-14 days after the first application. Two applications per season may be used in established centipedegrass. After spring green-up for Bermudagrass and Zoysiagrass apply MSMA 2 or 3 times at the recommended rate 5-7 days apart. Image also suppresses bahiagrass and may be used in all of the above turf grasses.


Center Publication Number: 66

Bagworms

Source(s):

  • M.F. Potter, Extension Entomologist, The University of Kentucky College of Agriculture.
  • L.H. Townsend, Extension Entomologist, The University of Kentucky College of Agriculture.

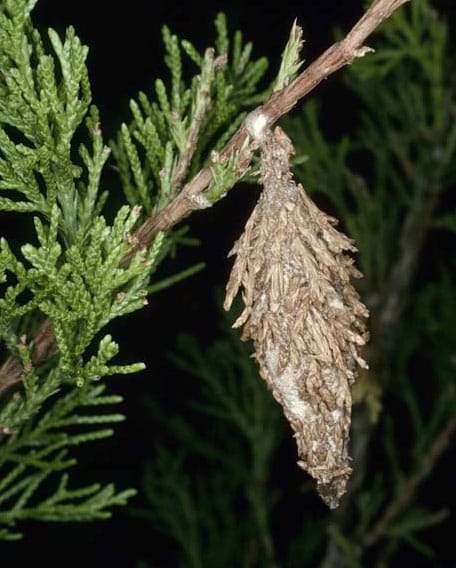
Bagworms are caterpillars that make distinctive spindle-shaped bags on a variety of trees and shrubs in Georgia. They attack both deciduous trees and evergreens, but are especially damaging to juniper, arborvitae, spruce, pine and cedar. Large populations of bagworms can strip plants of their foliage and eventually cause them to die. Infestations often go unnoticed because people mistake the protective bags for pine cones or other plant parts.

bagworm_0

Description and Habits

Bagworms are the larval (caterpillar) stage of a moth that is rarely seen. Only the males develop into typical moths capable of flight. The adult female is grub-like and remains inside the bag until just before she dies. Bagworms pass the winter as eggs inside the bag that contained the previous year’s female. In mid to late May the eggs hatch, and the tiny larvae crawl out from the end of the bag in search of food. By using silk and bits of plant material, they soon construct a small bag around their hind part that looks like a tiny, upright ice cream cone. As the larvae continue to feed and grow, they enlarge the bag enabling them to withdraw into it when disturbed. Older larvae strip evergreens of their needles and consume whole leaves of susceptible deciduous species, leaving only the larger veins. The bag is ornamented with bits of whatever type of vegetation they are feeding upon. By early fall, the bags reach their maximum size of 1-1/2 to 2 inches. At this time the larvae permanently suspend their bags (pointing downward) from twigs, and transform into the pupa or resting stage before becoming an adult.

Adults emerge from the pupal stage in early fall. Males are black, furry, clear-winged moths with about a 1-inch wing span. They are active fliers and fly in search of females which remain inside their bags. The females produce a powerful scent, or pheromone, that attracts the males. The creamy white females lack wings and legs and appear to be no more than grubs. The male flies to the female bag, inserts his abdomen in the hole in the bottom of the bag and mates with the female. After the fertilized female has laid several hundred eggs inside her old pupal case within the bag, she drops from the bag and dies. The eggs remain in the bag until the following May when the cycle begins again. There is one generation per year. Bagworms have two means of dispersing from plant to plant. Very young larvae may spin strands of silk and be carried fairly long distances by wind. Larger larvae may move short distances by crawling.

Bagworm Control

If only a few small trees or shrubs are infested, picking the bags off by hand and disposing of them may afford satisfactory control. This approach is most effective during fall, winter or early spring before the eggs have hatched. When many small bagworms are infesting evergreens, an insecticide may be needed to prevent serious damage. The best time to apply an insecticide is while the larvae are still small (less than 1/2-inch long). In Georgia, this is usually in June. Small larvae are more vulnerable to insecticides, and inflict less damage. Carefully inspect susceptible landscape plants, especially evergreens, for last year’s bags. Young bagworms are harder to see; look closely for the small, upright bags which have the appearance of tiny ice cream cones constructed of bits of plant material. Preventive treatment is often justified on plants that were heavily infested with bagworms the previous year.

Several products are available for homeowner and professional use. For homeowners, conventional insecticides such as Sevin, malathion, various pyrethroids or the microbial insecticide Bacillus thuringiensis (Bt) provide satisfactory results. For commercial operators, acephate (Orthene TTO, Pro 75), tebufenozide (Confirm 2E), Bt (Dipel 3.2WP) and various pyrethroids work well. The BT products have very low mammalian toxicities, but are only effective against younger larvae. If large bagworms are present (more than about 3/4-inch long), a conventional insecticide probably will provide better results. The foliage should be throughly wetted with the insecticide spray in order to achieve thorough coverage. Trade names are used as examples. No endorsement is intended, nor criticism implied of similar products not named. Always read and follow directions on the label.


Resource(s): Insect Pests of Ornamental Plants

Center Publication Number: 203

Azaleas’ Leaves Turning Yellow and Dropping?

Source(s): Willie O Chance


As we head toward the end of the year, gardeners want their landscapes to look their best. But sometimes, in spite of our best efforts, the leaves on certain evergreen plants turn yellow and unsightly! This is especially true of azaleas, gardenias and hollies.

Azaleas' Leaves Turning Yellow?

Why Are My Azaleas’ Leaves Turning Yellow?

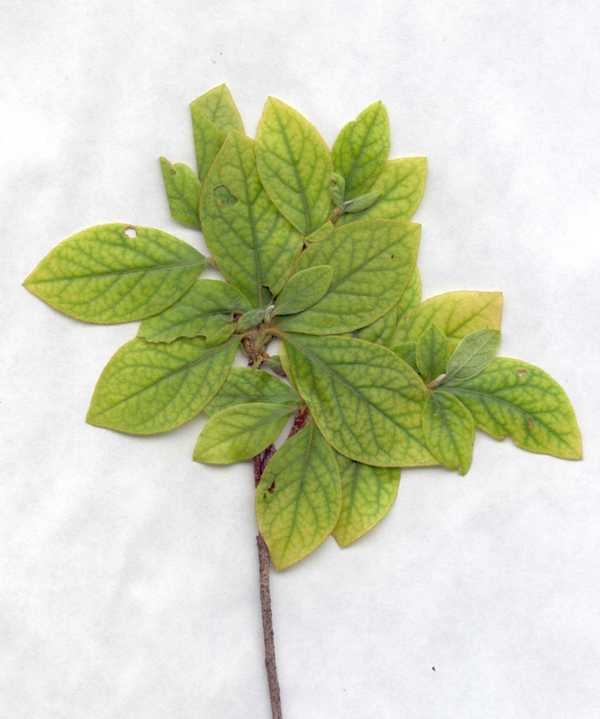
One of the main questions at this time of the year is – “Why are so many of the leaves on my azalea plants turning yellow?” This year, it appears many azalea plants have more yellow leaves than green leaves! Usually we see a few older leaves yellowing with the younger leaves remaining green. However, in some cases, many leaves are turning yellow. Why is this condition so bad this year?

Remember, a plant losing some of its leaves is a normal process. The older leaves die and younger ones replace them. You would only be concerned if most of the leaves are yellow.

The traditional reply is that the plants have run out of fertilizer – particularly nitrogen. Nitrogen-deficient azaleas will shed older leaves. This is certainly a possible cause. And why did this happen? Azaleas may have missed their last fertilization in July or August or just never took up the fertilizer available.

Don’t worry about these plants. They should bloom normally in the spring. Fertilize them after the danger of frost is past – about April 1. Do not fertilize them now. This may cause the plant to start growing again. And this new growth, in turn, will be cold-tender and may be burned back by our winter weather.

Our unusual weather may be causing a problem with azaleas. Azaleas are a Southern favorite, but they are somewhat temperamental. Their fine fibrous roots like well-drained but moist soils. This year’s summer drought, followed by a wet autumn, may have damaged these roots. This is especially a problem in areas not suited for growing azaleas. Azaleas do not like wet or very dry soils or full sun locations.

There is not much we can do about this now. Fertilizing now will not fix this problem, and in fact, could further complicate the situation. Proper planting and maintenance will help prevent this problem in the future.

Plant azaleas in well-drained soils in partially shaded locations. The shade provided by planting them next to a building is not always enough shade. If they must be planted in the sun, they prefer the morning sun. Plant azaleas in slightly raised beds, if possible. Plant them no deeper than they originally grew.

The roots may be pot-bound when you buy them. This is when the roots are tightly matted together. Pot-bound roots form a tough ball that the roots may never grow out of. Cut the root ball or break the roots down four sides of the root ball if the plant is pot bound. Spread the roots out as you add soil.

Also, plant azaleas in beds, if possible, and not individual holes dug in the ground. Till the area well. You do not need to add compost to the soil. Put a three-inch mulch over the entire bed after planting. Water the soil well to settle the roots. Plant in fall and winter for best results.

Proper planting and watering are critical steps in assuring success in growing azaleas. Azaleas and other shrubs must be watered for best results. This is especially true during the first year. Water the soil so as it keeps it moist but not wet for the first six months. After that, water when soil dries out, wetting the soil to a depth of twelve inches. Water three-quarter to one inch a week during drought conditions. After plants are established, do not water every day or every other day! Frequent watering can kill plants.

Two other leaf problems with azaleas are: 1)iron deficiency and 2) lace bugs. An iron deficient azalea will have yellow or white younger leaves. The leaf will be yellow with green veins. Use a soil applied iron fertilizer at the labeled rate. If the iron deficiency returns quickly or repeatedly, the azalea may have root injury or the soil pH may be too high.

Lace bugs make the leaves look speckled or silvery. The underside of the leaves will be brown speckled. Wait until March and treat the plants with Orthene or other recommended insecticides. Read and follow all label directions.

Enter the New Year with healthy azaleas. Azaleas may look sad and unsightly now, but they can return to healthy plants with proper care.


Center Publication Number: 230

Look at this too from our friends in Cobb County: Azalea Leaves Turning Yellow, Dropping?

Azalea Leaf Gall

Source(s): Laurene Hall


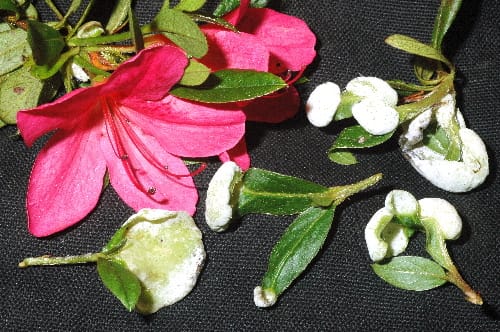
Azalea leaf gall is a very common and widespread fungus disease that occurs in early spring on new azalea foliage. The leaves become thickened, curled, fleshy and pale green to white in color. Fortunately, this disease is more alarming than damaging.

Dsc-0028-06AzaleaLeafGall

Description

Caused by a fungus, Exobasidium vaccinii, which is dormant in the developing buds from one year to the next. When bud growth begins in the spring, the pathogen renews activity also, and one or more of the leaves on the shoot may develop symptoms. A spore-bearing hymenium is eventually produced which completes its development on exposed leaf surfaces. Spores are blown about by air currents, some of them lodge on the plant and finally invade leaf buds. The actual damage to plants is not nearly so important as it appears to be. However, if disease is severe, the vigor of the plant can be affected due to the loss of young leaves.

Detection

First noticed soon after leaf buds open in the spring. All or only part of the individual leaf may be affected. Part of the leaf becomes distorted with a pale green to whitish, bladder-like thickening. When young, the thickened, fleshy-like leaf is covered with a white growth. As the galls age they turn brown, dry up and fall to the ground. Occasionally, a black coating may develop on the surface of the gall, particularly during rainy weather, which results from secondary invasion of the galls by the fungus Pestalotia.

Control

  1. Handpick or prune out and destroy (burn) galls.
  2. Spray with recommended fungicides, such as Daconil 2787 or Mancozeb.
  3. Serious outbreak in large plantings: spray in early spring when leaf buds just begin to open and at two-week intervals (if spring is relatively dry) through early summer (mid-June) with Bordeaux mixture which may reduce incidence of disease in the following season. Timing of sprays is critical because the spores over-winter in the bark and bud scales.

Resource(s): Common Landscape Diseases In Georgia

Center Publication Number: 44