Dollar Spot

Source(s): Laurene Hall


Dollar Spot makes circular areas only a few inches in diameter. Spots may run together causing large, irregular patterns. Blades have straw-colored lesions along one edge that spread across the leaf blade until tips dieback. Leading edge of dieback is reddish brown. White mycelium (the vegetative part of a fungus that looks like a mass of branching strings) may be associated with patches when turf is wet.

3dolspt1 DollarSpot3

Appearance

Active in late spring to late autumn. Will attack lush turf fertilized with excessive nitrogen (<1/2 lb. N/1000 sq. ft./month). Disease is severe in soils that are low in phosphorus and potash; when night temperatures are 50 to 60° F (10 – 16° C) and when more than 10 hours of foliar wetness persists per day for several days. Disease is also severe when the soil drains poorly and turf has previously suffered from other environmental stresses

Hosts

Bentgrass, Bermuda, Centipede, Fescue, Rye, St. Augustine, Zoysia

IPM Control

Maintain adequate nitrogen fertility. 1/2 lb. to 1 lb. of N/1000 sq. ft. every 2 – 4 weeks will reduce severity of disease. Maintain moderate to high levels of soil potassium as determined by soil tests. Decrease shade and increase air circulation to enhance drying of turf. Avoid irrigation in late afternoon and in evening prior to midnight. Water only when required to depth of 5 – 7 inches in early morning. Maintain thatch at ½ in. thickness or less. Raise mowing height.

Chemical Controls

If you think you have Dollar Spot in your lawn, bring a sample of grass (about 4 in. square) with both living and dead tissue to the Extension office for proper diagnosis. A fungicide recommendation may be required if the problem cannot be corrected by cultural IPM practices. Always carefully follow label directions when applying chemicals and wear protective clothing if necessary


Resource(s):

Center Publication Number: 46

Poison Ivy: Leaves of Three – Let it Be!

Source(s): Mark Czarnota, UGA Weed Specialist


Everyone who works outdoors with plants or goes hiking, camping, picnicking or other outdoor activities should be able to identify poison ivy. Failing to know it when you see it can lead to severe allergic reactions. Poison ivy and its Rhus cousins are said to cause more contact dermatitis (redness, rash, blisters and itching) in the United States than all other plants and industrial or household chemicals.


Poison ivy (Rhus radicans) is found mostly in moist, deciduous forests and wooded areas. Unfortunately, it’s also found on trees, fences and ornamental plantings in Georgia landscapes. A related species, poison oak (Rhus toxicodendron), may actually be a type of poison ivy. Poison ivy may grow as a small shrub or a high-climbing vine on trees, fences and buildings. Each compound leaf has three bright green, shiny leaflets.

poisonivyleaves-lrRemember the rule

The shape of the leaves and presence of hairs on the undersides vary greatly, so people may not always recognize poison ivy. The old saying, “leaflets three, let it be,” is a good rule. Poison ivy produces small flowers with five yellowish-green petals arranged on slender stalks. Its small, grayish white berries are food for more than 55 bird species.

Box elder (Acer negundo) is often confused with poison ivy. Its seedlings have three leaflets, too, but they have opposite leaves. Poison ivy leaves are alternately arranged on the stem. Virginia creeper (Parthenocissus quinquefolia) is also commonly confused with poison ivy. However, it is a harmless plant that has five leaflets growing out of one point where they are attached to the vine. Virginia creeper has blue berries. It is found growing in the home surroundings on houses, fences, trees, and in other places where poison ivy is observed.

All parts are poison

All parts of poison ivy are poisonous year-round. A toxic, oily compound (urushiol) is quickly exuded if plant tissues are broken in any way. People are exposed as they brush against the plant or touch equipment, clothes or pets that have touched it. It can even be carried in the smoke from burning the vines.

Only the oily toxin, though, can spread the rash. Symptoms usually appear in 12 to 48 hours but may not show up for days. If you think you’ve contacted poison ivy, washing your skin with cold water within 5 minutes may keep the urushiol from contacting your skin. Within the first 30 minutes, use soap and water. Consult a physician or pharmacist for the best treatment.

Can you dig it?

Digging poison ivy plants and roots can control it in small beds of landscape ornamentals. Be sure to wear watertight gloves, though. Continually clipping poison ivy at or near the ground will eventually control it. But you may have to clip it several times during the year for several years.

Chemical control

Herbicides can control poison ivy, too. But always read all label directions. Poison ivy has extensive roots, so you’ll likely have to apply herbicides many times. Glyphosate is the active ingredient in Roundup and many other products. Apply it directly to the foliage of poison ivy. It works well on warm, sunny days when plants are actively growing. It’s best when plants are flowering or fruiting, generally in early summer in Georgia.

You’ll need at least one rain-free hour after applying glyphosate to get the best results. The product can severely injure desirable plants, so don’t spray it on windy days. Use coarse sprays with large droplets to minimize drift.

Cut and spray

Where poison ivy has grown into large trees, cut the vine 2 to 3 feet above the soil. Within 24 hours, spray the leaves of the lower section (if any) with a 5-percent to 10-percent glyphosate solution (using at least a 41-percent glyphosate concentrate to make the spray solution).

If there are no leaves, paint or spray the lower stem portion with 50-50 glyphosate-water solution or undiluted glyphosate (with at least a 41-percent glyphosate concentrate.

Triclopyr (Brush-B-Gon, Brush Killer Plus) is recommended around homes, fences and nongarden areas. It’s often used to keep poison ivy and other plants from coming back after being cut. Just clip the poison ivy vine near the soil surface. Then paint the freshly cut surface with undiluted triclopyr. Don’t apply it, however, to the bark of any trees. Repeat the treatment when regrowth appears.


Resource(s): Poisonous Plants in the Landscape

Center Publication Number: 194

Propagating Herbs for Food, Fragrance, and Fun

Source(s): Wayne McLaurin, Professor Emeritus of Horticulture, The University of Georgia, College of Agricultural and Environmental Sciences


Growing Herbs

Growing herbs in southern gardens is simple and rewarding. Herbs provide seasonings for food, pleasant fragrances and interest to landscapes. Herbs are easy to propagate.

Herbs are propagated from seed, stem cuttings, division and layering. They are available from nurseries, garden centers, speciality shops, as well as in the traditional manner from friends and fellow gardeners who are thinning their herb gardens.

Seeding Herbs

A number of herbs, particularly annuals, can be grown from seed in much the same way as vegetables and flowers.

Direct seeding in the spring can be successful, but seeding is more successful if begun indoors in late winter. Use clean flats which are deep enough to give the root area a proper amount of space for growth.

Fill the container with moistened mix and firm the surface. Make shallow indentations, and sow the seed evenly at the same depth given on the package; most seeds are planted at a depth approximately twice their diameter. Very small seeds should be simply pressed gently into the surface of the soil and barely covered. Lightly water the surface, and place the container in a warm, well-lighted area or under fluorescent lights, not in direct sunlight. The container can be covered with plastic wrap or placed in a plastic bag, but remove the bag as soon as germination occurs. When the seedlings have two or three leaves, they may be transplanted into small pots or, if the frost-free date has passed, into the garden. “Harden-off” transplants by putting them in their pots outside in light shade for a few days before planting them in the garden. Water the transplants well initially and for the first week after planting.

Cutting Herbs

Many herbs such as lavender, rosemary, scented geraniums, and lemon balm can be propagated through cuttings. Some, such as French tarragon, cannot be propagated any other way. In spring or summer, cut about 3 to 5 inches of new growth containing two or more nodes. Make the cut just below a node where a leaf joins a stem, remove the lower leaves, and dip the cut end in rooting compound. The cuttings should be inserted past the first leaf node into the potting medium. The medium should be kept slightly warm and moist until cuttings have rooted, usually about three to six weeks. Root cuttings are done similarly, except the cutting is made from the budded root of the established plant and buried in the medium.

Dividing and Layering Herbs

Herbs that form clumps with many fibrous roots can be divided. Slice through a section of the mass with a shovel or dig up the entire plant, split the mass, and replant the divisions. Water the division well after transplanting to promote root-soil contact for quick re-establishment. Herbs propagated by division generally benefit from being dug up and divided every few years.

Another method of propagation is layering, bending a portion of a stem to contact the soil, pinning it in place until rooted, then removing and planting the rooted portion. Layering can be done in the spring or summer. If done in late summer, the plant can be left over the winter and transplanted the following spring.

Annual and Perennial Herbs

Most Common Methods of Propagation:

Annuals (seed)

  • basil,
  • borage,
  • caraway,
  • chervil,
  • cilantro/coriander,
  • dill,
  • parsley (biennial)

Perennials (seed)

  • hyssop,
  • lovage,
  • marjoram,
  • summer savory,
  • thyme,
  • fennel

Perennials (cuttings)

  • artemisia,
  • bay,
  • scented geraniums,
  • germander,
  • lavender,
  • lemon verbena,
  • rosemary,
  • rue,
  • sage,
  • santolina,
  • French tarragon,
  • winter savory

Perennials (divisions)

  • chives,
  • lemon balm,
  • mints,
  • monarda,
  • sorrel,
  • tansy

Resource(s): Herbs in Southern Gardens

Center Publication Number: 258

Dodder

Source(s): Mark Czarnota


Dodder (Cuscuta spp.) is a parasitic weed that infects a wide range of herbaceous and woody plant material. There are approximately 12 species of dodder and each species has a different host range. Dodder is generally brought into ornamental planting via infected plant material.

Dodder

Growth Characteristics

Dodder is a rootless, leafless, parasitic flowering plant. It is in the morning glory (Convolvulaceae) family. Dodder flowers and produces seed like any other flowering plant. Seeds can remain dormant in the soils for years before germinating. Under the right conditions, dodder seed will germinate, sending up a tendril that attaches to a suitable host plant. If no suitable host is available, the plant will die within a few days. Dodder attaches itself to the host plant’s vascular system with a peg-like haustoria. Once attached, the root system of the dodder plant shrivels and the plant feeds off the host. Dodder contains no green tissues because it does not need to photosynthesize and produce its own food. The stem color of dodder is generally yellow to orange, but can also be shades of red or white. Flowers are small, white or pink, and usually born in clusters.

Host Plants

Dodder infects a wide range of plants, including plants in the Asteraceae family (chrysanthemums, marigolds and sunflowers), Fabaceae family (alfalfa, clovers, soybeans and vetches), and the Ericaceae family (azaleas and rhododendrons).

Control

Remove all plants or portions of plants infected by dodder. Ideally it should be removed before the dodder flowers and produces seed. To date, dodder cannot be controlled through a selective post emergent herbicide application. However if the host plant is killed, the dodder plant will also die. Dodder seed can be controlled with pre emergent herbicides (check label to see if these herbicides are safe to host ornamentals) and soil sterilization.

Pesticide Precautions

It is the responsibility of the pesticide user to observe all directions, restrictions and precautions on pesticide labels. It is dangerous, wasteful and illegal to do otherwise. Store all pesticides in original containers with labels intact and behind locked doors. Use pesticides at correct label dosage and intervals to avoid illegal residues or injury to plants and animals. Use pesticides carefully to avoid drift or contamination of non- target areas. Surplus pesticides and containers should be disposed of in accordance with label instructions so contamination of water and other hazards will not result. Follow directions on the pesticide label regarding restrictions as required by State or Federal Laws and Regulations. Avoid any action that may threaten an endangered species or its habitat.

KEEP PESTICIDES OUT OF THE REACH OF CHILDREN!


Center Publication Number: 216

Proper Planting Tips

Source(s): Taft Eaker, Former UGA Extension Homeowner IPM Specialist


Improper planting is a common problem with many woody and herbaceous ornamentals. Results of improper planting are commonly seen on azaleas, boxwoods, hollies and junipers, but problems can occur with any plant. Symptoms usually include poor growth, and affected plants are often seen as “off-color” and unhealthy-looking with low vigor. Plants may develop branch dieback and eventually die due to environmental stresses resulting from poor planting.

thumbnail_planting

Improper planting can result from poor soil and planting hole preparation, failure to incorporate organic amendments and/or failure to break up the root ball. Planting holes should be dug twice as wide as the root ball and eight inches deeper than the root ball. Although the hole is dug deeper than the root ball, the plant should not be set too deeply in the hole. Backfill with clod-free soil under the root ball so that the top of the root ball is level with the surrounding ground. Azaleas should be set in the planting hole with the top of the root ball slightly above ground level.

Organic soil amendments such as peat moss, top soil, nature’s helper, pine bark, etc. may be helpful to improve quality of excessively sandy or clayey soils. However, soil amendments should always be evenly incorporated into the planting area/site and NOT dumped directly into the planting hole. Not mixing soil amendments into the native soil usually results in poor root growth and/or root rots as excessive moisture is retained near the roots by the uneven or irregular layers of soil texture.

Breaking up the root ball with hands or a knife prior to setting the plant into the hole helps to encourage root growth into the surrounding soil. Failure to do so usually causes the plant to continue to be root-bound (most plants are to some degree when they are purchased in containers). The roots grow inward, upward or around the root ball without penetrating the surrounding soil. (See pic above). Digging a hole just big enough for the root ball has a similar effect. Sometimes, when dying plants that have been in the ground for several years are removed, their root systems are still in the original shape of the pot.

Improper planting results in a stressed plant that is more susceptible to disease and insect attack. Plants weakened from improper planting, disease and insect attack, are then more likely to die when harsh environmental conditions occur. Plants subject to improper planting are often too injured or root-bound to save and the best approach is to start over. If replanting correctly is attempted, it should be done in early spring or fall.


Resource(s): Care of Ornamental Plants in the Landscape

Center Publication Number: 234

Proper Water Management Key to Turfgrass Drought Stress

Source(s): Gil Landry, PhD., Coordinator- The Center for Urban Agriculture, The University of Georgia.


Proper irrigation is the key to maintaining turfgrasses. Although irrigation may be costly, a green and growing turf improves environmental conditions. The main benefits of a healthy turf include water and wind erosion control. An actively growing turf may have a surface temperature that is 20 degrees F cooler than a dormant turf during the summer.

water

Turf Drought Maintenance Details

Water use, also called evapotranspiration, is the total amount of water needed for turfgrass growth, plus the quantity evaporated from the soil surface. Turfgrass water use rates depend on soil type, grass species and/or cultivar, management level and atmospheric conditions. Atmospheric water loss increases as temperature and solar radiation increase. Water loss also increases with increasing winds up to four mph, and as humidity decreases. In general, most turfgrasses grown in Georgia use about one inch of water per week to maintain normal growth and color.
Sandy or coarse-textured soils absorb water much faster than clay or fine-textured soils. However, sandy soils retain less water and therefore need water more often than clay soils. Since clay soils absorb water slowly, irrigation rates should be slow and extended over a longer period.
Most turfgrasses grown in Georgia need about one inch of water per week during the summer to remain green and growing. (Table 1). Some turfgrasses, like bermudagrass develop a deep root system to obtain the needed water. But other turfgrasses, like Zoysiagrass, have shallow root system and need weekly irrigation to remain green.
Table 1. provides summer water use rates/drought resistance rankings and irrigation frequency for turfgrass species in Georgia. The water use rate and drought resistance ranking is based on the amount of water used through evapotranspiration and the relative rate the turf begins to show drought stress. The days between irrigations are for mid-summer, high evaporative conditions. The differences between grasses reflect differences in daily evapotranspiration, root depth, viability, and quantity, and turfgrass drought resistance. Under non-irrigated conditions, the relative drought tolerance, or ability to survive without water, becomes more important. Generally, turfgrasses with high water use rates tend to have low drought tolerance.

Table 1. Summer water use rates/drought resistance rankings and irrigation frequency of turfgrasses used in Georgia.

COMMON NAME

WATER USE/DROUGHT

RESISTANCE

DAYS BETWEEN IRRIGATIONS

Bermudagrass

1

14 – 21

St. Augustinegrass

2

12 – 18

Centipedegrass

3

8 – 12

Tall Fescue

4

6-8

Zoysiagrass

5

5-7

During moisture stress periods, raising the mowing height and mowing often enough so that no more than one-third of the leaf tissue is removed can increase turf survival. Raising the mowing height helps the grass maintain a deeper root system which helps it find more water. Irrigate at the first sign of moisture stress. When a turfgrass is under moisture stress it becomes dull and bluish green, the leaf blades fold or roll and footprints remain after walking over the area. If dry conditions continue, the grass wilts. Begin irrigation on that portion of the lawn which first exhibits these signs. Irrigate between sundown and sunrise when the wind and temperatures are lower. Apply enough water to soak the soil to a depth of six to eight inches. This is usually equivalent to about one inch of water or 600 gallons per 1000 square feet but will vary with different soils. A sand would require 0.5 inch of water while a clay would need 1.75 inches to wet the soil to an eight-inch depth. Most sprinklers apply about one-fourth inch of water per hour and thus must be on in one spot for up to four hours to apply one inch of water.

Applying the proper amount of water is one maintenance practice often done wrong. Light, frequent irrigations produce shallow, weak root systems. The shallow root system prevents efficient use of plant nutrients and water in the soil.

If water is being applied faster than the soil can absorb it, either move the sprinkler to a new location or turn it off and allow the water to soak into the soil. To determine the depth of water penetration, use a spade or sharp probe to push into the soil two to four hours after irrigation. The probe will move into the soil very easily where it is moist. The probe becomes harder to push when it hits dry soil.

To test your sprinkler output and application uniformity, place several open-top containers of the same size under the sprinkler. After running the sprinkler for an hour, measure the amount of water in each container. The difference between containers provides an estimate of water distribution and application rate.


Resource(s): Lawns in Georgia

Center Publication Number: 213

Discover the Hydrangeas

Source(s): Jim Midcap, Extension Horticulturist, The University of Georgia


The hydrangeas we know best in Georgia are the garden shrubs which produce fluffy blue flower globes during summer.

hydrange

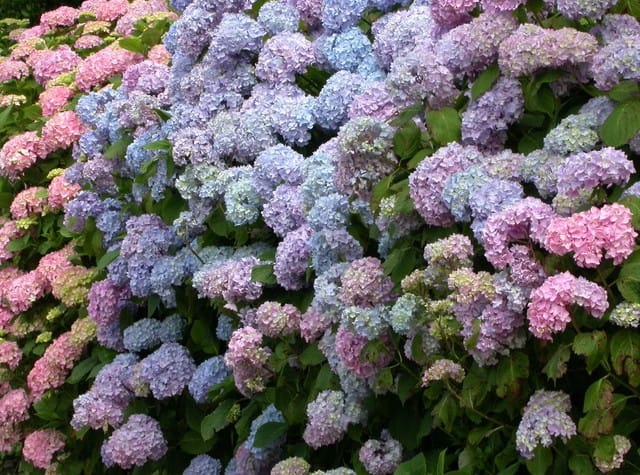
We also see them in florists’ pots, blooming in rich shades of pink or blue – until we plant them in our gardens. Then they flower in a sickly blend of the two colors or not at all.

Let’s look at ways we can help that familiar “mophead” or “florists”‘ hydrangea look its best and let’s learn about its wonderful relatives, the other hydrangeas for our landscape.

Hydrangea macrophylla

Hydrangea macrophylla is the botanical name for bigleaf hydrangea. There are two distinct types of bigleaf hydrangea: the “hortensia” (mophead,florists’, French and Japanese are some of its nicknames) and the “lacecap”, so-called because of the disc-like blooms that have tight little fertile flowers in the center and showier sterile flowers around the outer edge.

Bigleaf hydrangea blooms may be blue, pink or white, depending upon plant variety and soil acidity. This plant can absorb more aluminum from acidic (pH 5.0-5.5) soil. Aluminum contributes to rich blue flowering. Less aluminum can be absorbed by a plant growing in more alkaline (pH 6.0-6.5) soil. A deeper pink flower is the result. Color can be intensified as follows:

Make blue-flowering varieties or cultivars bluer over time by watering in 1/2 cup wettable sulfur powder per 10 square feet once a year OR, more quickly, by applying one tablespoon of aluminum sulfate in a gallon of water around the plant in March and again in April and May.

Pink varieties or cultivars develop richer color if you apply one cup of granular dolomitic lime per 10 square feet once a year OR if you drench around the plant with one tablespoon hydrated lime powder in a gallon of water in March, April and May.

Plant bigleaf hydrangea in partial shade, only as deeply as it grew in the pot or previous location, working lots of organic matter into a wide hole. Keep the plant evenly moist but do not fertilize during the first month or two. Afternoon shade and good mulching help to keep the leaves from drooping in summer heat.

Fertilize in March, May and July with one pound (2 cups) of 8-8-8 or 10-10-10 granular fertilizer per 100 square feet and water deeply as needed. Hydrangeas are very hungry, thirsty plants. An acid forming fertilizer would be best for blue varieties, an alkaline fertilizer for pink ones.

Prune bigleaf hydrangeas to control size as blooms fade, usually before August 1, because next year’s buds begin forming during late summer. Pruning in spring removes potential blossoms. If you choose to let the shrub reach its natural size and shape, you may prune for increased vigor by cutting out old woody stalks to the ground in-late winter.

Protect developing flower buds from late freezes which sometimes destroy a year’s flowering. Patio pots of small varieties can be moved to shelter during extreme cold. Large plants may be covered with sheets or blankets, but these should be removed during sunshine or the plant may be scorched.

Blooms usually appear during June and July in the Atlanta area. Cutting them for indoor use or drying encourages more bloom. Dry the blossoms by hanging in a dry, warm location or by putting them in a vase with only an inch or so of water and ignoring them until they are dried.

Varieties of Hydrangea macrophylla (bigleaf hydrangea) are endless, but many are available only from specialty nurseries. Here are a few good ones to look for:

Hortensias (Mopheads)

  • ‘Nikko Blue’ – the standard blue mophead, grows to 6′, heavy bloom, needs acid soil
  • ‘Otaska’ – rich blue in acid soil, to 3′ tall, bends under weight of blossoms
  • ‘Forever Pink’ – needs lime here for richest color, compact 3′ tall, good dark green foliage, early June bloom
  • ‘Pia’ – very small (1′) for rock garden or mixed border, reddish-purple bloom in any soil acidity
  • ‘Sister Therese’ – small, white bloom, good for containers

Lacecaps

  • ‘Variegata’ – nice white-edged light green foliage, blue disc flower in acid soil, 3′ tall
  • ‘Lanarth White’ – to 3′, mostly white bloom with touches of blue or pink in July/August, perhaps the best lacecap
  • ‘Blue Wave’ – rich blue in acid soil, to 7′ tall.

Hydrangea serrata

Hydrangea serrata, named for its serrated leaf edges, is very much like the lacecap bigleaf hydrangea. Being a mountain woodland native, it is more cold-hardy. Treat it like the big leaf and try these cultivars:

  • ‘Bluebird’ – grows to 5′, resists drought, June flowers may be coaxed to blue or pink
  • ‘Preziosa’ – to 4′, flowers emerge pink, deepen to crimson, sun or part shade, red fall foliage

Hydrangea arborescens

Hydrangea arborescens is called “hills of snow” because of its broadly rounded, showy white blooms or “smooth hydrangea” because of its bark appearance. These plants are striking when grouped in natural-looking masses under trees.
Plant this southeastern native in moist, partly shaded, rich soil.

Fertilize well in late winter with 10-10-10 (2 cups per 100 square feet), mulch to retain moisture, water during dry spells.
Prune this kind of hydrangea in late winter before new growth begins, for H. arborescens blooms on the new growth of the season. To restrict size cut the whole plant to 12″ in height. Otherwise remove the oldest stems to the ground and tip-prune the vigorous young ones.

Blooms appear in June/July. Another flowering in August/September may occur if old flowers are removed after completing their bloom.

Cultivar ‘Annabelle’ is the only one recommended. It grows 3′ to 5′ tall, 4′ to 6′ wide, and has gorgeous flower mounds up to a foot across. The blooms emerge apple green, become white, then revert to green before browning. Fall foliage is sometimes yellow. ‘Annabelle’ has been chosen as a 1995 Georgia Gold Medal Plant because of its outstanding flower and growth characteristics.

Hydrangea paniculata

Hydrangea paniculata is a large (10′ to 15′) shrub commonly seen in the colder northeast where its white panicles (cone shaped blossoms) fade to an old rose in early autumn. It also grows vigorously in our area – in fact it is hard to kill.
Plant in moist, loamy soil either in sun or part shade.

Prune in late winter (blooms appear on the new season’s growth) by cutting back hard to control size or by removing all but 5 to 10 vertical stems on which new, vigorous shoots will grow and flower.

Fertilize heavily in April and June with a cup or two of 10-10 10 per plant.

Cultivars include:

  • `Grandiflora’ – usually called “PeeGee” (short for Paniculata Grandiflora, has cones of bloom 12″ to 18″ long and 6″ to 12″ wide at base during late summer
  • `Praecox’ – blooms in June
  • ‘Tardiva’ – smaller flowers in September, good for cutting

Hydrangea quercifolia

Hydrangea quercifolia, the “oakleaf hydrangea”, gets its name from the shape of its leaf. A southern native, the species is often seen in older gardens where it suckers from it roots to form wide colonies in moist, shady areas. This plant is remarkable for rich red and bronze fall color and for attractive peeling bark in winter.

Plant in moist, semi-shady, rich soil where a rather casual, woodsy appearance is appropriate. Good drainage is needed.

Fertilize with 8-8-8 or 10-10-10 in spring and summer, one pound per 100 square feet, and keep evenly moist.

Blooms are cone-shaped white, aging to rose and then brown, appearing in early summer. They arise from buds set at the end of the previous summer.

Prune around August 1 as blooms fade. Cut out old canes to promote new growth.

Cultivars represent a big improvement over the species:

  • `Snow Queen’ – flowers mature to a good pink, foliage dark green, withstands sun well, holds flower spikes upright
  • `Snowflake’ – prefers partial shade, the many large blooms have a double-flowered appearance, probably the best oakleaf
  • ‘PeeWee’ – a 2′ to 3′ cultivar, good choice for smaller gardens or mixed borders

Hydrangea petiolaris

Hydrangea petiolaris, the climbing hydrangea, is an unusual and uncommonly good vine or groundcover for our area. Deep green leaves turn bright yellow in autumn and then drop to reveal the tracery of peeling bark throughout the winter.

Like ivy this vine clings with root-like holdfasts and so should be planted only against masonry walls or very sturdy trellises. It is effective tumbling over a rock wall or climbing a large tree, where it may grow to 60′ or 80′. Climbing hydrangea grows in a mounded, three-dimensional habit, unlike other vines that lie close to the surfaces they cover.

Plant in a moist, semi-shady area with rich, well-drained soil. Very cold-hardy, it suits a northern or eastern exposure well. After a year or two of slow root establishment, it should grow rapidly.

Fertilize in spring if you wish with a balanced complete fertilizer such as 10-10-10 and keep evenly moist.

Blooms are of the white lacecap type, occurring in June or July on old wood. Heavy shade may reduce the number of flowers, but this plant is worth growing for foliage and bark alone.

Prune only as necessary to keep in bounds.

Schizophragma hydrangeoides

Schizophragma hydrangeoides, Japanese hydrangea vine, is quite similar to climbing hydrangea. This vine has more deeply serrated leaves, lies flat against the surface it climbs and blooms a little later. Site and culture needs are the same as for H. petiolaris.

There is a rose-tinged cultivar called ‘Roseum’, while ‘Moonlight’ has silvery green leaves and white lacecap blooms.

Sources for Out of the Ordinary Hydrangeas

  • Louisiana Nursery, Rt. 7, Box 43, Opelousas, LA 70570
    • (318) 948-3696
    • Catalogue $5, refundable with purchase
  • Wayside Gardens, 1 Garden Lane, Hodges, SC 29695-0001
    • 1-800-845-1124
  • Wilkerson Mill Gardens, 9595 Wilkerson Mill Rd., Palmetto, Ga 30268
    • (404) 463-9717
    • Phone for extensive list of varieties and direction

Center Publication Number: 76

Protect Landscape Trees from Drought Injury

Source(s): Kim D. Coder, Professor of Community Forestry, Warnell School of Forestry and Natural Resources, The University of Georgia


Trees across Georgia are declining due to drought. Drought stressed trees may have fewer or smaller leaves. Small or large limbs or the entire tree may die. Although trees can withstand some drought injury, some trees may require months to years to recover. Trees may not show damage immediately. When they do, it may be too late to save them. Protect trees now from drought with proper care.

drought

How to Water

The best ways to water trees are by soaker hose or drip irrigation. Automated lawn sprinklers are less efficient for applying water to trees. Even a garden hose, moved often, can provide a good soil soaking. Use a light organic mulch to conserve moisture and apply water over the top of the mulch. Do not pile mulch against the base of the tree or allow water to concentrate at the base of the trunk as this can lead to pest problems.

Where to Water

Most of the tree’s absorbing roots are in the top foot of soil. Applying water deeper than this misses the active roots and wastes water.

Lay-out water hoses or applicators out to the tree crown edge (drip-line). Water the soil areas directly beneath the foliage and shaded by the tree. Do not water beyond the drip-line and do not water closer than 4 feet to the trunk base on established trees.
Use mulch and slow application rates on slopes, heavy soils (clays), and compacted soils to assure water is soaking-in and not running-off. Do not spray tree foliage when applying water. Water droplets on tree leaves can lead to pest problems. Try not to wet the tree’s trunk.

Young, newly planted trees need additional watering care. Water has limited horizontal movement in soil. You must apply water directly over where you need it in the soil. For new trees, concentrate water over the root ball, as well as the planting area.
Old, large trees can be watered over the entire area under their foliage. Another method in watering large trees is to water roughly 1/3 of the area within the drip-line.

When to Water

The best time to water is at night from 10 p.m. to 6 a.m. Trees refill with water during the night. Watering at night reduces losses to evaporation and assures that more water moves into the soil and tree.

For every 18°F increase in temperature, the amount of water lost by a tree and the site around it almost doubles. Consider this when watering trees. Trees surrounded by pavement and other hot, hard surfaces can be 20-30°F warmer than a tree in a protected, landscaped backyard. Water use rapidly climbs with increasing temperatures, and so should water application volumes.

How Much To Water

Depending upon soil texture 1 to 2 inches of water per week should sustain a tree. Trees in limited rooting areas, in containers or pots, or on major slopes, need additional care to assure water is reaching the root system in adequate amounts and not suffocating roots from lack of drainage. Five gallons per square yard is about 1 inch of water.

Fine soils (clays) require careful attention to prevent over- watering and root death. Sandy soils can dry out rapidly since water runs out of the rooting zone quickly. Composted organic mulch on the soil surface can help prevent rapid loss of applied water.

How Often To Water

Water trees once or twice a week (minimum of 1 inch per watering) in the growing season if there is no rainfall in that particular week. A few heavy waterings are much better than many light, shallow waterings. A greater proportion of the applied water is used by the tree with heavy, infrequent watering. Once you begin watering, continue to water until rain comes.
Drought is the main cause of tree decline but beware of other factors that damage roots and lead to long-term tree decline and death.

  • Do not fertilize or use pesticides on severely drought stressed trees.
  • Do not dig or drive under the canopy of trees or do other things that kill or crush roots.
  • Do not pile soil under tree canopies. When adding soil to cover roots etc., add no more than 1 inch per growing season. Protect the critical root zone of the tree. Measure the trunk diameter at chest height in inches. Multiply this by one and a half. This will be the size in feet of the radius of the circle that you must protect around the tree. For instance, a 20 inch diameter tree would have a critical root zone with a radius of 30 feet. Avoid digging, piling soil, trenching or driving through this area.

Call your local Extension Agent at (800-ASK-UGA1) or Locate your local Extension Office Georgia Extension Office Locations


Center Publication Number: 267

Pruning and Training New Fruit Trees

Source(s):

  • Lynwood Blackmon
  • Ellen Bauske

Pruning and training are important practices for managing fruit trees. The primary objective of pruning and training is to develop a strong tree framework that will support fruit production. All fruit trees are not pruned and/or trained in the same fashion. This publication is designed to get a new tree started correctly and will cover pruning and training in the first year only. It is not comprehensive. Visit UGA Cooperative Extension’s web site (http://www. caes.uga.edu/Publications/subjectList.cfm) and find the publication on your specific tree. For example, search home garden figs, apples, blueberries etc. These publications contain up-to-date, research-based information.

Screen shot 2011-02-17 at 11.45.55 AM

The proper time to prune is during late winter and early spring before new growth occurs. During this time, pruning wounds heal quickly, flower buds and undesirable branches are easily recognized, bark is less likely to tear when cuts are made, and injury from low winter temperatures is avoided. Light summer pruning may also be used to train young trees to the desired shape, improve light quality, thin fruit loads or remove water sprouts and other undesirable growth.

Apple, Pear, Plum and Apricot

These trees are pruned and trained to a central leader. A central leader tree is characterized by one main, upright trunk, referred to as the leader. Branching generally begins on the leader 24 to 36 inches above the soil surface to allow movement under the tree.

Whether you obtain a small, unbranched whip or a larger, branched tree, it is necessary to prune the tree at planting. Cut the unbranched whip back to 24 to 30 inches from the ground. This will cause the buds just below the cut to grow and form scaffold branches. If branched one or two-year-old trees are planted, select four or five lateral branches with wide-angled crotches and that are spaced equally around the tree and 2 to 5 inches apart vertically. The selected laterals should be no lower than 18 inches above the ground, and they should be pruned back slightly by cutting off 1/4 of each limb’s length.

Figs

Begin training to bush form at the time of planting by cutting off one-third of the young plant to force shoots to grow from the base of the plant. Allow these shoots to grow throughout the first season.

Pomegranates

Cut trees back to 2 to 2.5 feet at planting and allow 5 to 6 vigorous suckers, evenly distributed around the stem to develop. Since the fruits are borne only at the tips of new growth, judiciously shorten the branches to encourage the maximum number of new shoots on all sides, prevent straggly development, and achieve a strong well-framed plant.

Blackberries and Raspberries

Blackberries and raspberries are biennial fruiting plants that may be trellised. They produce little or no fruit the first year. Little pruning is needed for blackberries and raspberries the first year.

Blueberries

The general rule is to remove 1/3 to 1/2 of the top of young blueberry plants when transplanting them to the field. Remove weak, twiggy growth near the base of the plant and side branches bearing flower buds. Remove flower buds the first and second year after planting to stimulate vigorous growth. Failure to remove flower buds from young plants can reduce canopy growth and delay plant establishment.

Muscadines

A Muscadine grape plant consists of a trunk and selected side shoots referred to as cordons. The cordons are spread out and attached to the trellis support wires. Pruning initiates growth of short lateral shoots called spurs that come directly off the cordons. The new fruit develops on these spurs. All shoot growth from last summer should be cut back so that spurs will all have from 2 to 4 buds each. Prune along each of the cordons or main side branches to eliminate excess competition. Cut off excess growth so that there is at least a 6 inch spacing between each of the spurs.


Resource(s):

Simple Tree Training Techniques for Peaches

Center Publication Number: 258

Discouraging Rabbits

Source(s): Susan Zaro, DeKalb County Master Gardener Volunteer, College of Agricultural and Environmental Sciences.


Rabbits can do considerable damage to the landscape. For the most effective control, a variety of methods should be tried, including habitat modification, fencing, trapping, chemical repellents and the use of rabbit-resistant perennials.

rabbit1

Removing dense, heavy vegetative cover, brush piles, weed patches, junk dumps and stone piles adjacent to the landscape will help eliminate rabbit habitats. Fencing made from chicken wire, with mesh less than 1 “, can be placed around a vegetable garden or herbaceous plant border. The fence must be at least 2′ high with the bottom buried at least 3″ deep. You can also use cylinders of 1/4″ wire hardware cloth extending higher than a rabbit’s reach by placing them around the trunks of individual trees and shrubs. Bury the bottom of the cylinders 2″ to 3″ inches below ground level and place them 1 ” to 2″ inches from the trunk.

Live traps, most effective in winter, can be baited with corn cobs, oats, dried apples or rabbit droppings can also be used but then you must be ready to relocate the live animal.

Chemical repellents, which take advantage of a rabbit’s keen sense of smell and taste, can discourage rabbit browsing. Try one or more of the following:

  • Dried blood meal
  • Mole Med or Scoot Mole
  • Predator Scent
  • Repel
  • Hinder
  • Human hair
  • Scott Rabbit
  • Used kitty litter sprinkled around edges of garden
  • Animal lard smeared on tree trunks
  • Onions interspersed with other crops
  • Ropel and Bonide rabbit-deer repellent

Note: These methods have not been tested by the University of Georgia, so their use is at your own discretion. Before applying, test the safety and effectiveness of products on a small area of your garden first.

Plastic snakes or owl decoys can scare away some rabbits, but often only on a temporary basis.

Another method for ridding the landscape of rabbits is setting half filled quart jars with water around the garden, although no one is sure why this has been found to be effective.

Finally, there are plants that are not as attractive a food source as some others:

  • Yarrow
  • Hosta
  • Monkshood
  • Red Hot Poker
  • Wormwood
  • Geranium
  • Aster
  • Iris
  • Astilbe
  • Bishop’s Hat
  • Bellflower
  • Narcissus
  • Wild Indigo
  • Yucca
  • Snakeroot
  • Oriental Poppy
  • Autumn Crocus
  • Lamb’s Ear
  • Foxglove
  • Sedum
  • Daylily
  • Globe Flower
  • Leopards Bane
  • Meadow Sage
  • Meadowsweet
  • Bergenia

If the presence of these adorable yet annoying creatures has you stewing, try a combination of the approaches mentioned above to gain the upper hand.


Center Publication Number: 37