Growing Halloween Pumpkins in Georgia

Growing Halloween Pumpkins in Georgia

Growing Halloween Pumpkins in GeorgiaThis week is Halloween and no doubt you have seen the beautiful pumpkins for sale at your local stores or even church yards.  As a gardener you may want to grow your own pumpkins for next Halloween.  Be aware that it is a challenge to grow pumpkins in the Atlanta area that mature at the end of October. The disease and insect pressure is high.  It will take some planning and diligence on your part.   Most of the pumpkins that are sold in stores and church yards are imported from the dry western states.  If that information hasn’t “spooked you” or “rattled your bones” then plan for growing your own Halloween pumpkin for 2015.

Growing Pumpkins

Commercial Production and Management of Pumpkins and Gourds will give you some background and let you see what the commercial growers are up against.  This publication also has a great list of pumpkin cultivars for Georgia.

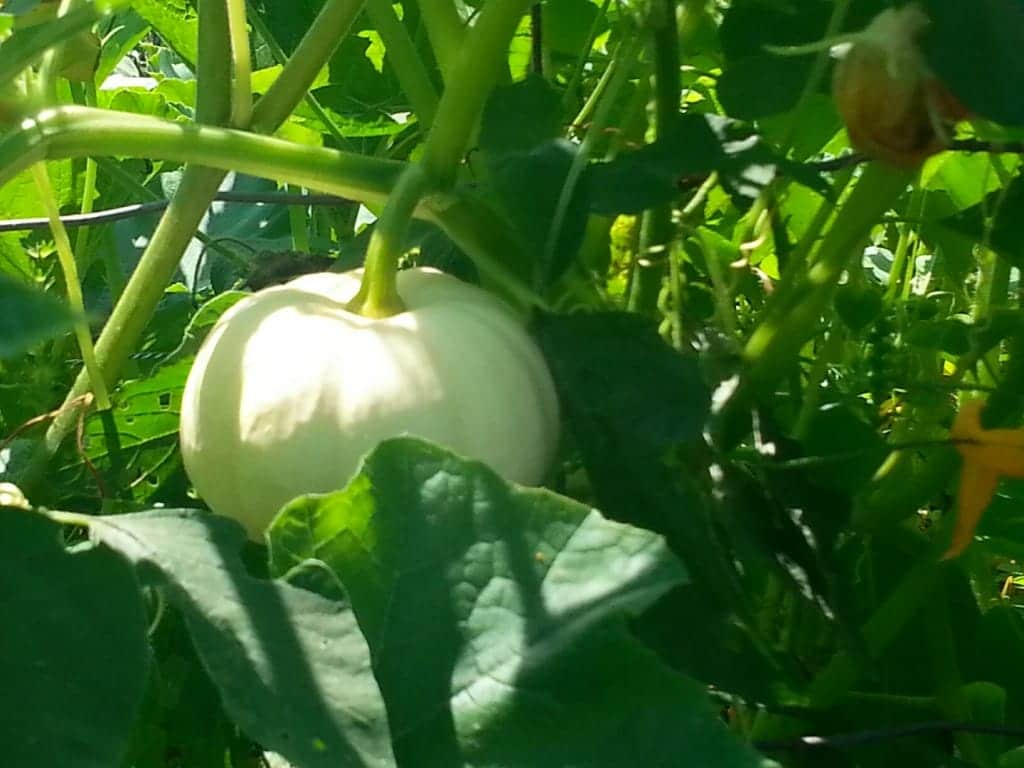
Botanically, pumpkins are related to squash plants.  And, they come in many sizes and colors from mini orange pumpkins to small white pumpkins to the giant, fair-winning pumpkins.  When deciding what cultivar to grow, think about what size you want.  The mini and small pumpkins, under about 5 pounds, make great decorations.  Cultivars used for making pumpkin pies are usually 5-10 pounds.  The typical jack-o-lantern size is about 10-25 pounds.  In Georgia, we just don’t have great luck growing the super large pumpkins that win national prizes for size.  The disease and insect pressure is just too great.

Growing Halloween Pumpkins in Georgia

Growing Halloween Pumpkins in Georgia
Notice the mesh sling on this trellised pumpkin. This helps prevent the fruit from pulling away from the vine.

Pumpkin plants need rich soil with a pH of 6.5-6.8.  Add compost to your bed before planting seeds.  Don’t just take out your early spring crop and plant your pumpkin seeds.  Direct sow your seeds about 1 inch deep.  MULCH! Pumpkin seeds need to be in the ground between the middle of May and the end of July, depending on your cultivar choice, in order to be ready to harvest for Halloween.  (See the “Determining Planting Dates” post from September 17th.)  Some plants have more vines than others but you probably want to plan for space.  Some growers use a trellis system for the mini or smaller pumpkins.

Pumpkin Problem Control

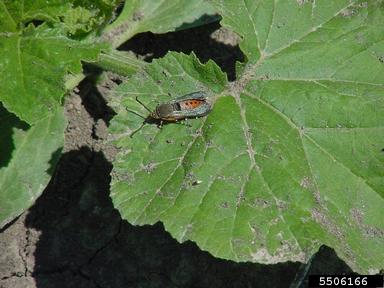
Pumpkins are plagued with disease and insect pressure in Georgia; trellising may help here.  Vine borers can attack pumpkin plants (see July 30th post on vine borer control).  Also, powdery mildew is a real problem for Georgia.  Powdery mildew is a fungus that  appears as a dusty white coating of the tops of leaves.  This fungus thrives in warm, humid conditions – what we typically have when Halloween pumpkins are growing.  There are cultivars such as Magic Lantern that show some powdery mildew resistance.  And, there are some fungicides available to help as well.   Be diligent in scouting your pumpkin patch to spot, and handle, diseases and insects early.  Use your local UGA Extension agent as a resource.  He/she can help identify any disease or insect problems.

To have a few really showy pumpkins on your vines, thin some of the very early forming fruits.  The plant will put its energy towards those few pumpkins.  Once the pumpkins have formed you may want to roll them occasionally to prevent soft spots where the fruit touches the ground.  Be careful not to snap the pumpkin off the vine as you roll.  Many growers put extra mulch, even newspaper under the pumpkins to prevent the fruit from direct contact with the ground.

Growing Halloween Pumpkins in Georgia

Armed with this knowledge you will be ready to tackle pumpkin growing next spring.  May your Halloween be filled with treats and no tricks!

Happy Halloween!

Stone Mountain Community Garden at VFW Park

Master Gardener Averil Bonsall and UGA Extension Agent Gary Pieffer show off a beautiful bed of watermelons.

The Stone Mountain Community Garden is a beautiful space located on an old ball field.  It is a partnership between the city of Stone Mountain and UGA Extension Master Gardeners.  When you first visit you will be impressed with the number of plots (50) and how well organized and maintained the raised bed plots are.  One master gardener site coordinator, Averil Bonsall, indicated that they have public demand for more but they are trying to keep it a manageable size.  You will also notice the wildlife!   A bee hive ensures that bees are present and they are busily flying around collecting nectar and pollinating the gardens which are full of vegetables, fruits and flowers.  Birds and pollinators are also attracted by the new meadow garden on the perimeter of the property and the sunflowers.

The garden has demonstration areas where gardeners can learn how to grow herbs and fruits.  A demonstration compost bin system is on the property and is used by the gardeners.  There is a 3,000 square foot pantry garden where everyone pitches in with the chores and the food is donated to the local food pantry in Stone Mountain.

To be part of the garden each grower pays a small annual fee and commits to provide two four-hour time periods of labor in the community areas of the garden.  This can be mowing the grass,working in the pantry garden, or weeding the demonstration areas.  As with all gardens, there is always a lot to be done.

Stone Mountain Community Garden

The usual tomatoes, beans, and squash, are present as well as some unusual choices.  There is a large asparagus bed and a plot of dwarf okra.  Tomatoes are grown in hay bales here and there is an ornate trellis for growing pole beans.  The growers really do try new things and learn from each other.  For a brief walking tour of the garden visit A Walk Through the Stone Mountain Community Garden at VFW Park.

“The garden is a testament to the cultural richness and diversity of the nearby community.  Everyone works together and learns from each other.  They have put the ‘Community’ back into community gardening.”  – Gary Peiffer, DeKalb UGA Extension Agent

Happy Gardening!

Determining Planting Dates

Sometimes determining planting dates can be tricky.  We know that our fall vegetable garden should be in and growing when it is still hot, and dry, outside.  We also know that many cool season plants don’t grow well in the heat.  What to do?

Weather Station Map
Weather Station Map

The first step is to find out when the average first frost date is for your area.  Luckily in Georgia we have the Georgia Automated Environmental Monitoring Network (AEMN) which has weather stations all over the state.  These weather stations collect weather data year after year, including first frost dates.  This information can help us determine when to plant. Let’s say you live in Dallas, Georgia and you want to plant broccoli, specifically the cultivar Green Goliath.

If you visit the AEMN website, www.georgiaweather.net, and type in your zip code, 30132, you will be directed to the Dallas Georgia weather station.  Following the link for first frost date you will find years of data for your use.  Let’s just use the last six years of collected data:

2012    Nov 9

2011    Oct 30

2010    Nov 6

2009    Oct 19

2008    Nov 10

2007    Nov 7

Using this information we can determine when we want to make sure the broccoli has matured and hopefully been eaten and enjoyed.   These dates have a span of 22 days.  The earliest is October 19th and the latest is November 10th.  The October 19th date looks like it may be an outlier.  (A statistician could do better justice to this analysis I am sure!)  So, you may decide that Halloween, October 31st looks like a good date to work with.

According to The Southern Seed Exchange catalog, the information for Green Goliath says 55 days to maturity (DTM).  In this case the DTM is from the transplant stage.  So, if you are starting your seeds to create your own transplants you will need to add about 20 days to that number, 75 days.

Look at October 31st and count back in the calendar 75 days.  This leads us to August 17th as the date to plant your seeds. Experienced, and maybe obsessive, gardeners mark in their calendars key dates such as “100 days until average first frost date” and “75 days until average first frost date.”

If you live in Dallas Georgia today, September 17th, is 44 days until your estimated average first frost date.  If you are feeling lucky with the weather, you might find some Green Goliath transplants at your local plant store.

Happy Gardening!

Healthy Life Community Garden

Healthy Life 6“We are NOT building a garden.  We are breaking generational barriers, cultivating and amending the fallow ground of imagination and hope, planting seeds of thought, birthing fruit of propensity for prosperity.  That – that is what we are doing.” This is on a sign that greets you when you visit the Healthy Life Community Gardens in Griffin.  The garden is located on the grounds of the old Fairmont High School, which was started as a Rosenwald school.  Rosenwald schools were primarily built for the education of African-Americans in the early 20th century.  So, there is a lot of history here.  But, the school has been closed down for some time now and the area forgotten until the idea was born to create a garden here.  And, it is a beautiful garden.

There is no cost to get a plot at the garden and the Griffin Area Housing Authority

Patti Beckham waters a few plants.

provides water.  There are 17 official gardeners using assigned raised beds.  And, others who come to just volunteer here.   There is a

Young readers enjoy the garden.

pollinator garden and a nice seating area.  A unique feature to this garden is the  “Summer in the Garden” reading program where volunteers from the FERST Foundation bring garden-themed books to read and give to young gardeners.  The space has designated Community Areas where anyone can pick and take vegetables.  They have recently added some fruit and pecan trees.

At the heart of the garden is Patti Beckham.  Patti is a program assistant with Spalding County Extension and you can hear the passion in her voice as she talks about the garden, and the people who garden here.  Patti taught at Fairmont  for eight years

when it became a special needs school.  She loves seeing the place reborn.  She conducts a Junior Master Garden program here and also supervises 4-H students who are volunteers.  Patti and Wade Hutcheson, the Spalding County ANR agent, agree that

UGA Extension Agent, Wade Hutcheson, visits with gardeners Jimmy Jones and Ernest Lewis.  Mr. Jones went to the Fairmont school in the late 1960s.
UGA Extension Agent, Wade Hutcheson, visits with gardeners Jimmy Jones and Ernest Lewis. Mr. Jones went to the Fairmont school in the 1950s.

the number one need is more gardeners from the immediate community.  Wade says the garden is here and within walking distance of so many people, he is hoping that more will come out.  For more information about the garden contact Wade at the Spalding County Extension Office at 770-467-4225.

The first rule at the Healthy Life Community Gardens is “I will have fun.”  Isn’t that great?

Happy Gardening!

Collard Greens – A Southern Favorite

Collard Green SeedsCan any Southern garden truly be Southern without collard greens?  If you are from the South your Grandmother probably cooked them up with a bit of smoked meat or bacon.  They are a staple at the Sunday dinner table, tasty and very nutritious. Collard greens are a wonderful fall plant because they can take the heat and the cold.  For questions about any fall garden vegetable contact your local UGA Extension Agent.

August is the time for direct seed sowing.  Make sure your soil is loose and well-drained.  The seeds will germinate at soil temperatures from 45 degrees – 85 degrees, a very wide range.  Seed heavily, putting about 2 inches between seeds, and cover the seeds with about 1/4-1/2 inch of soil. Thin to 12-18 inches between plants.  The thinnings can be steamed and eaten or transplanted.  Since you are planting in the summer, insect pests may be a problem for very young seedlings.

Many gardeners start their seeds inside and transplant hardier seedlings.  For transplants, either raised or purchased, September is the time for planting.  Transplants will adjust quicker if they are planted on a cloudy day or hardened off to the heat by keeping them in the shade for a few days.  Keep the plants 12-18 inches apart.   Collards are heavy feeders so make sure to add some fertilizer or compost when you plant.  Nitrogen keeps those leaves nice and green.  Keep the young plants well watered.   Some gardeners have problems with leaf spots on their greens.  Paul Pugliese’s Leaf Spots on Greens Related to Moisture could be helpful if this happens to you.

With collard greens you don’t have to worry about the first frost damaging the plant.  The greens actually taste sweeter after a frost.

You can harvest greens a number of ways.  You can harvest the entire plant when it is half grown or full grown.  Or, you can begin taking several of the outer, lower leaves after the plants are about a foot tall.  Harvesting the plant a few leaves at a time will prolong your harvest and you will have fresh greens as you want them.

Blue Max, Georgia Southern, Hevi-Crop are all recommended cultivars.  Master Gardeners have also had success with Georgia Green as well.  These should be available almost at any place that sells seeds.  If you are fortunate enough to live near an old fashioned feed and seed store or an older hardware store, you may be able to find seeds there.  Also, there are several mail order companies such as Seed Savers Exchange and Baker Creek Heirloom Seeds that specialize in hard to find seeds.

The poet Maya Angelou is quoted as saying “The best comfort food will always be greens, cornbread, and fried chicken.”  We tend to agree, don’t you?

Happy Gardening!

Tomato Recipe from 4th and Swift

It seems no matter how hard we plan at some point during the summer we have more tomatoes than we know what to do with. We have eaten many BLT sandwiches, given the neighbors more than they can use, and canned tomatoes for the winter.  You have donated scads to the local food bank.  What next?  I asked chef and owner of the restaurant 4th and Swift, Jay Swift, how he would handle this problem and he gave me a recipe that is perfect for those tomatoes!

Heirloom Tomato and Melon Gazpacho

1 pound tomatoes, cut into quarters

1 cantaloupe, skin and seeds removed

1 honeydew melon, skin and seeds removed

5 basil leaves

1 TBSP champagne vinegar

3/4 cup olive oil

Salt/pepper to taste

Honeydew Melon, Cantaloupe, Tomatoes, and Basil sauteing in Olive Oil.

In a large saute pan, heat the olive oil.  Add the tomato quarters, melons, and basil.  (Note:  with a gas stove make sure you turn off the heat when you add your ingredients.  This prevents flames in the pan.)  Saute the ingredients until they start to bleed out, about 1 minute.  Remove from heat and quickly store in the refrigerator.  Once everything is chilled, buzz in the food processor with vinegar.  Add salt and pepper to taste.  Enjoy!

Delicious!
Delicious!

Chef Swift is a gardener in his own right and his restaurant is known for its farm-to-table menu, using all-natural and sustainable farm products.  He was happy to share a photo of his garden with us.  He is proud of his restaurant located in the Old Fourth Ward district of Atlanta near the new Atlanta Beltline project.  And he should be! We thank him for sharing his culinary expertise with us.

Chef Jay Swift's Garden
Chef Jay Swift’s Garden

Happy Eating!

Looking Forward to Fall Vegetables-Guest Post by Amy Whitney

The summer vegetable garden is still producing plenty of great food for most Georgia gardeners, but the first frost date is getting close enough that we all can begin to think about fall crops.

As Extension Horticulturist Robert Westerfield says in the UGA publication Home Gardening, “Fall-grown vegetables are usually of very high quality. If you supply water as needed, use pesticides properly and fertilize according to label recommendations, you will be rewarded with tender vegetables in a season when few people are enjoying such delicacies.”

Young Broccoli Plant (PHOTO/Amy Whitney)

While many summer vegetables will grow and produce into the fall, cold-hardy crops that can withstand some freezing weather can extend the harvest well into winter for much of the state. The list of these cold-hardy crops includes broccoli, cabbage, cauliflower, spinach, beets, turnips, collards, kale, carrots, and more!  Your local UGA Extension Agent will be able to tell you what fall crops grow well in your area.

When the first frost wilts and blackens the last of our summer crops, the fall crops should already be in place and growing strong.

To get them far enough along that they will reach maturity before a very hard freeze damages the more tender of these crops, they should be planted according to the times listed in UGA’s Vegetable Planting Chart. The dates in the chart are for middle Georgia, so an adjustment of one, two, or more weeks will need to be made in the planting dates for most Georgia counties.

For gardens north of middle Georgia, an earlier planting date is needed to allow time for good growth before their earlier frost. Gardeners farther south can plant later than the recommended dates, since their frost date will be later.

At planting time, don’t forget to follow the soil preparation guidelines that make the summer garden such a success. Add more composted organic matter to the soil, since some will have been lost to decomposition over the hot summer, and remember to provide good nutrition to your crops through fertilizer additions.

These additions can be based on soil test results (preferred) or based on instructions on a home-garden fertilizer package. Careful soil preparation pays off in higher yields, so these are important steps.  Most important of all, though, is to enjoy the beautiful fall weather and bountiful harvest!

Amy Whitney is a Horticulture Program Assistant with Cobb Extension.  She lives in Kennesaw where she is famous for the creative way she grows food crops in her suburban yard.

Happy Gardening!

The Dreaded Squash Vine Borer

If you have grown squash for very long you have probably run across the dreaded squash vine borer (Melitta curcurbitae).  One day your plants look great and the next day the plants look wilted.  Shortly after they collapse and die.  The base of the plant becomes mushy.  You may even see small holes at the stem base.   Squash vine borers have probably paid your garden a visit.

Squash Vine Borer Photo by Jim Jasinski, Ohio State University Extension, Bugwood.org

To understand how to control this pest we need to understand a bit about its biology.  In June/July adults emerge from under the soil.  They fly during the daytime and lay a single egg at the base of susceptible plants like squash and pumpkins.  After about a week the egg hatches and the larva bores into the plant stem.  The insect will feed through the center of the stem for several weeks.   Then the larva will exit the stem and burrow back into the soil to pupate until next summer where it emerge as an adult.  There is one generation per year.

Knowing this biology we can use integrated pest management (IPM) to help combat this pest.  Choose plants that the vine borers don’t like.  Gardeners have had success with moschata types of squash like butternut.  Their stems seem to be more resistant to the borer.   Next, especially if you have ever had vine borers, you must rotate your crops.  Don’t plant squash in the same place next year because the pest is in the soil waiting until next summer to emerge.

If you have planted in an area that does not have a history of squash vine borers you can use row covers (simply structurally supported netting) to block the flying adults from laying eggs.  As soon as the squash starts to flower you will need to remove the row covers to give the necessary pollinators access to the flowers.  Some gardeners have had success with trapping.  The adults are attracted to the color yellow.  Some gardeners use yellow bowls with filled with water.  The thought is the yellow bowls will attract the insects and they will drown.  Yellow sticky traps are also available.

Squash Vine Borer Larva Photo by Gerald Holmes, California Polytechnic State University at San Luis Obispo, Bugwood.org .
Squash Vine Borer Larva Photo by Gerald Holmes, California Polytechnic State University at San Luis Obispo, Bugwood.org

Change your squash planting time.  If you can plant very early so that the squash will be mature and fruited before the adults lay eggs, you might outwit the pest.  When the squash plant has finished producing vegetables, remove it from the garden.

What if it is too late and you are already infected with squash borers?  One recommendation is to make a sharp slit in the stem and remove the borer.  Afterwards pile soil around the stem so that the wound is covered with soil.  Insecticides can be used for prevention but once the pest is inside the plant, insecticides aren’t very helpful.

If your crop is a complete failure, your local Farmers Market will probably have some squash and you can try again next year.

Contact your UGA Extension Agent for more information on combating the vine borers.  Also, visit Homegrown Summer and Winter Squash by Florkowska and Westerfield for other tips on growing squash.

Happy Gardening!

Help Fight Hunger-Guest Post by Ellen Bauske

Plant a Row for the Hungry Marker

Buried in Veggies?  It can happen. I was in college when I planted my first garden and I had a taste for zucchini. I planted 50 seeds and ultimately grew 36 fine zucchini plants.

I stir-fried zucchini, baked zucchini casseroles, made chips, and baked bread. I sold it at the local coop. I gave it to the neighbors and gave more to the neighbors. Eventually, they stopped coming to the door when I knocked. I put in on tables in front of my house with a sign, “Free to a Good Home.” Did you know zucchini makes a fine addition to the compost pile?

Fortunately, you can do much better with your extra produce today. The Plant a Row (PAR) Program was started by Jeff Lowenfels, a garden columnist in Anchorage Alaska. He asked his readers to plant an extra row of vegetables for Bean’s Café, an Anchorage soup kitchen. The program was very successful. In 1995 Jeff introduced the program to the Garden Writers Association and eventually, they created a foundation to administer and expand the program. The program has helped collect over 20 million pounds of produce to date.

Freshly Washed Produce Ready for Donation.

Some community gardens have dedicated spaces or rows specifically for food donation. They are cared for by the entire group or even visiting groups of young gardeners or FFA (Future Farmers of America) students.

If you are near the Atlanta metro area, you can easily donate your extra veggies to those in need. The Atlanta Community Food Bank’s Community Gardens web site has a very handy-dandy locator that will help you find a PAR drop-off site. Ample Harvest also lists many food pantries. Ask around. It isn’t hard to find a place.   MUST Ministries in Cobb or Cherokee county would love to have your extra produce.

You will want to contact the food pantry before you show up with your harvest. They may have a preferred delivery date and time. Harvest your crops in the early morning on delivery day to take advantage of the cool air. Dry off any dew.

Now this next part is really important. Inspect each item for bruising, insect damage and ripeness. If you would not serve it to your family, do not give it to the pantry. If it is the sort of veggie or fruit you would put in a stew, don’t give it to the pantry.

A Plot Dedicated to Feeding the Hungry at the Cherokee County Senior Center Garden.

If the pantry gives you packaging instructions, follow them. If not, put the produce in a supermarket bag and take it to the pantry at the requested time and date.

Bring what you have. If you have a bushel of zucchini and 10 tomatoes, bring them both to the pantry. Your food will be aggregated with the donations of others. Handle the food just as you would for your family. You are protected by the Emerson Good Samaritan Food Donation Act. This Act encourages food donation while provided the donor with protection form criminal and civil liability provide you do not exhibit negligence.

Just as you have always suspected, you can make the world a better place by gardening.

Dr. Ellen Bauske is a Public Service Associate with the Georgia Center for Urban Agriculture who still enjoys zucchini.  She is active in the local food movement.

Happy Gardening!


Growing Popcorn

Corn Tasseling
Corn Tasseling

Sweet corn can be a challenge to grow in the community garden, especially for the one to two ears you get for each corn stalk. It can shade your other crops, or your neighbor’s.   Some community gardens have rules that prohibit growing corn for that reason. Popcorn can be another story.  The cultivars can be shorter than sweet corn and even though the yield is about the same, you can make popcorn last a long time.

Tom Thumb popcorn grows to be about 3 feet tall and is a popular cultivar all over the country.  Pennsylvania Butter Flavor, Dakota Black, and Cherokee Long Ear are cultivars Master Gardeners have had great success growing in Georgia.  Know that all corn types, including popcorn, are heavy feeders so make sure you have good fertility in the soil.  If you can plant the corn where a legume has been growing – fantastic!  The legume will have added nitrogen to the soil for you!  You will want to add some compost  or nitrogen when the corn is about 6 inches high and again when it is about knee high.

Sow twice as many seeds as you think you will need and thin to about 8-12 inches apart.  Keep weeds at bay and when the corn is about knee high add soil over the exposed roots for good support.  If you decide to try growing popcorn this late in the season, determine how many days until maturity (usually this information is on the seed package) and make sure it will have time to mature before frost.

The trick to successfully growing popcorn is to know it is wind pollinated.  The pollen of the male flowers (the tassels) need to

Cherokee Long Ear Small Popcorn

reach the female flowers (the silks).  Especially when you are growing limited amounts you want to think “blocks” instead of “rows”.  Planting in squares will drastically improve pollination as the wind-blown pollen grains will have a better chance at landing on another corn stalk.  So for a 4′ X 8′ plot you could have four stalks across and at least four stalks down the plot for a total of at least 16 stalks.  With this plot size, know popcorn would take up at least half of your plot area.  This would probably be a minimum for good pollination.  You could always help the wind out by gently shaking the stalks yourself!

The wind pollination can be an issue if another community gardener is also growing another type of corn, especially if either one of you is planning on saving seed. You could get cross- pollination.  You may want to separate your planting dates by a couple of weeks so that the corn doesn’t tassel at the same time.  Or maybe you all can grow the same type of popcorn.Your local Extension Agent has all types of information on growing all types of corn.

Let the popcorn ears remain on the stalks until the husks are dry.  The downside here is this takes time that could be used to start another crop.  Bring it inside to finish drying for several weeks.  You can remove the corn kernels from the ears by hand, by twisting the kernels off or by rubbing two cobs together.  Experience teaches that it is fairly easy to remove them by flicking them off with your thumb.  This winter when there is a nice fire in the fireplace and a good book in hand, you will appreciate the time and effort it took to grow your own popcorn!

Happy Gardening!